Articles 16 min read

Cricut Shadow Box Ideas for 3D Paper Art

Transform flat paper into stunning 3D masterpieces with Cricut shadow box ideas using layered SVG files

Shadowbox Magical Fox - Image 01

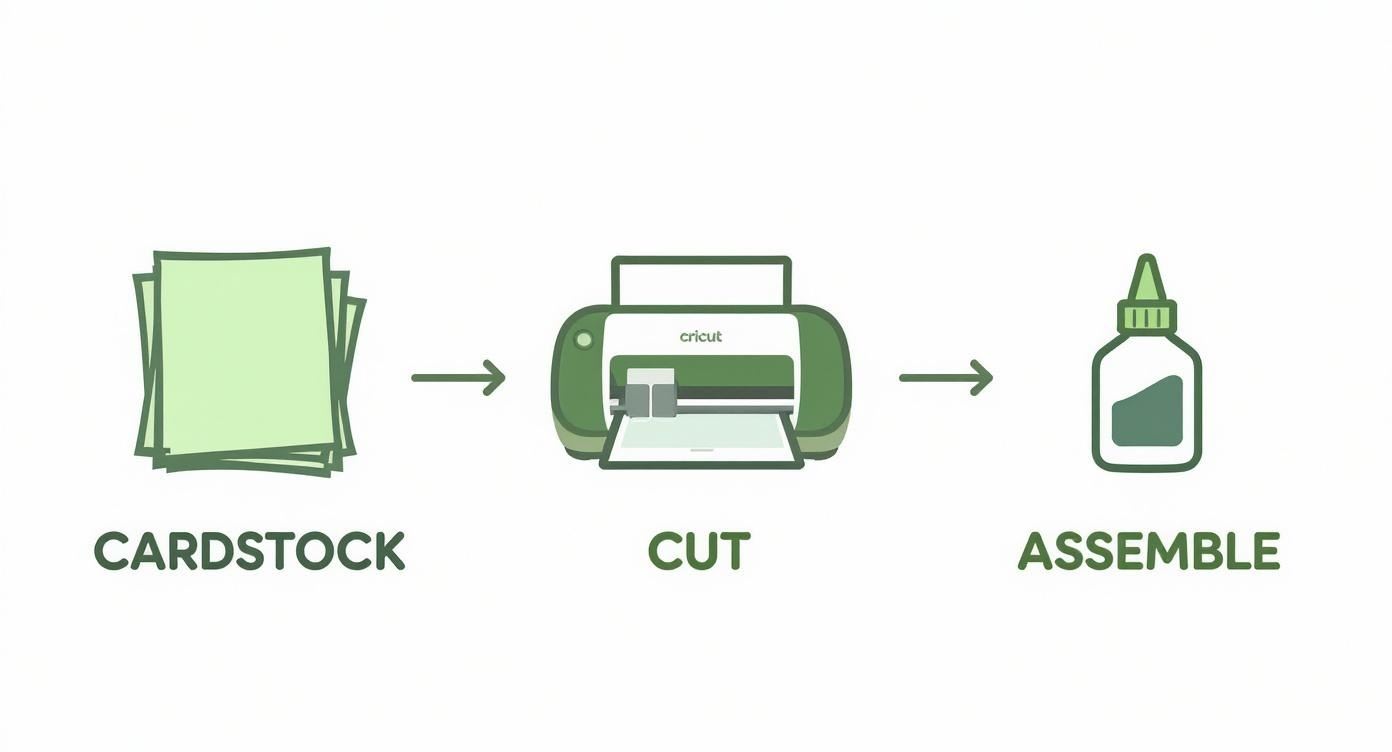
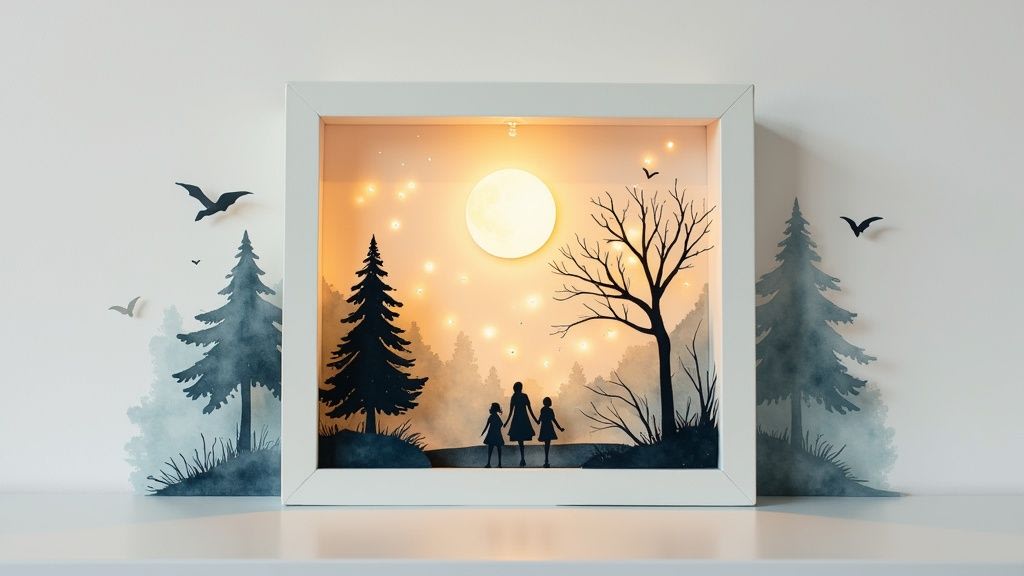
Ready to turn simple stack of cardstock into a stunning 3D masterpiece using your Cricut machine? The magic behind Cricut shadow box ideas lies in layered SVG files, which are key to creating incredible depth and detail. Think of it as building story with paper, one precise Cricut cut at a time.

Bringing 3D Paper Art to Life with Your Cricut

Person using Cricut cutting machine to create floral paper crafts on white desk

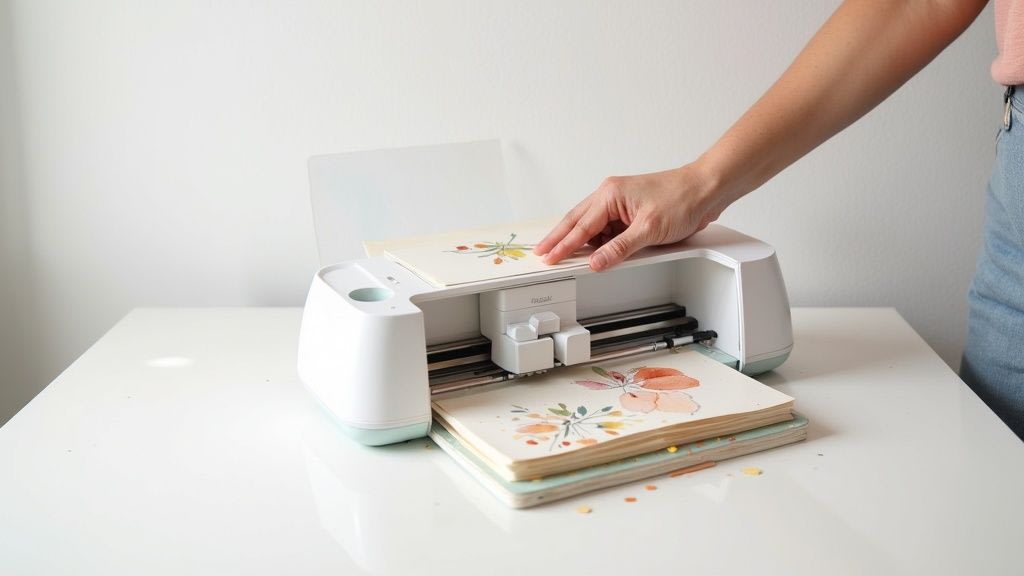
Transforming flat paper into vibrant, layered shadow box is one of the most rewarding crafts you can tackle with your Cricut. Whether you have a Cricut Maker, Explore, or even Joy for smaller projects, your machine is perfect tool for bringing these intricate designs to life. The whole process hinges on special type of design file: the layered SVG.

An SVG (Scalable Vector Graphic) file for shadow box isn't just a single flat image. It's collection of individual layers, each designed to be cut separately by your Cricut and then stacked. Every piece represents different element of the final scene, from a distant mountain range in back to a delicate flower petal right up front. When you assemble them these layers create a tangible sense of depth that makes the artwork pop.

The Role of Layered SVG Files

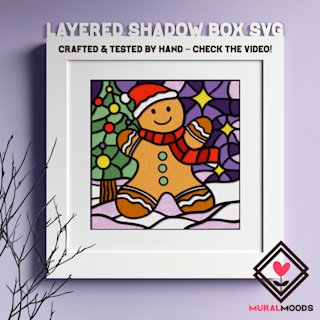
Layered SVG files are digital blueprints for your Cricut shadow box. They're meticulously designed so that when you cut them from cardstock and assemble them, they form cohesive, three-dimensional picture. This is where the artistry of creators like Mural Moods Art really shines, as they offer pre-made, test-cut SVG templates that guarantee smooth crafting experience with your Cricut.

This type of project is so popular because it plays directly to the Cricut's greatest strength: its incredible precision. Machine can handle complex details far beyond what you could ever manage with scissors, allowing for designs that are both delicate and dynamic.

At its heart, creating a Cricut shadow box is about storytelling with paper. Each layer your Cricut cuts and you add builds upon last, revealing more of the narrative until the full, dimensional picture emerges from your SVG file.

Getting Started in Cricut Design Space

Your journey begins in Cricut Design Space, software that controls your Cricut machine. This is where you'll upload your chosen SVG file and prepare it for cutting.

The software makes managing all different paper layers surprisingly simple. For instance, subscription to Cricut Access unlocks a huge library of images and SVG files you can use to customize your shadow box projects even further.

Most shadow box SVG designs are sized for standard 8 or 9-inch frames, making it easy to display your finished art. If you're looking for great walkthrough, check out this detailed guide from Jennifer Maker to see just how accessible these Cricut projects are. A good guide can empower you to create beautiful keepsakes right from your craft table.

Choosing the Right Supplies for Your Cricut Shadow Box

Any great Cricut project starts with right gear, and shadow boxes are no exception. Before you load that first sheet of paper, let's walk through toolkit you'll need to bring those beautiful layered SVG files to life. Getting this right from start is the difference between a project you love and one that causes frustration.

Heart of your shadow box is the paper. The weight and finish you choose will make or break final look. For Cricut shadow boxes, I almost always reach for 65 lb (176 gsm) cardstock. It's sweet spot—sturdy enough to create crisp layers, but not so thick that your Cricut struggles with the tiny intricate details in the SVG file.

Here's checklist of everything you'll need to have on hand for your Cricut shadow box project.

Your Cricut Shadow Box Supply Checklist

This table is your quick reference for essential tools and materials for your next layered paper art project using SVG files.

Category Item Pro Tip
Paper 65 lb (176 gsm) Cardstock This weight is ideal for clean Cricut cuts and stable layers. Mix in matte, glitter or metallic finishes for added pop.
Adhesives Foam Dots or Squares Perfect for creating that signature 3D depth between SVG layers. Use them to separate each paper layer consistently.
Adhesives Foam Tape Roll Best for supporting larger paper layers or long straight edges to prevent sagging over time.
Cricut Tools Weeding Tool Absolutely essential for poking out tiny cutouts from your cardstock without ripping the SVG design.
Cricut Tools Scraper Tool Use this to quickly clear your Cricut cutting mat of leftover paper bits for clean start on the next SVG layer.
Cricut Tools Scoring Wheel or Stylus A must-have for creating crisp fold lines if your shadow box SVG design includes folded elements.
Framing Shadow Box Frame Choose a frame with enough depth (at least 1 inch) to accommodate all your spaced SVG layers.

With these items ready you're set up for a smooth and successful Cricut project.

Selecting the Perfect Paper

Picking right cardstock is biggest decision for your Cricut shadow box project. Many crafters get frustrated because they used paper that was too flimsy, causing SVG layers to droop. On the flip side, go too thick and you risk the Cricut blade dragging and tearing up delicate cuts from your SVG file.

Finding that perfect balance is key. Don't be afraid to experiment with different textures and colors to make your SVG design your own. For deeper look into all the options, our comprehensive Cricut cardstock types guide is a great resource. It'll help you match perfect paper to whatever SVG shadow box you're making.

Adhesives That Create Dimension

Secret to that jaw-dropping 3D effect in a Cricut shadow box is the space between the paper layers. While glue has its place for tiny details, foam adhesive is real MVP for assembling SVG projects.

  • Foam Dots or Squares: These are my go-to for creating consistent spacing between SVG layers. They control how deep your shadow box scene looks.
  • Foam Tape: For big SVG layer or a long, straight edge, use a roll of foam tape. It gives sturdy, continuous support and stops any dreaded sagging.

Using these adhesives elevates simple stack of paper into a dynamic work of art. The gaps allow light to cast soft shadows, making every detail your Cricut cuts from the SVG file stand out beautifully.

Essential Cricut Tools for a Clean Finish

Your Cricut machine is the star, but few hand tools are non-negotiable for a professional look on your shadow box project.

The Cricut crafting community has exploded with creativity around 3D layered art and SVG designs. I've seen mentions of over 50 unique SVG shadow box designs in a single group! A common thread in all best projects is the use of a Scoring Wheel or Stylus for creating the sharp, perfect folds needed for some of the more complex 3D SVG pieces.

Beyond a scoring tool you absolutely need a good weeding tool. It's the only way to get tiny, pesky bits out of your SVG design without tearing cardstock. A scraper is another essential Cricut tool; it makes cleaning your mat between cuts thousand times faster. With the right paper, adhesive and these key Cricut tools, you'll be ready to bring any layered SVG project to life.

Bringing Your First Layered SVG to Life

Okay, you've got your supplies, your workspace is clear and you're ready to start crafting with your Cricut. This is where your digital SVG file turns into stunning piece of shadow box art.

We'll use floral layered SVG file for this walkthrough, a popular starting point for gorgeous shadow boxes. The basic steps are same whether your SVG is a complex mandala, a cityscape or a cute woodland creature scene.

The whole process boils down to three main phases: cutting paper with your Cricut, assembling the SVG layers, and framing your finished piece.

This visual breaks it down: cut, glue, assemble. That's core of making a Cricut shadow box from an SVG file.

Three-step Cricut crafting process showing cardstock being cut with Cricut machine then assembled with glue

Your job is to ensure your Cricut cuts are clean and your assembly is precise. Get that right and you'll have a professional-looking project every time.

From Digital SVG to Physical Cuts

First, let's get your file ready in Cricut Design Space. Once you've downloaded quality SVG file, like one from the Mural Moods Art shop, upload it to a new project. You'll see all layers of the SVG stacked on top of each other.

Before you touch anything else you must ungroup the layers. This is a non-negotiable step. It lets your Cricut work with each piece individually.

Next, measure the inside of your shadow box frame. Back in Design Space, select all SVG layers and resize them together to fit those dimensions. This keeps everything in perfect proportion for your Cricut to cut.

Now, give each layer quick once-over. Make sure they're all set to "Basic Cut" and assign colors if you're planning your paper choices on-screen. This is your final check before you hit that "Make It" button on your Cricut.

Nailing the Cricut Cutting Process

With SVG design prepped, it's time to let your Cricut machine do the work. The secret to clean, tear-free cuts is in settings. For most shadow box projects using 65 lb cardstock, the "Medium Cardstock - 80 lb" setting works perfectly.

If your SVG design has super fine lines, switch to "Cardstock for Intricate Cuts" setting. The Cricut machine uses lighter touch but does two passes, which prevents delicate bits from snagging.

A clean LightGrip mat is your best friend for Cricut paper projects. If your mat is too sticky it'll tear the paper when you peel it off. If it's lost its tack, the paper will shift and ruin the cut from your SVG file. A quick clean can save you world of frustration.

Once layer is cut, flip the mat over and gently peel it away from the cardstock. This trick keeps your paper from curling and ensures everything stays perfectly flat for assembling your shadow box.

Assembling Layers for Maximum Depth

This is where magic happens. Lay out all your Cricut-cut pieces in order, from the largest background layer to smallest, most detailed top layer of your SVG design.

Start by placing your bottom layer inside frame. Take your second layer and flip it over. Apply small foam adhesive spacers to the back. Space them out evenly, adding extra near delicate cutouts to prevent sagging. These foam dots create amazing depth and shadows in your Cricut shadow box.

Carefully line up that second layer over first and press it down. Repeat the process for every SVG layer, working from back to front. For tiny top layers, pair of tweezers helps with precise placement.

Once final layer is secure, pop the back on the frame and your Cricut shadow box is done.

Inspiring Cricut Shadow Box Themes and SVG Files

Best part of making a Cricut shadow box isn't just the crafting—it's dreaming up the perfect idea. Once you get hang of assembling layered SVG files, you can have fun choosing a theme that speaks to you.

The possibilities are endless, but few themes are always showstoppers. Intricate mandalas, cut with Cricut, are incredible. The way geometric patterns build up layer by layer creates a mesmerizing piece of art.

Nature scenes are another favorite for Cricut shadow boxes. Think enchanting forests with layers of trees, distant mountains and maybe a deer peeking out from the SVG design. That kind of layered paper art really pulls you in and creates stunning sense of depth.

Finding High-Quality SVG Files

Quality of your SVG file is just as crucial as the cardstock you use for your Cricut. A well-designed SVG file will have clean cut lines, logical layers and—most importantly—will have been test-cut by the designer on a Cricut machine. This saves you world of frustration.

That's why so many Cricut crafters turn to creators who specialize in layered paper art.

When you're hunting for perfect shadow box SVG, here's what to look for:

  • Clearly Layered: Product photos should preview how the SVG layers stack up and what the final 3D effect will be.
  • Tested and Verified: Good sellers will mention that their SVG files are test-cut on Cricut machines. That's your green light.
  • Well-Reviewed: See what other Cricut crafters are saying! Reviews are invaluable for gauging quality of the SVG and how easy it is to assemble.

To see some great examples, explore variety of professionally designed templates in our collection of shadow box SVG files for Cricut to get inspired.

Personalized and Occasion-Based Ideas

Beyond decor, Cricut shadow boxes make heartfelt gifts. Create custom piece for a wedding or new baby by modifying an SVG file. You can easily add names and dates to make one-of-a-kind keepsake. A shadow box with a couple's new last name layered over beautiful floral SVG background? That's wedding gift they'll cherish.

Seasonal themes also open up a ton of creative doors for your Cricut. Imagine swapping out your decor—a box bursting with spring floral SVG, another with rich autumn leaves and something magical for the holidays. It's no surprise that festive SVG designs are consistently top sellers for many online craft shops.

The magic of a themed Cricut shadow box is how it captures a memory. Whether it's quiet calm of a winter forest SVG or the joy of a birthday, the layers work together to tell a story without single word. That's what makes them such a powerful and personal art form.

Taking Your 3D Paper Art to the Next Level

Illuminated shadow box displaying family silhouette scene with trees, moon, and warm glowing backlight

So you've nailed basics of putting together a layered SVG project with your Cricut. Now it's time to add special details that turn cool craft into a piece of art that makes people say "Wow, you made that?"

These next steps are about bringing in new textures, playing with light and adding personal touches to make your Cricut shadow box uniquely yours.

One of simplest ways to get a more professional look is to experiment with different materials for your SVG layers. Moving beyond standard cardstock can transform feel of a design.

Here are few favorites to incorporate into your Cricut projects:

  • Vellum: This creates soft, dreamy vibe. Use it for clouds or mist in an SVG scene, or as a back layer to diffuse light for softer glow.
  • Acetate: For a stained-glass effect, cut your intricate top SVG layer and place colored acetate behind it. You can even color clear acetate with alcohol inks for custom look.
  • Glitter or Foil Cardstock: A little sparkle goes long way. Use it for just one or two accent layers of your SVG to catch the light and guide the eye.

Mixing these in adds visual interest and takes your project from simple papercraft to a true mixed-media piece.

Let There Be Light: Adding a Magical Glow

Lighting up shadow box is a total game-changer for Cricut projects. It creates incredible warmth and shows off the depth you worked so hard to create with your SVG layers. Best of all it's easier than it looks.

Use a string of battery-powered micro LED fairy lights. They're thin, don't get hot and are flexible, making them perfect for paper crafts. Before closing your frame, use clear tape to run wire along the inside edges of the shadow box. You can wind them around perimeter for an even glow or bunch them behind a specific SVG element you want to pop.

Pro Tip: Don't forget battery pack! Some shadow box frames are deep enough to tuck it inside behind the SVG layers. If not, drill small hole in the back of the frame to feed the wire through, taping the pack to back for easy access.

Making It Personal with Cricut Vinyl

Adding name or special date with vinyl is the perfect way to customize a shadow box, especially as gift. This is my go-to trick for wedding or new baby keepsakes made with a Cricut.

Process is simple. Design your text in Cricut Design Space, making sure to measure the glass on your frame so text fits.

Cut your vinyl, weed it and use transfer tape to apply it to inside of the glass. Why the inside? It protects vinyl from dust and peeling, and gives the text a clean professional look that seems to float above your layered SVG art. It's small step that elevates the project.

Choosing the Perfect Frame

Frame is a critical part of the final look for your Cricut shadow box. First, think about depth. You'll need at least one inch of space between glass and the backing to fit all your foam spacers and create that awesome 3D look from your SVG file.

Then, consider the style. A rustic wood frame might be perfect for mountain scene SVG, while a sleek black frame can make a colorful mandala design stand out. Think about how the frame's color will harmonize with colors and theme of your paper layers. It's finishing touch that completes the artwork.

Working Through Common Shadow Box Sticking Points

Even after years of using my Cricut I still run into hiccups. It's part of the process! So, let's walk through common issues people face when making layered paper shadow boxes with a Cricut and an SVG file.

What's the Best Paper to Use for a Cricut Shadow Box?

Sweet spot for paper is a 65-80 lb (176-216 gsm) cardstock. It's sturdy enough for beautiful shadows but light enough for the Cricut to handle intricate details in your SVG without fight.

Mix in different colors or finishes like glitter and metallic cardstock to make your design pop. Pro-tip: always use clean but not overly sticky mat. A well-used LightGrip or broken-in StandardGrip mat is best to keep paper from tearing when you remove it.

How Do I Light Up My Shadow Box?

Battery-powered micro LED fairy lights are my go-to for adding that magical glow to Cricut shadow boxes.

Before putting back on your frame, tape the light string along the inside of the back panel or around interior edges. The key is planning for battery pack before you seal everything. You'll want it accessible from the outside—taping it to back of the frame is a great option—or tucked away behind the art if the frame is deep enough. Always test lights before you call it done!

I can't tell you how many times I've almost sealed a project only to realize battery pack was trapped inside. Plan its placement from beginning. Taping it to the back of the frame is lifesaver when it's time to change the batteries.

How Can I Stop My Cricut From Ripping the Paper on Tiny Cuts?

Ah, the dreaded paper tear. It almost always comes down to one of three things when cutting an SVG file.

First, check your Cricut blade. A dull blade or one with paper bits stuck to it, will drag and tear. Second, think about your mat. A brand new, super tacky mat can be too aggressive for delicate SVG cuts.

But most common culprit is the cut setting. In Cricut Design Space, find the 'Cardstock for Intricate Cuts' setting. It's game-changer. It uses lighter pressure and makes a second pass to ensure every little detail from your SVG comes out perfectly. If you're still having trouble, Learn more about how to fix papercut mistakes in our article.

What's the Best Way to Put All the Layers Together?

Depth of a shadow box comes from the space between the SVG layers. I use foam adhesive dots or double-sided foam strips for this.

Here's my assembly process for a Cricut shadow box:

  1. Start with your bottom SVG layer (the biggest piece) and place it inside frame.
  2. Take your next layer, flip it over and apply foam spacers around the back.
  3. Carefully align it on top of bottom layer and press it down gently.
  4. Keep repeating this, working your way from the back of SVG design to the very front.

A pair of craft tweezers is your best friend here, especially for positioning smaller fiddly pieces of your SVG with precision.


At Mural Moods Art, we put a ton of thought into our SVG files. Each one is designed with clean cut lines and logical layers to help you sidestep these common frustrations right from start. Find a Cricut project you'll love making at https://muralmoodsart.com.