Articles 17 min read

Free Christmas SVG Files for Cricut Shadow Boxes

Your hands-on guide to finding, preparing, and cutting free Christmas SVG files for Cricut to create breathtaking holiday shadow boxes and papercraft projects.

Shadowbox - Image 05

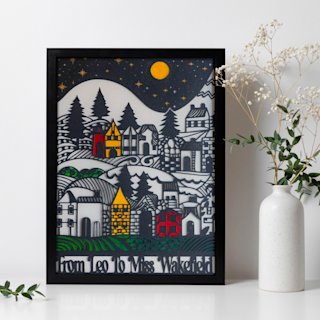
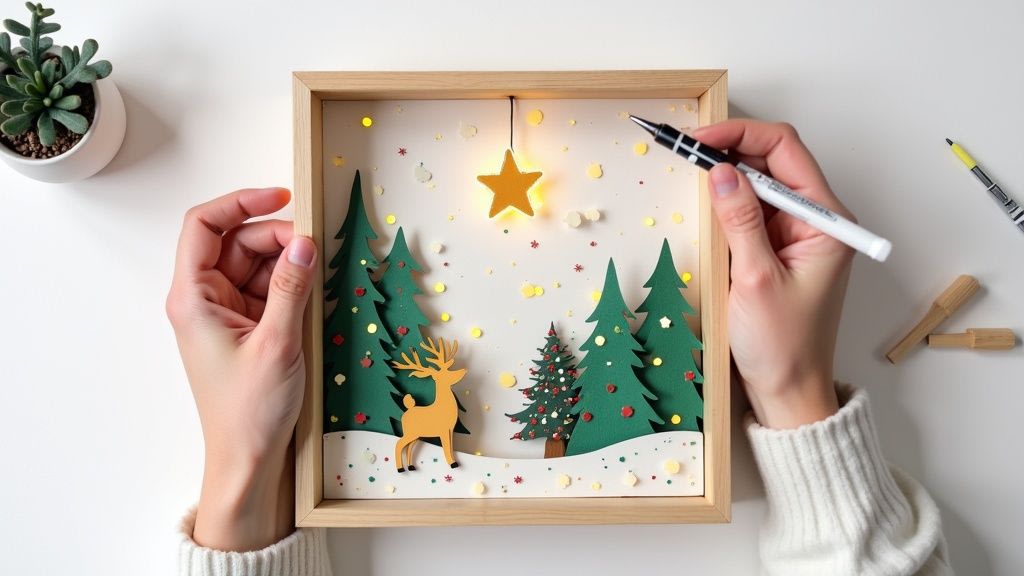
Ready in order to turn those amazing free Christmas SVG files for Cricut you've seen online into breathtaking shadow boxes? This is you're hands-on guide to making that happen. We're going to skip the fluff and get right into practical steps that will take you from a digital SVG file to stunning piece of holiday decor, all created with your Cricut machine.

Your Guide to Crafting Shadow Boxes With Free Christmas SVGs

Person designing Christmas deer SVG file on laptop with Cricut printer and printed designs

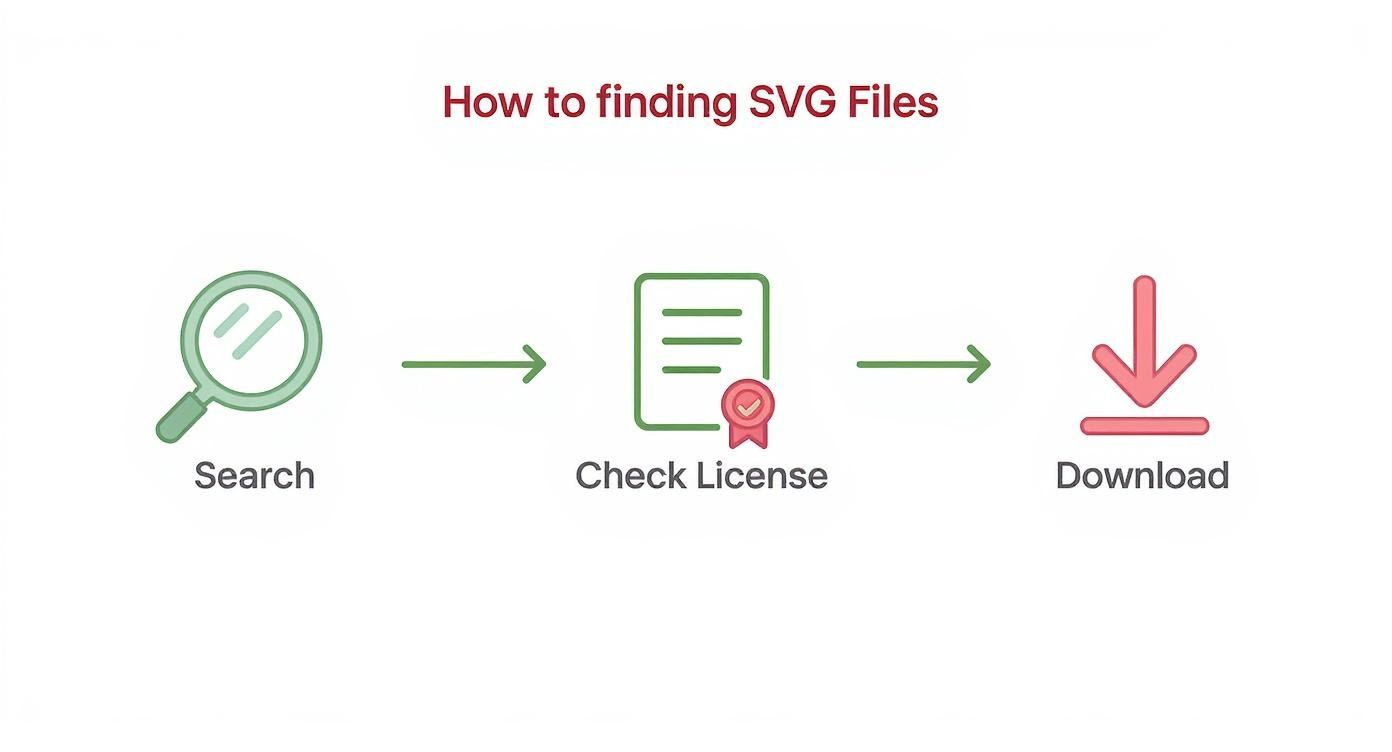
Think of this as your personal roadmap to a less stressful, more creative holiday season focused on paper crafting with your Cricut. We'll cover everything from finding trustworthy SVG files and prepping them in Cricut Design Space to assembling your final shadow box masterpiece. My goal is in order to make sure your Cricut crafting experience is a joyful one, from the first click to final dab of glue.

Why SVG Files Are Essential for Cricut Shadow Boxes

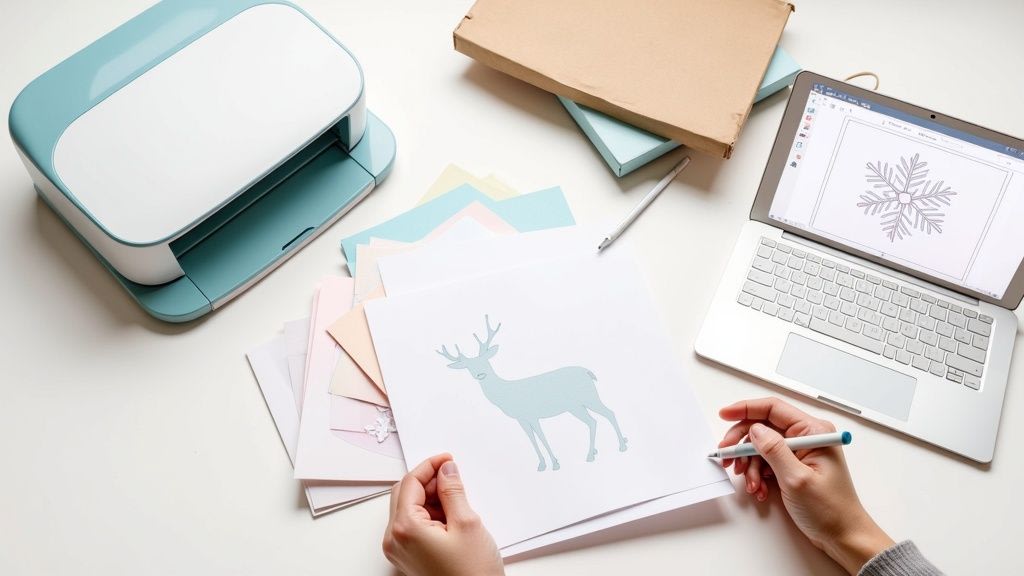
When you're creating layered paper art like shadow box, SVG (Scalable Vector Graphic) files are your best friend. They are, without a doubt, the gold standard for Cricut crafters working with paper. Unlike JPG or PNG that gets pixelated and blurry when you resize it, an SVG keeps its lines perfectly crisp and clean. This is absolutely critical for tiny, intricate details in Christmas shadow box designs—think delicate snowflakes or the fine lines in a complex nativity scene that your Cricut will cut from cardstock for you.

Market for free Christmas SVG files has exploded as Cricut machines have become more popular. Millions of Cricut users now make their own custom decorations, and demand for these files always peaks between October and December.

SVGs offer a huge advantage for layered shadow box projects. Let's break down exactly why they are so perfect for this type of papercraft for the crafters.

SVG Feature Benefit for Cricut Crafters
Scalability Enlarge a tiny snowflake or shrink a huge deer for your shadow box frame without any loss of quality. Your Cricut cuts will always be sharp.
Layered Structure SVG files are built in layers, making it easy to separate colors and elements in Cricut Design Space for precise cutting on different sheets of cardstock.
Editability You can easily ungroup, resize, or delete individual parts of the design to customize your shadow box project.
Clean Cut Lines High-quality SVGs have smooth vector paths, which means fewer snags and tears for your Cricut blade, especially with detailed paper cuts.

In short, using an SVG gives you control and precision needed for a professional-looking finished shadow box.

The key to a stunning shadow box lies in its layers. SVG files are designed to be easily separated into individual layers within Cricut Design Space, giving you complete control over each piece of cardstock your Cricut cuts.

Mastering the Basics

Before you start downloading every free SVG you see, it helps in order to know what makes a good SVG for a Cricut shadow box. Well-designed file is the difference between a clean, easy project and a frustrating afternoon of torn paper and wasted materials.

Here are few things I always look for:

  • Well-Organized Layers: When you upload the SVG file to Design Space, can you easily ungroup it? Each color or element should be its own distinct, logical piece, ready for your Cricut to cut.
  • Clean Vector Paths: Zoom in on the design. The lines should be smooth, not jagged. Avoid files with tons of tiny, unnecessary cut points, as these are notorious for ripping delicate cardstock on your Cricut.
  • Clear Instructions: Top-tier SVG designers often include a PDF guide with assembly tips for their shadow box designs. This is usually a sign of a high-quality, thoughtfully created file.

Keeping an eye out for these details will help you spot best SVG designs and ensure your Cricut machine can cut them cleanly every single time.

Finding Great Free Christmas SVG Designs for Your Cricut

Diving into the world of free downloads can feel a bit like treasure hunt, but finding top-notch free Christmas SVG files for Cricut is totally doable once you know where to look. Right SVG file is everything when you're making a shadow box; a great one sets your Cricut project up for success, but a bad one can mean torn cardstock, wasted materials, and whole lot of frustration.

Trick is in order to find designs from people who actually get what Cricut crafters need for paper projects for you.

A lot of talented designers who sell their premium SVG files also give away freebies to grow their community. This is fantastic news for us. Believe it or not, selling SVG files is a pretty solid business, with some Etsy sellers bringing in $500 to $3,000 a month. To get their name out there, they'll often release older designs or seasonal samples for free. This means you can get your hands on professionally designed, well-tested file without spending a penny. These free SVG designs are usually built for clean, crisp Cricut cuts, which is exactly what you need for those detailed shadow box layers.

Where I Go for Reliable Free Christmas SVGs

My search for the perfect holiday SVG design always starts with creators who live and breathe papercrafts and Cricut. I've learned the hard way that generic clip art sites are a no-go. Their files often aren't made for cutting machines like Cricut, leaving you with jagged edges or mess of tiny, complex paths that give your Cricut blade a nightmare.

Instead, I stick to these goldmines:

  • Designer Blogs: I'm subscribed to a bunch of Cricut-focused bloggers. They frequently share exclusive, high-quality free SVGs with their email list. Since they use these designs in their own shadow box tutorials, you know they've been tested and work well with Cricut.
  • Crafting Communities: Facebook groups dedicated to Cricut crafts are amazing. Members often share their own unique SVG designs in a "files" section, and you can see what other people have made with them, so you know they cut well.
  • SVG Marketplaces: Big design websites that sell SVGs almost always have "freebies" section. This is a great spot to snag professional-grade files that are perfect for layered paper art and shadow boxes.

And of course, I've put together my own collection of SVG designs that I've personally tested with my Cricut. You can check out my library of free SVG files for your Cricut projects.

Start Free: Christmas Village Papercut Template
Try our free Christmas Village papercut template—perfect for your first shadow box project. This beginner-friendly design includes pre-organized layers, clear instructions, and guaranteed clean Cricut cuts. Download now and start crafting!

Don't Skip This Part: Understanding Licensing

Okay, this is really important bit. Before you download any SVG file, you have in order to check the license. It dictates what you can legally do with design and can save you from a major headache down the road.

My rule of thumb? Always assume a free SVG is for personal use only unless you see it spelled out otherwise. This means you can make a mountain of shadow boxes for yourself or to give as gifts, but you can't sell single one.

Some designers are generous and offer limited commercial license. This might let you sell a small batch of physical items, like up to 100 finished shadow boxes at a local craft fair. If selling the Cricut creations you make is part of your plan, you absolutely must find SVG files that come with a commercial use license for you.

You'll usually find this info in a little text file included in the download or on webpage itself. It's tempting to ignore, but trust me, you don't want to mess with copyright issues. Always take a second to double-check terms before you start your Cricut project.

Getting Your SVG Ready in Cricut Design Space

So you've found the perfect free Christmas SVG for your shadow box. Fantastic! Now it's time in order to bring it into Cricut Design Space and get it ready for cutting. This is stage where a digital file starts to become real-life creation, and a few little prep steps here are an absolute game-changer, especially if you're making something intricate like a paper shadow box with your Cricut.

Before you even get to Design Space, remember that finding quality SVG file is half the battle. Your Cricut success starts with good foundation.

Three-step process showing search magnifying glass, license verification document, and download arrow for finding SVG files

As you can see, work begins before the upload. Finding the SVG file, checking license, and downloading it correctly are the first critical steps on your Cricut journey for you.

First Look: Uploading and Organizing Your Layers

Start by opening a new project in Cricut Design Space and hitting Upload button to navigate to where you saved the SVG. Once it's on your canvas, the very first thing I always do is glance over at Layers Panel on the right. A well-made, multi-layer SVG design for a shadow box will usually load in as a single, neat group.

Click on that main group and then hit Ungroup. Think of this like unpacking suitcase—it separates all the individual paper pieces so you can see exactly what your Cricut will be cutting. For a nativity scene, you might suddenly see distinct layers for stable, Mary and Joseph, the star, and all the background pieces.

The Most Important Step: Sizing for Your Shadow Box

Getting the size right is everything for a shadow box project. Entire design has to fit perfectly inside your frame after your Cricut cuts it.

Take a ruler and measure inside dimensions of your shadow box. If you're working with an 8x8 inch frame, you'll want to size your SVG design just a tiny bit smaller—maybe 7.75 x 7.75 inches—to give yourself a little wiggle room for you.

To resize it properly, select all the ungrouped layers at once. Then, use size controls in the top toolbar. Double-check that the little lock icon is closed! This keeps the SVG design's proportions locked, so nothing gets stretched or squished. Every piece your Cricut cuts, from largest background layer to the tiniest snowflake, will scale down together correctly.

A word of warning from experience: never resize layers individually. It's the fastest way to throw whole SVG design out of whack. Always select all layers and resize them as one unified group to keep the artist's composition intact for your Cricut project.

Two Essential Tools: Attach and Color Sync

Now for function that has saved me countless headaches with my Cricut: Attach. Let's say your SVG design has a bunch of tiny stars that need to be cut from one sheet of glitter cardstock in their exact positions relative to each other. If you just send the project to mat, Cricut Design Space will try to be "helpful" by rearranging them to save paper, completely ruining your shadow box layout.

To stop that from happening, just select all the stars (or any other elements that need to stay put) and click Attach in bottom right corner. This basically tells your Cricut, "Hey, cut these pieces exactly as they appear on my screen."

Finally, a quick tip for keeping things straight. Even if your final shadow box will be all white, changing layer colors in Design Space makes life so much easier. Just click a layer, go to color swatch up top, and assign each one a different color. This helps you visualize final piece and makes it dead simple to know you're loading the right cardstock for each mat when it's time to let your Cricut work its magic.

Getting Perfect Cuts on Christmas Cardstock

A truly professional-looking shadow box all comes down to one thing: flawless cut from your Cricut. Once you have your free christmas svg files for cricut all prepped and ready to go in Cricut Design Space, it's time in order to dial in your machine's settings to match the cardstock you're using. Honestly, this is where real magic happens, turning a simple sheet of paper into crisp, intricate piece of your final artwork.

Cardstock you pick makes a massive difference. Not all paper is created equal, and from my experience, using right weight for the right SVG layer is a total game-changer for any Cricut project.

Choosing the Right Cardstock Weight

For layered paper projects like shadow boxes, a mix of cardstock weights is your secret weapon. Base layers are your foundation, giving the whole piece structure and stability. For these, I almost always reach for a sturdy 80lb to 100lb cardstock. It holds its shape beautifully and creates solid backdrop for all the delicate details you'll layer on top.

On the flip side, for those really intricate top layers from your SVG—think tiny snowflakes, delicate script, or a reindeer's elegant antlers—a lighter paper is your best friend. I've found that 65lb cardstock lets the Cricut blade navigate complex patterns with ease, which dramatically reduces the risk of tearing or snagging. Getting a feel for different paper types is a skill that will serve you well; you can learn everything you need to know in this complete guide to understanding Cricut cardstock types and their uses.

Matching Your Blade and Settings

With your paper picked out, you have in order to tell your Cricut what it's actually cutting. That little material settings dial (or dropdown menu in Design Space) is your most important tool here. We've all done it—forgotten to switch setting from "Vinyl" to "Medium Cardstock"—and the shredded paper that results is always a painful reminder for you.

To help you get started, here's quick cheat sheet I use for my own holiday shadow box projects.

Cricut Settings for Common Christmas Cardstock

This table should give you a great starting point for most common paper weights you'll use for shadow boxes.

Cardstock Weight Recommended Cricut Setting Blade Type Best Use Case
65lb - 80lb Light Cardstock or Medium Cardstock Fine-Point Blade Delicate top SVG layers, intricate details, and small elements.
80lb - 100lb Medium Cardstock or Heavy Cardstock Fine-Point Blade Sturdy base layers, frames, and larger structural pieces of your shadow box.
100lb+ or Glitter Heavy Cardstock or Glitter Cardstock Fine-Point Blade (Deep-Point for some) Very thick backings or tough materials like glitter paper.

Always remember to check your blade, too! If you're suddenly getting fuzzy edges or the Cricut cuts aren't going all the way through, dull blade is the number one culprit. A fresh blade makes all the difference.

Pro Tip: Before you commit your Cricut to cutting a whole sheet of that gorgeous, expensive cardstock, always do a test cut. I just add small star or circle to a corner of my canvas and cut only that piece first. This five-second check saves me so much material, time, and frustration by confirming my settings are perfect.

Putting Your Christmas Shadow Box Together

Person creating handmade Christmas shadow box craft with paper trees, deer, and star decorations

Now for the fun part! With all your cardstock layers neatly cut by your Cricut from the SVG file, it's time in order to bring your project to life. This is moment where those flat pieces of paper transform into stunning piece of dimensional holiday art. A little patience and right tools are all you need.

Secret to a professional-looking shadow box isn't just about glue; it's about strategically creating space and depth between each of those SVG layers for you.

Building Dimension, Layer by Layer

To get that beautiful 3D effect, you need in order to add space between each piece of cardstock your Cricut cut. This is where foam adhesives become your best friend. I always keep few different types in my craft drawer for exactly this reason.

  • Foam Dots or Squares: These are my absolute go-to for adding consistent height between main layers of any SVG design. They come in different thicknesses, which gives you amazing control over the depth of your final shadow box.
  • Foam Tape: For larger layers with straight edges, roll of foam tape is a huge time-saver. You'll get much better stability for those foundational pieces without having to place dozens of individual dots.
  • Precision Glue Pens: What about those tiny, intricate cutouts like little stars or snowflakes? Fine-tip glue pen is perfect. It gives you precise control and prevents a gooey mess on your paper.

My best advice? Be systematic. Always start with your largest background piece and work your way forward, one SVG layer at a time. Before you stick anything down permanently, do a quick "dry fit" by stacking the layers to make sure everything lines up just right. This one little step has saved me from so many shadow box headaches for the crafters.

Adding Those Final Magical Touches

Once your layers are stacked and secured, a few finishing touches can take your shadow box from nice Cricut craft to a breathtaking piece of art. This is your chance to add a personal twist and make the SVG design completely your own.

Think beyond the paper. The real magic often comes from adding an unexpected element of light or texture. A simple string of fairy lights can completely transform the mood of a shadow box scene.

For instance, try weaving a small, battery-powered string of fairy lights between some of the middle layers before gluing them down. When you switch them on, they cast warm, magical glow that illuminates the whole scene from within.

Another idea I love is swapping out one of paper layers for specialty cardstock. A sheet of glitter or metallic foil cardstock can add just the right amount of festive sparkle to your shadow box.

These techniques are perfect for giving any SVG design that extra charm. Imagine bringing a beautiful woodland scene to life, like in this shadow box Christmas deer SVG template, by using glitter cardstock for the snow and tucking tiny lights behind the trees. It's that combination of depth, light, and texture that really makes these Cricut projects so special.

Common Questions About Cricut Christmas SVGs

Once you start diving into the world of free Christmas SVG files for Cricut, you'll probably run into few head-scratchers. Figuring these out early can save you a ton of frustration—not to mention expensive cardstock—especially when you're tackling detailed shadow box. Let's walk through some of most common issues Cricut crafters hit and how in order to solve them.

Why Are Parts of My SVG Cutting in the Wrong Place?

This is, without a doubt, number one problem new Cricut users face. You have a beautiful arrangement of snowflakes on your screen from your SVG file, but when you hit "Make It," they're scattered all over cutting mat preview. So what gives?

Thankfully, the fix is simple: you need in order to use the Attach function. When you upload an SVG, Cricut Design Space sees every little piece as its own separate object. It then tries to be "efficient" by cramming them onto mat to save paper, completely ignoring your careful layout for the shadow box.

To fix it, just select all the layers on your canvas that you want to keep together, and then click little Attach paperclip icon in the bottom-right menu. This tells the Cricut machine, "Hey, cut these things out exactly where I put them." Just remember, Attach keeps placement, while Weld merges shapes into one single layer. For shadow box layout, Attach is your best friend for you.

What Is the Best Cardstock for a Layered Shadow Box?

Secret to a great-looking shadow box is creating depth and stability, and that starts with using the right cardstock. I've found that a mix of different weights works best for projects cut with a Cricut. Think of it like building house—you need a solid foundation for support and lighter materials for the fancy details from the SVG.

  • Back Layers & Structure: For the foundational pieces that hold everything together, go with a sturdy 80lb to 100lb cardstock. This heavier weight provides rigidity your shadow box needs to stand up straight and prevent any sagging over time.
  • Intricate Top Layers: For all those delicate, detailed top layers from your SVG file—like tiny text or intricate snowflakes—a lighter 65lb to 80lb cardstock is perfect. It allows your Cricut to make those super clean, crisp cuts without tearing or snagging the paper for you.

Pro Tip: No matter what cardstock weight you're using, the perfect cut always comes down to three things: the correct material setting in Cricut Design Space, a clean and sticky mat, and a sharp blade. If your cuts start looking a bit fuzzy, dull blade is almost always the culprit.

Can I Sell the Shadow Boxes I Make With Free SVG Files?

This is huge one, and getting it wrong can land you in hot water. Answer hinges entirely on the license that comes with the SVG file you downloaded.

Vast majority of free SVG files you'll find online are for Personal Use Only. This means you can make as many shadow boxes as your heart desires for yourself, your home, or as gifts using your Cricut. What you can't do is sell finished physical products.

Some designers do offer limited Commercial Use license, which might let you sell a certain number of finished items (say, up to 100 shadow boxes). You have to check! Always look for a "license" or "terms of use" file included with your SVG download or on the designer's website. If you can't find any licensing info at all, play it safe and assume it's for personal use only.


At Mural Moods Art, we live and breathe this stuff. Every SVG we design is made with Cricut crafters in mind, and we test each one in order to guarantee clean cuts and smooth assembly process for your shadow box projects. If you're looking for a beautiful centerpiece for your holiday decor, explore our collection of shadow box designs. Visit our shop and let's get you started on your next creative project.