Articles20 min read

Paper Quilling Art for Beginners: Complete Guide to Getting Started

Your complete guide to paper quilling art for beginners — master basic shapes, pick the right tools, and create striking quilled wall art.

Paper Quilling Art for Beginners: Complete Guide to Getting Started

Paper quilling art for beginners might sound intimidating — those impossibly delicate coils arranged into flowers, mandalas, and letters look like they took years to master. Here is the truth: the basic techniques take about fifteen minutes to learn. Everything after that is practice, patience, and choosing the right project.

Quilling is the art of rolling thin paper strips into shapes and arranging those shapes into designs. It costs almost nothing to start. The results are genuinely eye-catching — textured, dimensional art that catches light and shadow in a way flat paper crafts simply cannot match. And unlike most paper crafts that end up in a drawer, quilling produces art designed for your walls.

This guide covers everything you need to start quilling today and produce wall-ready art: the essential tools, every basic shape you need, color theory for designing striking compositions, a step-by-step first wall art project, framing and display guidance, and troubleshooting for the mistakes every beginner makes.

What Is Paper Quilling Art?

Paper quilling — also called paper filigree — involves rolling, shaping, and arranging narrow strips of paper into decorative designs. The paper strips are typically 3mm to 10mm wide and wound around a tool to create coils, which are then pinched into teardrops, marquises, scrolls, and other forms.

The craft dates back to the 15th century. Renaissance nuns and monks used quilling to decorate religious items, rolling strips of gilded paper trimmed from book edges. The name comes from the original tool: a feather quill. Modern quillers use slotted metal tools, but the principle remains the same — wind paper, shape it, glue it, and arrange it into art.

Quilling is experiencing a major resurgence right now, and for good reason:

  • It is meditative. The repetitive rolling motion is genuinely relaxing — many quillers describe it as their stress-relief practice.
  • It is affordable. A starter kit costs under $15. Individual sheets of quilling paper run a few cents each.
  • The results are frame-worthy. Unlike many crafts that stay on the craft table, quilling produces art designed for display.

Most quilling tutorials focus on greeting cards and jewelry — small, flat projects. But quilling excels as wall art. The raised coils create natural shadows that shift with the light throughout the day. A framed quilled piece has a warmth and texture that a printed poster or canvas simply cannot replicate. That is what makes quilling worth learning for home decor specifically: it produces something genuinely unique for your walls.

If you enjoy other paper crafts like paper cutting art patterns or paper sculpture techniques, quilling adds a textural dimension that pairs beautifully with cut silhouettes and layered designs.

Essential Quilling Supplies for Beginners

You do not need much to start quilling. Here is what actually matters, what you can skip, and how to build a budget starter kit.

Quilling Paper Strips

Pre-cut quilling paper strips are the single most important supply. They come in consistent widths — typically 3mm, 5mm, 7mm, and 10mm — and are made from paper specifically weighted for rolling and holding shape.

Width: Start with 5mm strips. They are the most versatile width for beginners — wide enough to handle easily, narrow enough to create detailed designs. Move to 3mm strips when you want finer detail work.

Weight: Quilling paper ranges from 120gsm to 160gsm. Lighter paper (120gsm) rolls tighter and is easier to shape, which makes it better for beginners. Heavier paper (160gsm) holds its shape more rigidly — better for large wall art pieces where coils need to support their own weight.

Pre-cut vs. DIY: Pre-cut strips are strongly recommended for beginners. Hand-cutting strips with a paper trimmer seems easy, but even slight width inconsistencies cause uneven coils. A pack of 50+ colors in pre-cut 5mm strips costs under $10 and will last through dozens of projects.

Slotted Quilling Tool vs. Needle Tool

The slotted tool is the beginner essential. It has a small metal slot at the tip that grips the end of the paper strip, so you can start rolling immediately without the strip slipping. Cost: $3-5.

The needle tool creates tighter coils with smaller centers, which gives a more polished look. But it requires you to hold the paper end against the needle with your fingertip while starting the roll — frustrating for beginners. Add a needle tool to your kit after you have made a few projects with the slotted tool.

Glue

Use a clear-drying white craft glue in a precision-tip bottle. The fine tip is critical — you need tiny dots of glue, not a spreading motion. A glue pen with a 0.5mm tip works well. Avoid glue sticks (too imprecise) and super glue (too fast-drying, and the fumes are unpleasant).

Workboard and Circle Sizing Guide

A quilling board is a flat surface (cork or dense foam) with holes in graduated circle sizes. You place a loose coil in a hole to let it expand to a consistent diameter before gluing. This is how you get uniform coils across a project — essential for symmetrical designs like mandalas and flowers.

A basic board costs $5-8. You can also print a circle sizing template and place it under a sheet of wax paper on any flat surface as a free alternative.

Tweezers, Scissors, and Optional Tools

Fine-point tweezers help you pick up, position, and adjust small coils without crushing them. Any craft tweezers with a pointed tip work.

Small sharp scissors for trimming strip ends cleanly. Bent-tip scissors give you better visibility when cutting close to a coil.

Optional tools to add later:

  • Quilling comb — wraps paper around comb teeth to create uniform loops and husking shapes
  • Crimper tool — adds a corrugated texture to strips before rolling
  • Husking board — a pin board for creating elongated, symmetrical shapes
  • Curling coach — a plastic guide that helps beginners maintain even tension while rolling

Budget Starter Kit vs. Individual Supplies

Budget starter kit ($10-15):

ItemCost
Slotted tool$3
5mm multi-color quilling paper (100+ strips)$6
Precision glue pen$3
Fine-point tweezers (from your craft drawer)$0

This is genuinely enough to start. Skip the pre-packaged "deluxe" kits with molds, combs, and crimpers until you know you enjoy the craft. Those tools are useful, but they add clutter and cost before you have the foundational skills to benefit from them.

When to upgrade to individual tools:

  • Add a needle tool when your coils need smaller centers and tighter rolls ($3)
  • Add a quilling board when you need consistent coil sizes across a project ($5-8)
  • Add a quilling comb when you want to explore husking and looped shapes ($4-6)
  • Add 3mm strips when you want finer detail for intricate wall art patterns ($5)

Quality quilling supplies are available from dedicated online retailers like Custom Quilling, Quilled Creations, and Lake City Craft. Amazon also carries reliable starter kits from Juya and Quilled Creations.

For guidance on choosing cutting and shaping tools for paper crafts more broadly, see our paper cutting tools comparison guide.

Basic Quilling Shapes Every Beginner Must Know

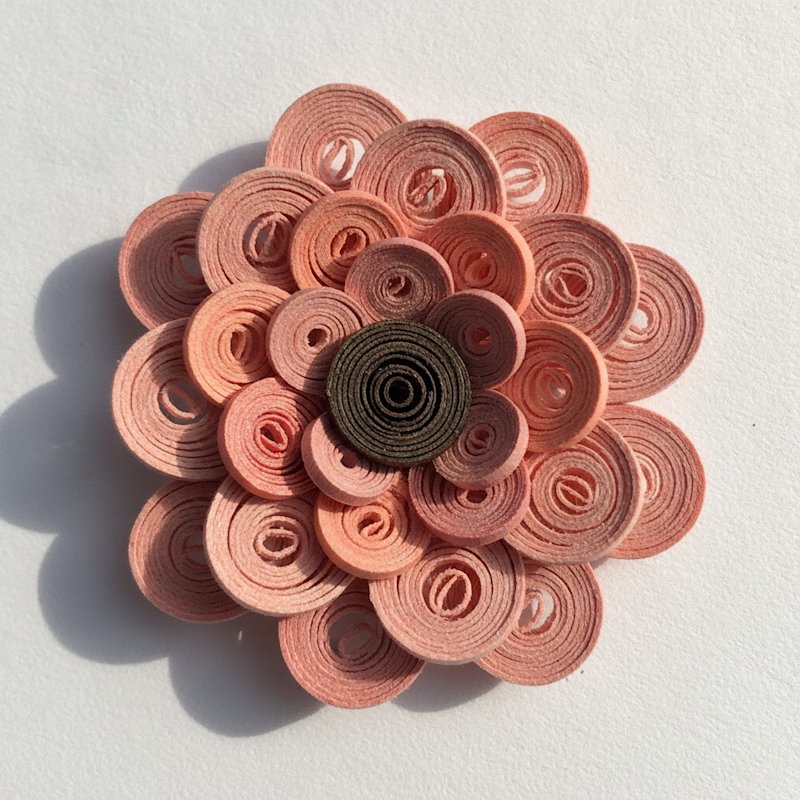
Every quilling design — from a simple flower to an elaborate wall mandala — is built from the same set of basic shapes. The coil is the foundation. Everything else is a variation: roll a coil, then pinch, bend, or shape it into the form you need.

Master the shapes below and you can create flowers, leaves, letters, mandalas, abstract patterns, and any quilled wall art design.

Tight Coil and Loose Coil

Tight coil:

  1. Insert one end of a paper strip into the slot of your slotted tool.
  2. Roll the strip around the tool, keeping even, steady tension.
  3. Continue rolling until you reach the end of the strip.
  4. Apply a tiny dot of glue to the loose tail and press it against the coil.
  5. Slide the coil off the tool.

The result is a solid, tight circle — the most basic quilling shape.

Common beginner mistake — the "tornado effect": If your coil spirals outward like a tornado instead of stacking neatly, your tension is uneven. You are either gripping too loosely or rolling too fast. Slow down, hold the strip lightly between your thumb and finger as you roll, and keep consistent pressure. The fix is simple: practice rolling strips slowly until even tension becomes muscle memory.

Loose coil:

  1. Roll the strip around the tool as before.
  2. Slide the coil off the tool before gluing.
  3. Let the coil relax and expand on your workboard.
  4. Optionally place it in a circle sizing guide hole to get a consistent diameter.
  5. Glue the tail to hold the expanded size.

Loose coils are the starting point for nearly every shaped coil — teardrops, marquises, squares, and more all begin as a loose coil that gets pinched into form.

Using a circle sizer for consistency: If you are making multiple coils that need to be the same size (essential for symmetrical wall art), roll each one, place it in the same circle sizing hole, let it expand to that diameter, then glue. This simple step is the difference between professional-looking quilling and wobbly, inconsistent results.

Teardrop, Marquis, and Leaf Shapes

Teardrop:

Make a loose coil. Pinch one point between your thumb and index finger to create a sharp tip. The opposite side stays round. This is the go-to shape for flower petals and is the most commonly used shaped coil in quilling.

Curved teardrop (paisley): Make a teardrop, then use the tip of your needle tool or a toothpick to gently curve the sharp point to one side. The result is a paisley shape that adds elegance to floral designs.

Marquis (eye shape):

Make a loose coil. Pinch both ends simultaneously between your thumbs and index fingers to create two sharp points. The shape resembles an eye or a diamond. Marquis shapes are used for leaves, decorative fills, and geometric patterns.

Leaf shape: Make a marquis, then gently push one side of the center inward with your fingernail or a tool tip. This creates a slight curve or indent along one edge, giving the shape a more natural leaf appearance.

Key technique — pinch pressure: The sharpness of your pinch points depends on how firmly you squeeze and how dry the glue is. Pinch immediately after gluing the loose coil tail for the sharpest points. If you wait too long, the glue sets and the coil resists shaping.

Square, Diamond, and Rectangle

Square: Make a loose coil and pinch one point to form a teardrop. Rotate 90 degrees and pinch again to form a second point. Repeat for all four sides. Adjust pressure on each pinch to equalize the sides.

Diamond: Same as the square, but pinch the four points with less rounding between them — aim for a narrower, more angular shape.

Rectangle: Make a loose coil. Pinch two opposite sides. Then pinch two more points on the remaining rounded sides, but position these pinches closer to one end. The result is a rectangle with a visible coil spiral in the center.

How pressure placement changes the center pattern: Where you position your pinches determines how the coil's internal spiral sits in the finished shape. Centering your pinches perfectly creates a symmetrical spiral. Offsetting them shifts the spiral to one side, creating an organic, less geometric feel — often more interesting for naturalistic designs like flowers and landscapes.

Scroll Shapes

Scrolls are rolled strips that are not glued closed. Their open, flowing ends make them ideal for decorative borders, stems, and filler elements.

S-scroll: Fold a strip in half. Roll each end toward the center fold — one clockwise, one counterclockwise. The result is an S-curve with loose spirals at both ends. S-scrolls create flowing, organic movement in designs.

C-scroll: Roll both ends of a strip toward the center in the same direction. The result is a C-shape with inward-curving ends. C-scrolls pair well with S-scrolls for vine and stem patterns.

Folded scroll: Fold a strip, then roll just one end outward. The other end stays flat as a straight tail. Use these as accents and connectors between shaped coils.

Heart scroll: Fold a strip in half. Roll both ends outward (away from the fold) in opposite directions. The result is a heart shape with loose scrolls at the top. Perfect for romantic and decorative designs.

Scrolls are the secret to filling space in quilled wall art without making it feel crowded. Use them between shaped coils to create visual flow and connect design elements.

How to Create Your First Quilled Wall Art Piece

This project produces a finished quilled flower suitable for framing as wall art. It uses only tight coils, teardrops, and marquises — the three shapes you learned above. The finished piece fits in an 8×10 inch frame.

Materials

  • 5mm quilling strips: 8 strips in petal color (choose pink, coral, or lavender), 2 strips in yellow or gold for the center, 4 strips in green for leaves, 2 strips in a darker shade of your petal color for depth
  • Slotted tool
  • Precision glue pen
  • Fine-point tweezers
  • Circle sizing guide or quilling board
  • 8×10 inch cardstock in white or cream (background)
  • Pencil (for sketching guidelines)

Step 1: Plan Your Design

Lightly sketch a flower outline on your cardstock. A simple five-petal flower with two leaves works perfectly. Do not worry about artistic precision — the sketch is just a placement guide. Your quilled shapes will cover the pencil lines.

Alternatively, print a simple flower outline from a free template and trace it onto your cardstock. Templates remove the drawing anxiety for your first project.

Step 2: Make the Petals

Roll 8 petal-colored strips into loose coils. Place each in the same circle sizing hole (the 12mm or 15mm hole works well) so they expand to a consistent size. Glue the tail on each, then pinch one end into a teardrop.

Roll 2 darker accent strips into slightly smaller loose coils (use a smaller sizing hole). Shape these into teardrops too. These darker petals will sit between the main petals, adding color depth.

Step 3: Make the Center

Roll 2 yellow or gold strips into tight coils. Stack and glue them together to create a larger, denser center. Alternatively, roll both strips as one continuous tight coil for a larger solid center.

Step 4: Make the Leaves

Roll 4 green strips into loose coils. Pinch both ends of each into marquis shapes. For variety, curve 2 of the marquises into leaf shapes by indenting one side.

Step 5: Build Up Shapes from Center Outward

Apply small dots of glue to the base of each shape. Start with the center tight coil — position it at the flower center on your cardstock.

Next, arrange the 5 main petal teardrops in a circle around the center, pointed ends facing outward. Press gently and hold each for a few seconds.

Place the 2 darker accent teardrops between petals, slightly offset, for color depth.

Position the leaf shapes below the flower, angled outward to suggest natural growth direction. Glue in place.

Step 6: Fill and Refine

Look at your design. Are there gaps between shapes? Fill small spaces with additional loose coils or tiny tight coils in matching colors. Add S-scrolls or C-scrolls as decorative stems connecting the flower to the leaves.

This is where quilling gets creative — fill, adjust, and layer until the composition feels complete. Trust your eye. If something looks off, you can carefully unstick a shape (before the glue fully dries) and reposition it.

Step 7: Let It Dry Completely

Give the glue at least 2 hours to set before moving the cardstock. Overnight is best. Paper quilling is fragile when wet — rushing this step is the most common way beginners ruin their work.

Framing and Displaying Your Quilled Art

Quilled art is three-dimensional. The raised coils create shadows and texture that deserve a frame with depth. Here is how to display your finished piece properly.

Shadow box frames are ideal. Standard picture frames press glass directly against the artwork, which crushes quilled coils flat. A shadow box frame has 1-2 inches of depth between the glass and the back panel, giving your quilled shapes room to exist in full three-dimensional glory.

Depth requirements: For most quilled wall art, a shadow box with at least 1 inch of internal depth works. Heavily layered or sculptural quilling may need 1.5-2 inches. Measure your thickest coil before buying a frame.

Mounting techniques: Use acid-free double-sided tape or small dots of craft glue to secure the cardstock backing (with your quilled art) to the shadow box's back panel. Avoid spray adhesives — they can warp quilling paper.

Background choices: The color behind your quilling dramatically affects the final look:

  • White or cream — clean, classic contrast for colorful quilling
  • Black — makes bright quilling colors pop dramatically; ideal for bold designs
  • Soft gray or navy — sophisticated backdrop that works for modern home decor

UV protection: Paper art fades in direct sunlight. Choose a shadow box with UV-protective glass, or hang your finished piece away from direct sun exposure. This is non-negotiable for preserving quilled wall art — a year of sun exposure can noticeably fade paper colors.

Gallery wall arrangement ideas: Quilled pieces work beautifully in gallery walls alongside framed paper art and other dimensional paper crafts. Mix sizes — a large quilled mandala as the anchor piece with smaller quilled flowers and botanical shapes around it creates a cohesive, collected-over-time display.

For detailed guidance on framing dimensional paper art, see our guide to displaying and framing 3D layered paper art.

Turn quilled art into framed masterpieces
Layered shadow box templates give your quilled pieces a dramatic backdrop. Try framing your quilling work inside a deer or fox shadow box for a mixed-media showpiece.

Color Theory for Quilling Compositions

Color choices make or break quilled wall art. The paper strips come in every color imaginable, and the temptation is to use all of them. Resist that urge. Thoughtful color selection is what separates striking quilled art from a colorful mess.

Three Reliable Color Strategies

1. Monochromatic. Use variations of a single color — light blue, medium blue, dark blue, and navy. This creates sophisticated, cohesive pieces that look intentional. Monochromatic quilling works beautifully for modern home decor because it blends with any room palette.

2. Analogous. Choose colors that sit next to each other on the color wheel — blue and green, or orange and red, or purple and pink. These combinations feel harmonious and natural without being boring. An analogous palette of blues and greens makes vivid botanical wall art.

3. Complementary with restraint. Complementary colors (opposites on the color wheel, like blue and orange) create vibrant contrast. Use one as the dominant color and the other as an accent — maybe 80% blue coils with 20% orange highlights. Equal amounts of complementary colors create visual tension that feels jarring rather than dynamic.

Practical Tips for Choosing Colors

  • Look at your room. The best quilled wall art complements its environment. Pick up accent colors from your existing decor — a pillow, a rug, a piece of pottery.
  • Limit your palette. Three to five colors is plenty for a single piece. More than five starts to look random unless you are deliberately going for a rainbow effect.
  • Include a neutral. White, cream, light gray, or kraft-colored quilling paper acts as a visual rest between bold colors. A few neutral coils scattered through a design prevent it from feeling overwhelming.
  • Test before committing. Roll a few coils in your chosen colors and arrange them on your background cardstock before gluing anything. Move them around. Live with the arrangement for an hour. Adjust before you glue.

Tips for Improving Your Quilling Skills

Practice consistent tension — the number one skill to develop. Even tension produces even coils, which produce professional-looking art. Roll practice strips daily for the first week. Your hands will develop muscle memory faster than you expect.

Start with pre-cut strips before cutting your own. Pre-cut strips guarantee consistent width, which guarantees consistent coils. If you want to cut your own later, you can use a Cricut or Silhouette machine with a fine-point blade on 120gsm cardstock for precise, uniform strips.

Use less glue than you think. The most common beginner habit is over-gluing. You need a dot smaller than a pinhead for most joints. If you can see the glue, you used too much. Precision is everything.

Organize strips by color before starting a project. Sorting takes two minutes and saves constant searching mid-project. Use a segmented container or even an empty egg carton to separate colors.

Advanced techniques to explore next:

  • Comb quilling — wraps paper around the teeth of a comb to create uniform looped shapes and fringed flowers
  • Husking — pins paper strips in patterns on a board, creating elongated, symmetrical shapes
  • 3D quilling — builds sculptural shapes by stacking and layering coils vertically, creating pieces that stand off the surface dramatically
  • On-edge quilling — uses the edge of the paper strip (rather than the flat face) for intricate line work and delicate outlines

Common Beginner Mistakes (and How to Fix Them)

Learning quilling means making these mistakes. Every quiller does. Here is what goes wrong and how to fix it.

Uneven tension causing wobbly coils. The fix: slow down. Roll strips deliberately rather than quickly. Grip the strip lightly between your thumb and finger as you roll — this acts as a tension regulator. Practice with scrap strips until even rolls feel automatic.

Too much glue ruining paper texture. The fix: switch to a precision-tip glue bottle. Apply glue by touching the tip to the paper — do not squeeze the bottle. Capillary action draws just enough glue for the bond. If glue oozes out, you squeezed. Stop squeezing.

Inconsistent strip widths from hand-cutting. The fix: buy pre-cut strips. Seriously. Hand-cut strips with a paper trimmer or scissors are never perfectly consistent, and inconsistent width means inconsistent coils. Pre-cut 5mm strips cost pennies per strip and eliminate this problem entirely.

Not using a sizing guide — shapes vary wildly. The fix: always use a circle sizing guide or quilling board for loose coils. Freehand shaping produces different sizes every time, which makes symmetrical designs impossible. A sizing guide costs $5 and is the single biggest quality upgrade for a beginner.

Rushing the drying process. The fix: patience. Set a timer for 2 hours and do not touch the piece. Moving quilled art before the glue is fully set causes shapes to shift, sag, or detach. If you are in a hurry, use a quick-dry craft glue — but standard white craft glue gives the strongest bond when given proper drying time.

Your quilling journey starts with one template
Download a shadow box SVG, cut your layers, and add quilled accents. Papercut dragon and seaside house templates make especially striking frames for quilled inserts.

Ready to Start Quilling?

You have the tools, the techniques, and a complete first project to try this weekend. Whether you picked up this guide out of curiosity or you are ready to commit to paper quilling art for beginners as your new creative outlet, a slotted tool, a pack of pre-cut strips, and a glue pen are enough to start making wall art tonight.

Browse our collection of paper cutting art patterns and paper sculpture techniques for more paper craft projects that pair beautifully with quilling. Or explore our full range of framed paper art for home decor for inspiration on displaying your finished pieces.

Frequently Asked Questions About Paper Quilling

Is paper quilling hard to learn?

No — quilling is one of the most beginner-friendly paper crafts. Start with basic coils and teardrops using pre-cut strips and a slotted tool. Most people can create their first simple design within an hour. The learning curve is gentle: the basic shapes take minutes to learn, and the craft rewards practice immediately with better-looking results.

What paper is best for quilling?

Use 120-160gsm acid-free paper strips, typically 3mm or 5mm wide. Pre-cut quilling strips are best for beginners because they guarantee consistent width. Standard printer paper (80gsm) is too thin and will not hold shapes well — your coils will collapse and your teardrops will not hold their points. Heavier cardstock (200gsm+) is too stiff to roll smoothly around a slotted tool.

How long does a quilling project take?

Simple greeting cards or small designs take 1-2 hours. A small framed flower piece like the project in this guide takes 3-5 hours including drying time. Larger wall art pieces — full mandalas, detailed botanical scenes, or lettered quotes — can take 10-40+ hours depending on complexity, size, and the number of individual coils involved. Start small and work up to bigger projects as your speed and confidence increase.

Can I use a Cricut to cut quilling strips?

Yes — Cricut and Silhouette machines can cut quilling strips with precision settings. Use medium-weight cardstock (120-160gsm) and a fine-point blade. Set your cut lines at 3mm or 5mm width for standard quilling strips. This is especially useful if you want strips in specific colors that are not available in pre-cut quilling packs, or if you want to use specialty papers like metallic or textured cardstock for unique quilling effects.

How do I seal and protect finished quilling art?

Use a clear acrylic spray sealer (apply in light, even coats from 12 inches away) or a decoupage medium like Mod Podge applied with a soft brush. Both options seal the paper fibers and add a protective layer against moisture and dust. For long-term protection, frame your sealed quilled art behind glass or in a shadow box with UV-protective glazing. Avoid displaying quilled pieces in direct sunlight or in high-humidity areas like bathrooms — paper is vulnerable to both UV fading and moisture warping.