Articles 11 min read

Emergency Shadow Box Repair: How to Fix Cuts Gone Wrong

Your comprehensive guide to fix botched cricut cuts.

Emergency Shadow Box Repair: How to Fix Cuts Gone Wrong

Emergency Shadow Box Repair: Fix Cuts Gone Wrong

You've been working on your intricate shadow box for hours. The design is loaded, the cardstock carefully selected, and you hit "Go" with confidence. Then disaster strikes—your Cricut tears through a delicate detail, leaves a cut incomplete, or worse, rips your cardstock completely. That sinking feeling is universal among paper crafters.

But here's the good news: most shadow box cutting mistakes are fixable. Before you toss that "ruined" layer in the trash and start over, try these emergency repair techniques. This guide will show you exactly how to salvage incomplete cuts, repair torn pieces, fix broken details, and rescue your project when things go wrong.

By the end of this article, you'll have a complete emergency repair toolkit and know exactly which mistakes are worth fixing versus when to re-cut. Let's turn that disaster into a save.

Triage Your Damage: Assess Before You Act

The first rule of emergency repair: stop and assess the damage before you start frantically trying to fix things. For more details, see our comprehensive cardstock troubleshooting guide. Rushed repairs often make the problem worse.

Quick Damage Assessment Checklist

Ask yourself these questions before touching the damaged piece:

How severe is the damage?

  • Minor incomplete cuts (90% complete) → Usually fixable with X-acto knife
  • Torn edges on non-critical areas → Easily repairable with tissue paper
  • Broken intricate details → May need creative solutions or substitutions
  • Complete destruction of critical elements → Better to re-cut

Where is the damage located?

  • Background layer → More forgiving, easier to hide repairs
  • Foreground focal point → Repairs need to be invisible or creative
  • Hidden by other layers → May not even need fixing
  • Edge or corner → Frame will likely cover it

Do you have replacement materials?

  • Same color cardstock available → Re-cutting is low-risk
  • Last sheet of special paper → Repair is worth the effort
  • Out of stock specialty cardstock → Repair is essential

What's the time vs. quality tradeoff?

  • Simple design, quick re-cut → Just re-cut it
  • Complex 30-minute cut → Repair if possible
  • Final layer of multi-hour project → Definitely try to repair first

Use this assessment to decide your best path forward. For the rest of this guide, we'll assume you've decided repair is worth attempting.

Fix Incomplete Cuts Without Re-Cutting

X-acto knife rescue method showing precision technique for finishing incomplete cuts

Incomplete cuts are the easiest mistakes to fix—your Cricut did 90% of the work, you just need to finish the job carefully by hand.

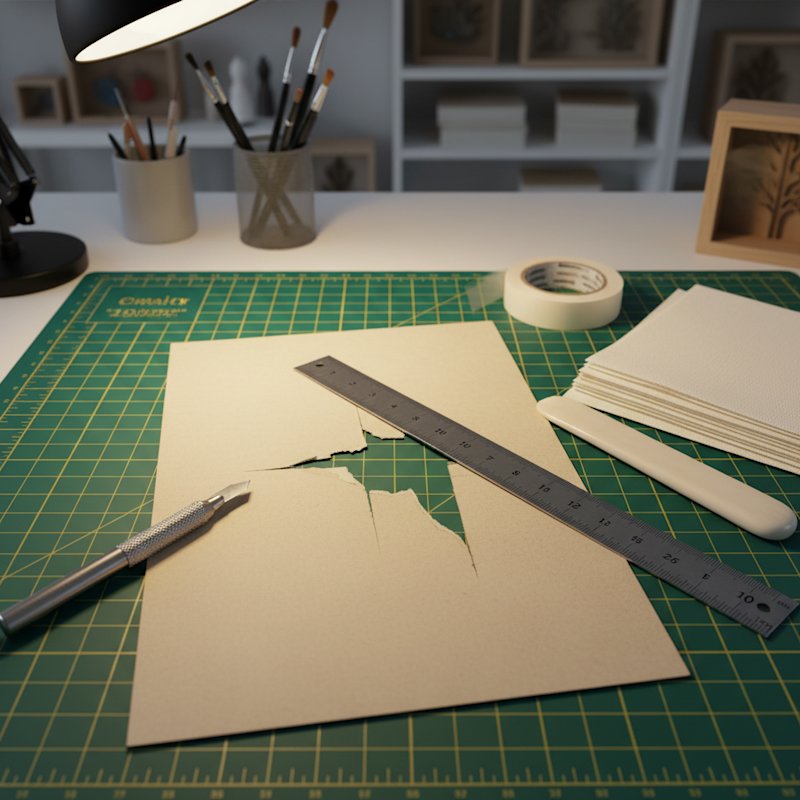
The X-Acto Rescue Method

When your blade didn't cut all the way through, follow this precise technique:

Step 1: Leave the paper on the mat
Don't remove the piece yet. Keeping it secured prevents accidental tearing while you work.

Step 2: Identify incomplete cut lines
Look carefully at where the blade failed to penetrate. Use good lighting and run your finger gently over the surface to feel for uncut areas.

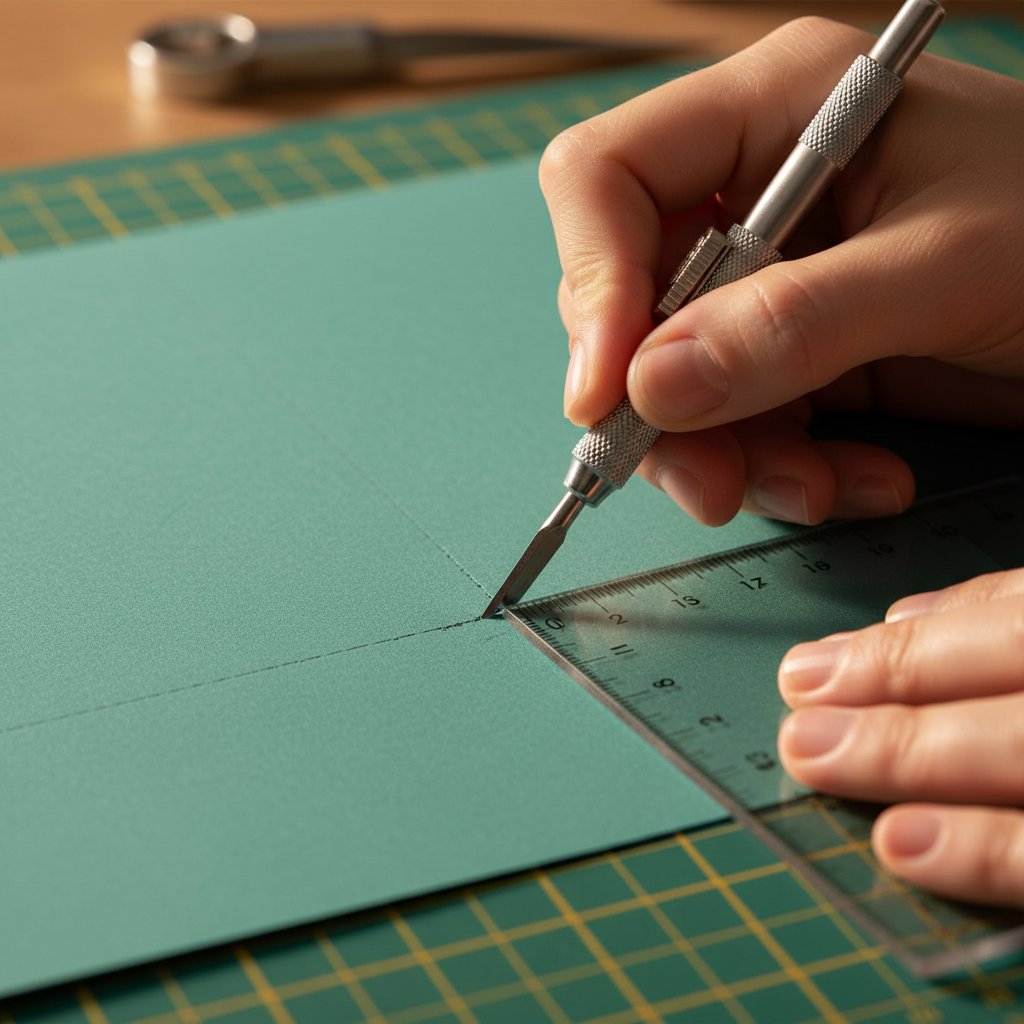
Step 3: Use a sharp X-acto knife
A fresh #11 blade is essential—dull blades will tear rather than cut. Replace your blade if you've used it for more than a few projects.

Step 4: Follow the existing cut line
Place your ruler along the straight sections and carefully slice through the remaining paper. For curves, work slowly and rotate the paper (not the knife) to follow the line smoothly.

Step 5: Support from underneath
Place a cutting mat under your work. This gives you a clean cutting surface and prevents you from cutting too deep.

When X-Acto Finishing Works Best

This technique is perfect for:

  • Straight lines that didn't complete
  • Simple curves with 2-3mm uncut sections
  • Corner connections that almost finished
  • Intricate details where 95% cut through

When to Skip This and Re-Cut Instead

Don't attempt X-acto rescue if:

  • More than 25% of the cut is incomplete (re-cutting is faster)
  • The uncut sections are in tight curves (you'll likely mess it up)
  • The paper shifted on the mat during cutting (alignment will be off)
  • Multiple layers have the same issue (indicates a machine problem—fix that first)

Pro Tip: Keep a fresh X-acto blade and self-healing cutting mat in your emergency repair kit. These two tools will save countless "ruined" projects.

Repair Torn Cardstock and Ripped Edges

Tissue paper patch repair method with archival glue and bone folder for torn cardstock

Tears are scarier than incomplete cuts, but they're surprisingly repairable—especially if the tear is on a background layer or will be hidden by other elements.

Tissue Paper Patch Method

This archival repair technique comes from book conservators and works beautifully for shadow box layers:

Materials needed:

  • White tissue paper (not toilet paper—get actual acid-free tissue paper)
  • Archival glue or YES paste (available at craft stores)
  • Bone folder or credit card
  • Wax paper

Repair process:

  1. Align the tear perfectly by placing the piece on a clean surface and carefully matching the torn edges together. Use weights to hold the pieces in position.

  2. Apply a tiny amount of archival glue to one side of the tear with a small brush or toothpick. Less is more—excess glue will show through.

  3. Press the edges together and hold for 30 seconds. Use your bone folder to gently burnish the seam, working from the center outward.

  4. Cut a small piece of tissue paper slightly larger than the tear. The tissue should overlap the tear by about 5mm on all sides.

  5. Apply thin glue to the tissue paper and carefully position it over the tear on the back side of your cardstock. Smooth gently with your bone folder.

  6. Place wax paper over the repair and weight it down with a heavy book. Let dry completely (at least 1 hour).

  7. Trim any excess tissue carefully with scissors once fully dry.

Archival Tape Quick Fix

For faster repairs that still look professional:

Use archival paper repair tape which is acid-free and won't yellow over time. Simply position the tape over the tear on the back side and burnish gently with a bone folder.

When this works best:

  • Clean, straight tears
  • Tears that will be completely hidden by other layers
  • Background elements where minor thickness is acceptable

Color Matching for Visible Repairs

If your repair will show (front layer or exposed area):

  • Match cardstock scraps to patch large tears
  • Use colored pencils or markers to blend repair edges
  • Consider adding intentional distressing to make the repair look deliberate
  • Strategic placement of decorative elements (flowers, stars, etc.) can hide repairs beautifully

Salvage Broken Intricate Details

Delicate elements like flower petals, tree branches, or fine filigree are prone to breaking during cutting or removal from the mat. Here's how to save them.

Reattach Delicate Pieces

For tiny broken elements:

  1. Don't panic and don't lose the piece. Place it immediately in a small container or on a piece of tape so it doesn't blow away.

  2. Use a fine-tip applicator to apply the smallest possible amount of strong adhesive. Options include:

    • Tombow Mono Multi Liquid Glue (fine tip)
    • BeaCon 527 Multi-Use Glue (bonds instantly)
    • Clear-drying craft glue applied with a toothpick
  3. Position with tweezers for precision. Steady your hand by resting your wrist on the work surface.

  4. Hold for 30-60 seconds until the initial bond sets. Support both sides if possible.

Simplification Strategies

Sometimes the best "repair" is to intentionally modify the design:

Strategic trimming: If a delicate swirl broke off, trim the remaining piece to make it look intentional. A slightly shorter branch or simplified detail often looks better than a visibly glued repair.

Design modification: Remove matching elements from other areas to create intentional symmetry. If one of four decorative corners broke, simplify all four corners.

Substitution options: Replace a complex broken element with a simpler cut shape from scrap cardstock. A simple circle or star can replace a broken intricate detail and still look intentional.

Fix Alignment Mistakes During Assembly

You've glued down a layer and realized it's misaligned. Before you panic, try these gentle removal and repositioning techniques.

Gentle Removal Without Damage

For foam tape spacers:

If you used foam mounting tape and caught the mistake quickly (within 10 minutes), you can often remove the layer:

  1. Work slowly from one corner using a thin palette knife or old credit card
  2. Slide gently under the foam tape rather than pulling upward
  3. Warm slightly with your hands if the adhesive is stubborn (body heat softens foam tape)
  4. Clean remaining adhesive with a rubber cement pickup or adhesive remover

For wet glue:

If the glue is still wet, you have more flexibility:

  1. Gently lift the misaligned layer if the glue hasn't set
  2. Clean excess glue immediately with a slightly damp cotton swab
  3. Let both surfaces dry before attempting to reposition
  4. Apply fresh adhesive and align carefully using registration marks

Compensation Strategies

When removal isn't possible, compensate for the misalignment:

Frame adjustment: Slightly rotate or shift the entire assembled piece within the frame to make the misalignment less visible.

Visual anchoring: Add a decorative element (ribbon, embellishment, or title card) that draws the eye away from the misaligned area.

Intentional asymmetry: If one layer is slightly off-center, you can shift other layers deliberately to create an artistic asymmetrical composition.

Trim and reframe: If the misalignment is severe, carefully remove the entire assembly, trim the background layer slightly, and use a smaller frame.

Emergency Glue Fixes and Adhesive Mistakes

Glue problems are common—drips, smudges, or glue showing through translucent paper. Here's how to fix them.

Remove Dried Glue

For white craft glue (PVA):

  • Let dry completely first (30+ minutes)
  • Gently rub with a rubber cement pickup or clean finger
  • For stubborn spots, use a white vinyl eraser
  • Residue on dark cardstock may need light alcohol dabbing (test first!)

For hot glue:

  • Never try to pull it off directly
  • Use rubbing alcohol on a cotton swab to soften the edges
  • Gently peel once softened
  • Freeze the piece for 10 minutes—frozen hot glue pops off more easily

Fix Glue Show-Through

If glue is showing through your paper:

Prevention for next time: Use less glue and apply it in small dots rather than continuous lines.

Quick fix: Cover the glue spot with a small decorative element, extra layer cutout, or strategic embellishment.

Color correction: Use a white gel pen or opaque paint marker to cover dark glue spots showing through light paper.

Strategic Design Pivots When Repair Isn't Possible

Sometimes the damage is too severe to repair invisibly. That doesn't mean your project is ruined—it means it's time to get creative.

Turn Mistakes into Features

Intentional distressing: If you have torn edges in multiple places, lean into it. Add more intentional tears and distressing to create a vintage, weathered aesthetic.

Add dimension: Cover mistakes with 3D elements like paper flowers, buttons, or embellishments that add interest rather than looking like cover-ups.

Shadow play: Position damaged elements in deeper shadow layers where lighting will make imperfections disappear.

Simplify the Design

Eliminate problematic layers: If one layer is beyond repair, consider whether the shadow box works with fewer layers. Often, removing a problematic middle layer doesn't hurt the overall design.

Combine layers: Glue two damaged layers together as a single thicker layer, positioning good sides outward.

Partial completion as art: An intentionally incomplete shadow box can have an artistic, deconstructed aesthetic—especially for modern or abstract designs.

When to Cut Your Losses and Start Fresh

Not every mistake is worth repairing. Here's how to make that decision objectively.

The Decision Matrix

Re-cut if:

  • You have plenty of replacement materials
  • The design is simple and cuts in under 15 minutes
  • The damage is on the front focal layer where repairs will show
  • Multiple layers have problems (indicates a machine issue)
  • Your repair attempts make it worse

Repair if:

  • You're out of that specific cardstock
  • The design took 30+ minutes to cut
  • The damage is on a background layer
  • The mistake is minor and fixable in under 10 minutes
  • You're almost done and one small fix will complete it

Learn From Mistakes

Before you move on (whether repairing or re-cutting):

Document what went wrong:

  • Take a photo of the damaged piece
  • Note what caused the problem (blade issue, mat stickiness, material setting)
  • Write down what you tried and what worked

Prevent repeats:

Build Your Emergency Repair Toolkit

Keep these items handy for shadow box emergencies:

Essential tools:

  • Fresh X-acto blades (#11 is standard)
  • Self-healing cutting mat
  • Metal ruler for clean cuts
  • Tweezers (fine-point)
  • Bone folder

Adhesives:

  • Archival glue or YES paste
  • Foam mounting tape (double-sided)
  • Clear-drying craft glue with fine-tip applicator
  • Archival paper repair tape

Papers:

  • White acid-free tissue paper
  • Scrap cardstock in common colors

Cleanup supplies:

  • Rubber cement pickup
  • White vinyl eraser
  • Cotton swabs
  • Rubbing alcohol

Conclusion

Shadow box mistakes happen to everyone—even experienced crafters deal with torn cardstock, incomplete cuts, and alignment disasters. The difference between a ruined project and a successful save often comes down to knowing these emergency repair techniques.

Remember: most mistakes are fixable with patience and the right approach. Assess the damage carefully, choose the appropriate repair method, and don't be afraid to get creative with design pivots when needed.

Keep your emergency repair toolkit stocked, document your fixes for future reference, and remember that some of the most beautiful shadow boxes have a repair story behind them. The key is knowing when to fix, when to pivot, and when to start fresh.

For preventing these problems in the first place, see our comprehensive Cricut Cardstock Troubleshooting Bible that walks you through proper blade maintenance, material settings, and cutting techniques that prevent mistakes before they happen.


Have you saved a "ruined" shadow box with one of these techniques? What emergency repair methods have worked for you?