Articles 17 min read

Paper Storage: Prevent Cardstock Warping and Damage

Your comprehensive guide to cardstock storage solutions.

Paper Storage: Prevent Cardstock Warping and Damage

Paper Storage Solutions: Prevent Warping and Damage to Cardstock

You walk into your craft room, excited to start your next shadow box project. You pull out a beautiful sheet of cardstock you've been saving—only to discover it's curled at the edges, warped in the middle, or mysteriously faded. Frustrating? Absolutely. Avoidable? Completely.

Proper cardstock storage is the invisible foundation of successful Cricut projects. While most crafters obsess over blade sharpness and cutting settings, they overlook the fact that damaged, warped, or moisture-logged paper causes half of all cutting failures. Your Cricut can't fix what improper storage has already ruined.

In this comprehensive guide, you'll learn exactly how to store cardstock to prevent warping, curling, color fading, and humidity damage. You'll discover practical storage solutions for every budget, understand the science of paper preservation, and implement systems that protect your cardstock investment for years.

Stop wasting money on ruined materials and prevent cutting problems before they start. Let's master cardstock storage.

Why Paper Storage Matters for Cricut Success

Every cutting problem starts with the material you're cutting—and if your cardstock is already compromised by poor storage, no amount of troubleshooting will save your project. For cutting troubleshooting, see our comprehensive cardstock troubleshooting guide.

How Poor Storage Causes Cutting Failures

When cardstock is improperly stored, it undergoes physical changes that make it nearly impossible to cut cleanly:

  • Warped paper won't lay flat on your cutting mat, causing inconsistent blade depth and incomplete cuts
  • Curled edges lift during cutting, resulting in registration errors and misaligned layers
  • Moisture-logged cardstock becomes tougher and more flexible, requiring dramatically higher cutting pressure
  • Brittle, dried-out paper cracks and tears instead of cutting smoothly
  • Uneven moisture distribution creates areas that cut perfectly and areas that fail completely

These aren't problems you can fix by adjusting your Cricut settings. The damage is done before the paper even touches your mat.

{{link:qerm:Fix cardstock cutting problems with our complete troubleshooting guide}}

The True Cost of Damaged Materials

Poor cardstock storage costs you more than failed projects:

  • Wasted materials: Ruined sheets add up quickly, especially with premium specialty cardstock ($1-3 per sheet)
  • Wasted time: Re-cutting, troubleshooting, and project delays eat into your creative time
  • Machine wear: Forcing your Cricut to cut damaged materials accelerates blade dulling and mat wear
  • Project quality: Even if cuts complete, warped layers create sloppy shadow boxes with visible gaps

Professional crafters know the secret: invest 20 minutes in proper storage to save hundreds of hours and dollars on cutting failures.

Understanding Paper's Enemy: Humidity and Temperature

Humidity control setup showing hygrometer, silica gel packets, and dehumidifier for cardstock storage

Cardstock isn't a static material—it's constantly interacting with its environment. Understanding this relationship is the key to perfect storage.

Paper is Hygroscopic (And Why That Matters)

Hygroscopic means cardstock actively absorbs and releases moisture based on ambient humidity. This isn't a defect—it's how paper fibers naturally behave. When humidity rises, paper fibers absorb water molecules and expand. When humidity drops, fibers release moisture and contract.

This expansion-contraction cycle causes:

  • Curling when one side of the paper absorbs moisture faster than the other
  • Warping when moisture distribution is uneven across the sheet
  • Dimensional changes that affect cutting accuracy
  • Structural weakening that makes paper tear instead of cut

The Ideal Storage Environment

Research shows cardstock remains stable when stored at:

  • Temperature: 68-72°F (20-22°C)
  • Relative humidity: 40-50%
  • Light exposure: Minimal to none (no direct sunlight)
  • Air circulation: Moderate ventilation without drafts

These aren't arbitrary numbers—they represent the equilibrium point where paper fibers neither absorb nor release significant moisture.

What Happens in High Humidity (>60%)

When humidity exceeds 60%, cardstock experiences:

  • Fiber expansion: Paper becomes thicker, tougher, and more flexible
  • Edge curling: Exposed edges absorb moisture faster than the center
  • Increased cutting resistance: Your Cricut blade struggles to penetrate swollen fibers
  • Mold and mildew risk: At 70%+ humidity, biological growth becomes a real threat
  • Adhesive activation: Mat adhesive can transfer to damp paper

Summer and coastal climates are especially challenging—expect to use dehumidifiers or sealed storage to maintain safe humidity levels.

What Happens in Low Humidity (<30%)

When humidity drops below 30%, cardstock becomes:

  • Brittle and fragile: Dry fibers crack and tear instead of cutting cleanly
  • Staticky: Static electricity causes paper to stick to blades and mats
  • Prone to curling: Rapid moisture loss causes dimensional instability
  • Faded: Combined with sunlight, dry conditions accelerate color degradation

Winter heating and arid climates create these conditions—humidifiers become essential for preserving cardstock quality.

Seasonal Storage Challenges

Your storage strategy must adapt to seasonal changes:

Winter (Heating Season):

  • Indoor humidity often drops to 20-30%
  • Run humidifiers in craft room
  • Store cardstock in sealed containers
  • Let paper acclimate 24 hours before use

Summer (Cooling/Humid Season):

  • Humidity can spike to 60-80%
  • Use dehumidifiers or air conditioning
  • Check storage containers for moisture accumulation
  • Rotate silica gel packets monthly

Spring/Fall (Transitional):

  • Fluctuating humidity is worst for paper
  • Monitor with a hygrometer
  • Maintain sealed storage during transitions
  • Condition paper before each project

Choosing the Right Storage Location

Where you store cardstock matters as much as how you store it. Even the best containers can't overcome a fundamentally unsuitable location.

Where to Store Cardstock

Ideal Locations:

  • Climate-controlled craft rooms: Perfect temperature and humidity control
  • Interior closets: Stable temperature, protected from sunlight
  • Under-bed storage (with climate control): Easy access, dark, stable
  • Office spaces: Typically well-climate-controlled

Locations to Avoid:

  • Basements: High humidity, potential flooding, mold risk
  • Attics: Extreme temperature swings, often unconditioned
  • Garages: No climate control, vehicle exhaust exposure, humidity extremes
  • Near windows: Direct sunlight causes fading and heat exposure
  • Near heating/cooling vents: Rapid temperature and humidity fluctuations

Real-World Tip: If you must store in a non-climate-controlled space, use airtight containers with dessicant packets and bring paper into your craft room 24 hours before use to acclimate.

Avoiding Direct Sunlight

Sunlight is cardstock's silent destroyer:

  • UV radiation breaks down paper fibers, causing brittleness and yellowing
  • Heat accelerates chemical degradation of dyes and coatings
  • Direct sun causes extreme color fading in as little as 30-60 days
  • Uneven exposure creates faded spots that ruin solid-color projects

Store cardstock in dark locations or opaque containers. If using clear storage, keep it in a closet or under furniture.

The Importance of Ventilation

While you want stable humidity, you also need air circulation:

  • Stagnant air promotes mold growth at moderate to high humidity
  • Condensation can form in completely sealed spaces with temperature fluctuations
  • Chemical off-gassing from adhesives and inks needs to dissipate

The balance: Use containers with tight lids but open them monthly to allow air exchange, or choose storage locations with gentle air circulation.

Conditioning Paper Before Use

If your storage environment differs from your craft room (temperature or humidity):

  1. Remove cardstock from storage 24 hours before cutting
  2. Place it flat in your craft room environment
  3. Allow it to equalize to room conditions
  4. Check for flatness before loading onto your mat

This simple step prevents mid-project warping and ensures accurate cuts.

Storage Container Options: From Budget to Premium

You don't need expensive specialty storage—you need the right approach for your collection size and budget.

Keep Original Packaging

The single best storage solution: Don't open cardstock reams until you're ready to use them.

Original cardstock packaging is engineered for protection:

  • Polyethylene-lined wrappers resist moisture transfer
  • Tight wrapping prevents curling and warping
  • Opaque materials block UV light
  • Convenient labeling shows color, weight, and brand

Once opened, reseal packages with tape or transfer to proper storage immediately. Don't leave partial reams sitting exposed.

Budget-Friendly Storage Solutions

Plastic Storage Bins with Tight Lids ($10-30):

  • Use for opened cardstock and loose sheets
  • Choose opaque or translucent bins (not clear)
  • Add silica gel packets for humidity control
  • Stack bins to save space
  • Label by color or weight

Plastic Job Ticket Holders ($15-25 for pack):

  • Slip individual sheets into clear plastic sleeves
  • Store vertically in filing cabinet or shelf
  • Protects from dust, moisture, and fingerprints
  • Easy to flip through and select colors
  • Budget-friendly for small collections

IKEA Trones Shoe Container ($40-50):

  • Popular choice in crafting community
  • Three pull-out containers hold 12x12 sheets
  • Compact footprint for small craft rooms
  • Keeps dust out when closed
  • Stackable for growing collections

Mid-Range Storage Options

Scrapbook Storage Cases ($30-60):

  • Purpose-built for 12x12 paper
  • Often include dividers for organization
  • Handles for portability
  • Stackable designs
  • Available at Michaels, Joann, Hobby Lobby

File Organizers and Desktop Filing ($25-50):

  • Vertical filing keeps paper flat
  • Color-coded folders or dividers
  • Easy access and visibility
  • Works in existing office furniture
  • Great for frequently-used colors

Cube Organizers with Cardstock Inserts ($40-80):

  • Fits standard cube shelving systems
  • Dividers separate colors
  • Stores paper vertically
  • Aesthetically pleasing craft room display
  • Expandable as collection grows

Premium Storage Systems

Wire Paper Display Racks ($80-200):

  • Professional-grade paper storage
  • Holds hundreds of sheets sorted by color
  • Flip-through access like a paint chip display
  • Perfect for serious crafters with large collections
  • Protects edges while allowing visibility

Custom Built-In Storage ($200-500+):

  • Drawers designed specifically for 12x12 sheets
  • Climate-controlled craft room integration
  • Maximum protection and organization
  • Long-term investment for dedicated spaces

DIY Storage Hacks

Repurposed Magazine Holders ($0-15):

  • Store cardstock vertically by color
  • Label with color names or swatches
  • Use existing office supplies
  • Line up on shelves for easy access

Pizza Boxes ($0-5):

  • Large flat boxes perfect for 12x12 sheets
  • Stack multiple boxes
  • Label tops for identification
  • Repurpose from parties or request from pizza shops

Cardboard Drawer Dividers ($0-10):

  • Create custom sections in existing drawers
  • Cut cardboard to size
  • Separate by color families
  • Zero cost using recycled boxes

Organizing Your Cardstock Collection

Organized cardstock storage showing rainbow-ordered filing system with labeled dividers by weight

Proper organization isn't just about aesthetics—it's about preserving paper quality and saving time during projects.

Sort by Weight and Thickness

Organize cardstock by weight categories:

  • Lightweight (65 lb / 176 gsm): Regular cardstock for most projects
  • Medium (80 lb / 216 gsm): Standard cardstock for shadow boxes
  • Heavyweight (100+ lb / 270 gsm): Premium cardstock for structural layers
  • Specialty (glitter, metallic, pearl): Separate category for delicate finishes

Why this matters: Different weights require different cutting settings and mat types. Grouping by weight speeds up project setup and prevents grabbing the wrong thickness.

Color Organization Systems

Choose an organization method that fits your workflow:

Rainbow Spectrum Order:

  • ROYGBIV progression (red, orange, yellow, green, blue, indigo, violet)
  • Add neutrals (white, cream, gray, black, brown) at the end
  • Intuitive for most crafters
  • Easy to maintain

Color Family Grouping:

  • All reds together (light pink → dark burgundy)
  • All blues together (sky blue → navy)
  • Allows quick shade selection within a color
  • Best for large collections

Project-Based Organization:

  • Group by project type (Christmas, baby shower, wedding)
  • Store seasonal colors together
  • Reduces search time for themed projects

Alphabetical by Brand/Color Name:

  • Useful if you buy specific branded colors repeatedly
  • Easy to restock exact matches
  • Works well with inventory systems

Labeling Strategies

Create clear, durable labels:

  • Include color name, weight, and brand
  • Use label maker for professional look
  • Add color swatches for quick visual reference
  • Note purchase date to track age

Inventory tracking:

  • Maintain a spreadsheet of your collection
  • Track quantities, purchase dates, costs
  • Note which colors are running low
  • Helpful for reordering and budgeting

FIFO Rotation (First In, First Out)

Like food storage, rotate your cardstock:

  1. Place new purchases at the back of each color section
  2. Pull from the front when starting projects
  3. Use older cardstock first before it degrades
  4. Check older stock quarterly for signs of damage

This prevents having "expired" cardstock that's been stored too long while newer reams sit unused.

Separating Specialty Papers

Glitter cardstock, metallic, and pearl finishes need extra protection:

  • Store in individual sheet protectors or acid-free tissue
  • Prevent glitter transfer to other sheets
  • Avoid stacking heavy items on top (damages finishes)
  • Use immediately after purchase (these degrade faster)

Humidity Control Solutions

Humidity control is the single most important factor in preventing cardstock damage. Here's how to achieve it at every budget level.

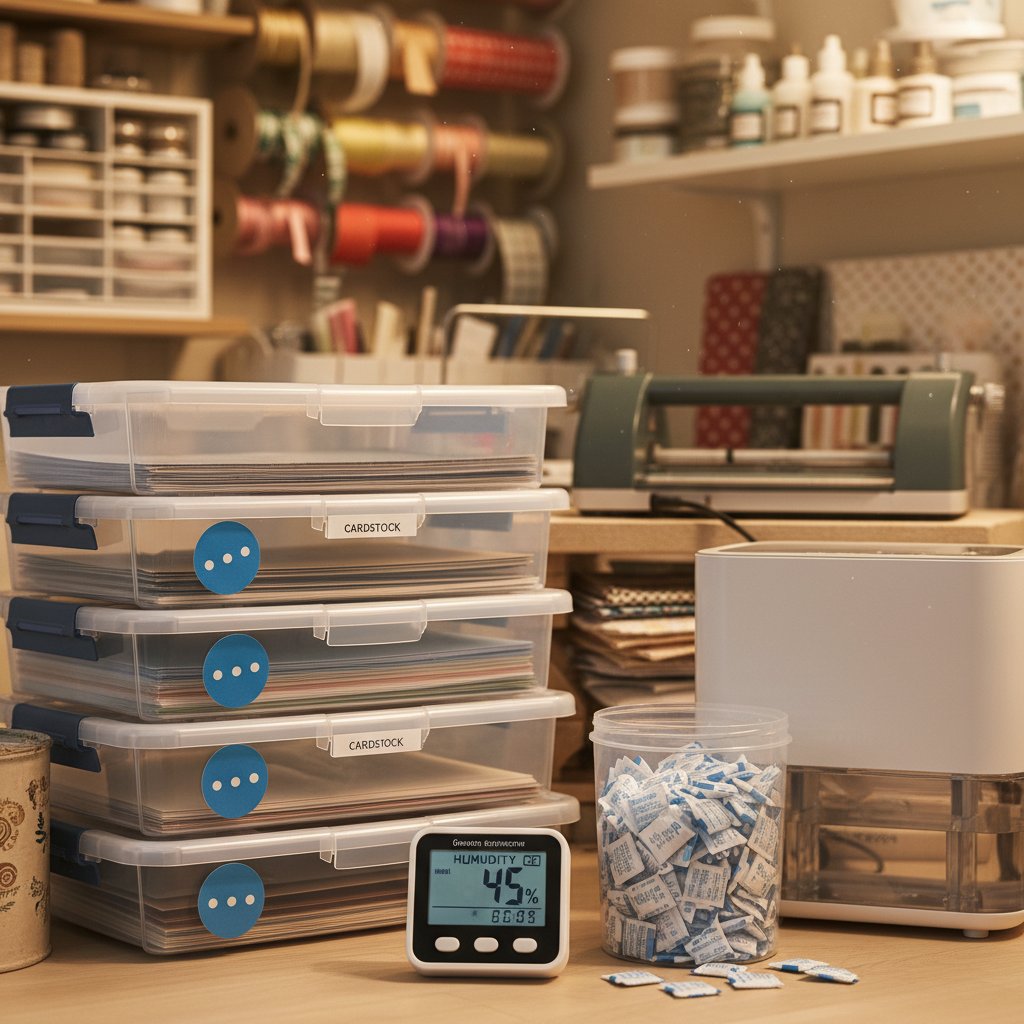
Silica Gel Packets (The Budget Solution)

Silica gel is your first line of defense:

How to use:

  • Place 2-4 packets in each storage container
  • Use 1 packet per 10-20 sheets in smaller storage
  • Replace packets every 3-6 months (or when saturated)
  • Recharge packets by baking at 250°F for 2 hours

Where to get them:

  • Buy bulk packs online ($10-15 for 50 packets)
  • Save packets from shoe boxes, electronics, vitamins
  • Choose indicating silica gel (changes color when saturated)

Effectiveness: Reduces humidity by 10-15% within sealed containers—enough to prevent most damage.

Dehumidifiers for Craft Rooms

If you live in a humid climate:

Small Electric Dehumidifiers ($30-60):

  • Covers 200-300 sq ft
  • Removes 10-20 oz moisture per day
  • Quiet operation
  • Perfect for dedicated craft rooms

Large-Capacity Dehumidifiers ($200-300):

  • Covers 1,500-3,000 sq ft
  • Removes 30-50 pints per day
  • Built-in hygrometer and auto-shutoff
  • Whole-home or large craft space solution

Desiccant Dehumidifiers ($150-250):

  • Works in cold environments (basements)
  • Quieter than compressor models
  • Effective at low humidity levels
  • Best for maintaining 40-50% RH

Target: Set dehumidifier to maintain 45% relative humidity year-round.

Humidifiers for Dry Climates

In arid or winter-heated environments:

Cool Mist Humidifiers ($30-80):

  • Adds moisture without heat
  • Safer around paper and materials
  • 1-2 gallon capacity for 24-hour runtime
  • Position away from direct contact with storage

Warm Mist Humidifiers ($40-100):

  • Boils water before releasing steam
  • Kills bacteria and mold
  • More comfortable in winter
  • Keep farther from cardstock

Whole-House Humidifiers ($200-600+):

  • Integrates with HVAC system
  • Maintains consistent humidity throughout home
  • Best long-term solution for dry climates
  • Professional installation recommended

Target: Maintain 45-50% relative humidity in craft room.

Monitoring with Hygrometers

You can't control what you don't measure.

Digital Hygrometers ($10-25):

  • Displays current temperature and humidity
  • Min/max tracking shows fluctuations
  • Battery-powered, portable
  • Place one in each storage area

Smart Hygrometers ($20-40):

  • Connect to smartphone via Bluetooth/WiFi
  • Alert you when humidity exceeds safe ranges
  • Track trends over time
  • Multiple sensors for whole-home monitoring

Analog Hygrometers ($5-15):

  • No batteries required
  • Less accurate but sufficient for basic monitoring
  • Vintage aesthetic for craft room

Best practice: Check humidity daily and adjust dehumidifier/humidifier settings to maintain 40-50% RH consistently.

Sealed Storage Containers

For maximum protection in challenging environments:

Airtight Plastic Bins:

  • Weathertight seals prevent moisture exchange
  • Add silica gel packets inside
  • Perfect for long-term storage
  • Check quarterly for condensation

Vacuum-Sealed Bags (use with caution):

  • Remove all air and moisture
  • Flatten cardstock during sealing (can cause creasing)
  • Best for bulk storage of backup supplies
  • Not ideal for frequent access

Preventing Common Storage Problems

Even with proper storage, problems can arise. Here's how to prevent and fix the most common issues.

Curling Edges

Causes:

  • Uneven moisture exposure (edges dry faster than center)
  • Low humidity (paper loses moisture from edges)
  • Poor stacking (weight on center causes edge lift)

Prevention:

  • Store cardstock flat with even weight distribution
  • Use humidity control to prevent moisture loss
  • Keep cardstock in original packaging until use
  • Avoid stacking heavy items on top

Quick fix:

  • Place curled cardstock under heavy books for 24-48 hours
  • Lightly mist the curled side, then press flat (use with caution)
  • Use a low-heat iron with a protective cloth (test first)

Warping

Causes:

  • Uneven moisture distribution across the sheet
  • Temperature fluctuations causing expansion/contraction
  • Storing paper upright without proper support

Prevention:

  • Store flat, never on edge (unless in tight file organizer)
  • Maintain consistent temperature and humidity
  • Use dividers or separators to prevent leaning
  • Avoid partial stacks (fill containers fully or add spacers)

Fix:

  • Flatten under heavy books with even pressure
  • Condition in craft room for 24 hours before use
  • Discard severely warped sheets (not worth fighting)

Color Fading

Causes:

  • UV light exposure (sunlight or fluorescent lights)
  • Extended storage in bright locations
  • Chemical degradation from poor air quality

Prevention:

  • Store in opaque containers or dark locations
  • Use UV-blocking sleeves for displayed papers
  • Rotate stock regularly (FIFO method)
  • Keep craft room curtains closed during peak sunlight

No fix: Once faded, color cannot be restored. Prevention is essential.

Dust Accumulation

Causes:

  • Open storage without covers
  • Poor craft room air filtration
  • Infrequent use of stored paper

Prevention:

  • Store in closed containers or sleeves
  • Use air purifiers in craft room
  • Wipe containers monthly
  • Cover open storage with dust sheets

Quick fix:

  • Use lint roller or microfiber cloth before cutting
  • Don't blow dust (spreads it around)
  • Discard heavily soiled sheets

Adhesive Transfer

Causes:

  • Stacking cardstock without separators
  • High humidity activating adhesive backing
  • Storing adhesive-backed materials with regular cardstock

Prevention:

  • Use wax paper or tissue between adhesive sheets
  • Store adhesive-backed paper separately
  • Maintain low humidity to prevent tackiness

No fix: Adhesive transfer ruins cardstock. Discard affected sheets.

Emergency Fixes for Damaged Cardstock

When prevention fails, try these emergency techniques to salvage warped or curled paper.

Flattening Curled Paper

The Book Press Method (Safest):

  1. Place curled cardstock between two clean sheets of printer paper
  2. Stack heavy books evenly on top (10-20 lbs total)
  3. Leave for 24-48 hours
  4. Check progress and repeat if needed

The Reverse-Curl Method:

  1. Gently curl cardstock in the opposite direction
  2. Hold for 30 seconds
  3. Release and check flatness
  4. Repeat 2-3 times until flat
  5. Finish with book press if needed

Using Heat (With Extreme Caution)

Iron Method (High Risk):

  1. Set iron to lowest heat (no steam)
  2. Place cardstock between two sheets of plain white paper
  3. Press iron gently for 3-5 seconds
  4. Check cardstock immediately
  5. Repeat if needed, increasing heat minimally
  6. Warning: Can scorch, melt coatings, or cause irreversible damage

Heat Press Method (If You Have One):

  1. Set to lowest temperature (150-200°F)
  2. Use protective sheets above and below
  3. Press for 5 seconds
  4. Check immediately
  5. Safer than iron due to even heat distribution

When to Discard vs. Save

Discard if:

  • Warping exceeds 1/4 inch deviation from flat
  • Paper has visible creases that won't flatten
  • Color is severely faded or stained
  • Mold or mildew present
  • Multiple failed flattening attempts

Try to save if:

  • Minor edge curling only
  • No creases, just gentle curve
  • Valuable or expensive specialty cardstock
  • Project doesn't require perfect flatness (backing layers)

Pro Tip: Use damaged cardstock for test cuts, practicing new designs, or scrap projects rather than discarding entirely.

Best Practices Checklist

Quick reference for perfect cardstock storage:

✓ Store in climate-controlled space (68-72°F, 40-50% RH)
✓ Keep cardstock in original packaging until needed
✓ Use opaque or dark storage containers
✓ Add silica gel packets to containers
✓ Store flat, never on edge (unless properly supported)
✓ Organize by weight and color for easy access
✓ Monitor humidity with hygrometer monthly
✓ Rotate stock using FIFO (first in, first out)
✓ Condition paper 24 hours before use if stored differently
✓ Avoid basements, attics, garages, or sunlit areas
✓ Check stored paper quarterly for damage
✓ Replace silica gel packets every 3-6 months

✗ Don't store near windows or heating/cooling vents
✗ Don't open reams until you're ready to use them
✗ Don't stack heavy items on cardstock
✗ Don't store adhesive-backed paper with regular cardstock
✗ Don't leave partial stacks leaning unsupported
✗ Don't ignore humidity fluctuations

Conclusion: Protect Your Investment, Perfect Your Cuts

Proper cardstock storage isn't just about organization—it's about preserving quality, preventing cutting failures, and protecting your investment. Every sheet of curled, warped, or faded cardstock represents wasted money and frustration that could have been avoided with simple storage solutions.

The relationship between storage and cutting success is undeniable. When you pull perfectly flat, properly conditioned cardstock from climate-controlled storage, your Cricut performs flawlessly. When you fight warped, moisture-damaged paper, even perfect machine settings can't save your project.

Your Action Plan:

  1. Assess your current storage situation—measure humidity, check for damage, identify problem areas
  2. Choose storage solutions that fit your budget and collection size
  3. Implement humidity control—start with silica gel packets and upgrade to dehumidifiers/humidifiers as needed
  4. Organize your collection by weight and color for efficient access
  5. Monitor and maintain your storage system quarterly

Remember: the best storage system is the one you'll actually use consistently. Start simple, monitor results, and upgrade as your collection and budget grow.

Now that your cardstock is properly stored and protected, you're ready to tackle any cutting challenge. Your materials are pristine, your Cricut is calibrated, and your projects will shine.

{{link:qerm:Master every cutting problem with our complete troubleshooting bible}}


Sources: