Articles15 min read

DIY Paper Lanterns for Home Decor

Create stunning DIY paper lanterns for your home — no expensive supplies, no special tools, and no guesswork. Four styles, step-by-step tutorials, and 12 ideas for every room.

5 Easy Paper Light Box SVG Projects Beginners Love to Make

DIY Paper Lanterns for Home Decor: A Complete Crafting Guide

Paper lanterns are one of the most rewarding crafts you can make for your home. They cost a fraction of store-bought alternatives (think $3–5 per lantern versus $20–60 retail), they take an afternoon to complete, and the warm glow they cast transforms any room into something special.

Whether you are looking for a cozy bedside accent, a statement piece for your living room wall, or a seasonal decoration that costs almost nothing to swap out, DIY paper lanterns deliver. You don't need a cutting machine, expensive tools, or years of crafting experience — just paper, a few basic supplies, and a willingness to experiment.

This guide covers four distinct lantern styles, each with a different look and skill level:

  • Paper mâché lanterns — sculptural, organic shapes with a handmade feel
  • Origami lanterns — geometric, precise, and endlessly repeatable
  • Cut-out silhouette lanterns — intricate patterns that come alive when lit
  • Wax paper and pressed flower lanterns — translucent, botanical, and utterly charming
    Translucent paper layers showing light diffusion

For each style, you will find a materials list, a step-by-step tutorial, and styling ideas. Plus, we will walk through 12 room-by-room lantern ideas and a full LED lighting safety guide so you can display your creations with confidence.

If you enjoy paper crafts for your home, check out our DIY paper wall art ideas for your living room and our seasonal paper crafts for home decor for more inspiration.

Materials You Will Need

The beauty of paper lanterns is that most supplies are already in your craft drawer. Here is what to gather before you start.

Paper Types

PaperBest ForWeightTranslucency
Tissue paperPaper mâché skins, delicate overlays10–20 gsmHigh
Wax paperPressed flower lanterns30–40 gsmHigh
Parchment / baking paperOrigami lanterns, soft glow40–50 gsmMedium-high
Copy paper (white)Cut-out silhouettes, practice pieces75–80 gsmLow-medium
Cardstock (65 lb)Structural elements, cut-out patterns175 gsmVery low
Rice paper / washiJapanese-style lanterns30–40 gsmHigh

For lanterns that will be lit from within, translucency matters. Tissue paper, wax paper, and parchment let light through beautifully. Cardstock and heavy copy paper create sharp silhouette effects instead — the light escapes only through your cut-out patterns.

Structural Materials

  • Balloon — for paper mâché (round or oval shapes)
  • Wire frame or embroidery hoop — for cylindrical or drum lanterns
  • Craft glue / white PVA — for paper mâché and general assembly
  • Masking tape — holds things in place while glue dries
  • Scissors and craft knife — for cutting shapes and patterns
  • Ruler and pencil — for measuring and marking

LED Lighting (Required for Safety)

Never use real candles inside paper lanterns. LED lights are the only safe option. We cover lighting in detail at the end of this guide, but in short:

  • LED tea lights — inexpensive, battery-powered, perfect for small lanterns
    Illuminated shadow box with LED lighting
  • LED fairy lights (string lights) — flexible, battery or USB powered, ideal for larger lanterns
    Paper craft assembly workspace with adhesive and layers
  • LED strip lights — for wall-mounted or shadow box lanterns

Style 1: Paper Mâché Lantern

Paper mâché lanterns have an organic, sculptural quality that looks like it came from a boutique — not your kitchen table. The technique is simple: layer torn paper and glue over a balloon, let it dry, then pop the balloon and trim the opening.

Materials

  • 1 balloon (round or oval)
  • Tissue paper in 2–3 colors, torn into rough strips (about 2 × 4 inches)
  • White craft glue (PVA) mixed 1:1 with water
  • A bowl to rest the balloon in while working
  • LED tea light or fairy light string
  • Scissors

Step-by-Step

1. Inflate the balloon to the size you want your finished lantern. Keep in mind the lantern will be slightly smaller once the balloon is removed. Rest it in a bowl, knot side down.

2. Apply the first layer. Dip a strip of tissue paper into the glue mixture, slide it between two fingers to remove excess, and lay it flat on the balloon. Overlap strips slightly. Cover the entire balloon except a 2-inch circle around the knot (this becomes the opening for your light). Use a single color for this base layer.

3. Let it dry completely. This takes 4–6 hours or overnight. The balloon should feel firm and dry to the touch.

4. Add a second layer using a contrasting color or pattern. You can create stripes, color blocks, or a random mosaic effect. Let dry again.

5. Optional third layer — for extra durability, add a third layer of plain tissue or translucent parchment. This strengthens the shell without hiding your colors.

6. Pop the balloon once everything is completely dry. Use scissors to snip the knot, then gently pull the deflated balloon out through the opening.

7. Trim the opening into a neat circle. You can also cut small decorative notches or scallops along the edge.

8. Add your light. Place an LED tea light inside, or thread a string of fairy lights through the opening and tape the battery pack to the outside (hidden against a wall or shelf).

Styling Tips

  • Group three lanterns of different sizes on a shelf for an instant display
  • Use warm white tissue for a cozy glow, or cool white for a Scandinavian feel
  • Hang several at different heights from a branch or curtain rod for a boho installation

Style 2: Origami Lantern

Origami lanterns are geometric, satisfying to fold, and incredibly easy to reproduce once you learn the pattern. They work best with translucent paper so the LED light glows through the folded walls.

Materials

  • 4–6 sheets of square translucent paper (parchment, rice paper, or washi), 8 × 8 inches or larger
  • Bone folder or the edge of a credit card (for crisp creases)
  • Craft glue or double-sided tape
  • LED tea light

Step-by-Step (Simple Square Lantern)

This is a beginner-friendly modular origami lantern that uses four identical folded units.

1. Start with one square sheet, colored side down. Fold in half horizontally, then unfold. Fold in half vertically, then unfold. You now have a cross of creases.

2. Fold each corner into the center point where your creases meet. You should have a smaller square.

3. Fold the top and bottom edges to the center line. Unfold these two folds — you need the creases for the next step.

4. Open the top flap. Using the crease you just made, tuck the top-right and top-left corners inward so the top edge collapses into a narrow triangle pointing toward you. Repeat for the bottom edge.

5. You now have a boat-like shape. Fold the top triangle down over the body. Fold the bottom triangle up over the body. You should have a compact parallelogram.

6. Repeat steps 1–5 to make three more identical units.

7. Assemble the lantern by tucking the pointed flap of one unit into the pocket of the next. Work your way around all four units to form a four-sided lantern shape. Secure the joints with a tiny dab of glue or double-sided tape.

8. Add a flat base by cutting a square of cardstock to fit the bottom opening, and glue it in place. Put your LED tea light inside before sealing.

Styling Tips

  • Use a single color for a minimalist look, or alternate two colors for a woven effect
  • Fold from large sheets (12 × 12 inches) for statement pieces
  • Hang a cluster at staggered heights with invisible thread for a floating effect
Light Up Your Paper Art — Shadow Box Templates with LED Glow
Paper lanterns and shadow boxes share the same magic: light through paper. These templates are designed for LED backlighting that transforms any room after dark.

Style 3: Cut-Out Silhouette Lantern

This is where a cutting machine like a Cricut really shines — but you can absolutely do it by hand with a sharp craft knife. The idea is simple: wrap opaque or semi-opaque paper around a cylinder, cut patterns into it, and let the light shine through the openings.

Materials

  • Cardstock or heavy paper (65–80 lb), one sheet per lantern
  • A cylindrical form (glass jar, oatmeal container, or a simple wire frame)
  • Craft knife (or Cricut/Silhouette cutting machine)
  • Cutting mat
  • Double-sided tape or glue
  • LED tea light or fairy light string

Step-by-Step

1. Measure your cylinder. Wrap a piece of paper around it and mark where it overlaps. Add half an inch for the seam. Measure the height and add half an inch at top and bottom for folding.

2. Design your pattern. Simple geometric shapes (circles, diamonds, stars) work beautifully and are easy to cut by hand. For more intricate designs — trees, birds, botanicals — use a Cricut or trace a printed template.

If you own a Cricut, you can find plenty of free silhouette patterns in Design Space. For a shadow-box-inspired lantern, try adapting one of our layered papercut shadow box templates into a flat wrap-around design.

3. Cut the patterns. Work slowly if cutting by hand — a sharp blade and a steady ruler make all the difference. If using a Cricut, set your blade to the appropriate depth for your paper weight.

4. Wrap and secure. Wrap the cut paper around your cylinder. Use double-sided tape along the seam. Fold the top and bottom edges inward over the rim of the cylinder for a clean finish.

5. Add lighting. Place an LED tea light inside the cylinder. The light will glow through your cut-out pattern, creating a beautiful shadow effect on nearby walls.

Styling Tips

  • Black cardstock with warm LED light creates dramatic, moody shadows
  • White cardstock with cool LED light feels clean and modern
  • Layer two wraps — an inner solid color and an outer cut-out — for colored light effects

Style 4: Wax Paper and Pressed Flower Lantern

This is the most charming of the four styles — and surprisingly easy. You sandwich pressed flowers and leaves between two sheets of wax paper, iron them to seal, then wrap the translucent panel around a jar or frame. When lit from within, the dried botanicals glow like stained glass.

Materials

  • Wax paper (2 sheets per lantern, roughly 8 × 12 inches each)
  • Pressed flowers and leaves (you can press your own in a heavy book for 2–3 weeks, or buy pre-pressed online)
  • An iron (set to medium, no steam)
  • A piece of thin cotton fabric or a tea towel (to protect your iron)
  • A glass jar or cylindrical vase
  • Double-sided tape or twine
  • LED tea light

Step-by-Step

1. Arrange your pressed flowers. Lay one sheet of wax paper flat on your ironing board, waxy side up. Arrange your pressed flowers and leaves on it in any pattern you like — a dense collage, a single statement bloom, or a scattered natural look.

2. Seal with the second sheet. Place the second sheet of wax paper on top, waxy side down (so the waxy sides face each other with the flowers sandwiched between).

3. Iron to seal. Place your cotton cloth over the sandwich and iron gently on a medium setting. Do not use steam. The heat melts the wax layers together, encapsulating the flowers. Iron slowly for about 30–60 seconds, checking that the wax has bonded evenly.

4. Let it cool for a minute. The wax paper will become slightly stiffer and more translucent.

5. Trim the panel to fit around your jar with a slight overlap. Round the corners for a softer look.

6. Wrap and secure. Wrap the panel around the jar. Secure with double-sided tape along the seam, or tie with twine or ribbon for a rustic finish.

7. Add your LED tea light inside the jar. The glow through the wax paper and pressed flowers is genuinely magical — especially in a dim room.

Styling Tips

  • Use small, delicate flowers (pansies, violas, fern fronds) for the best translucent effect
  • Match the flower colors to your room's palette, or go with a wildflower mix for eclectic charm
  • These make beautiful homemade gifts — wrap one in tissue paper with a spare LED tea light

12 DIY Paper Lantern Ideas by Room and Style

Now that you know how to make four different lantern styles, here are twelve specific ways to use them throughout your home.

Living Room

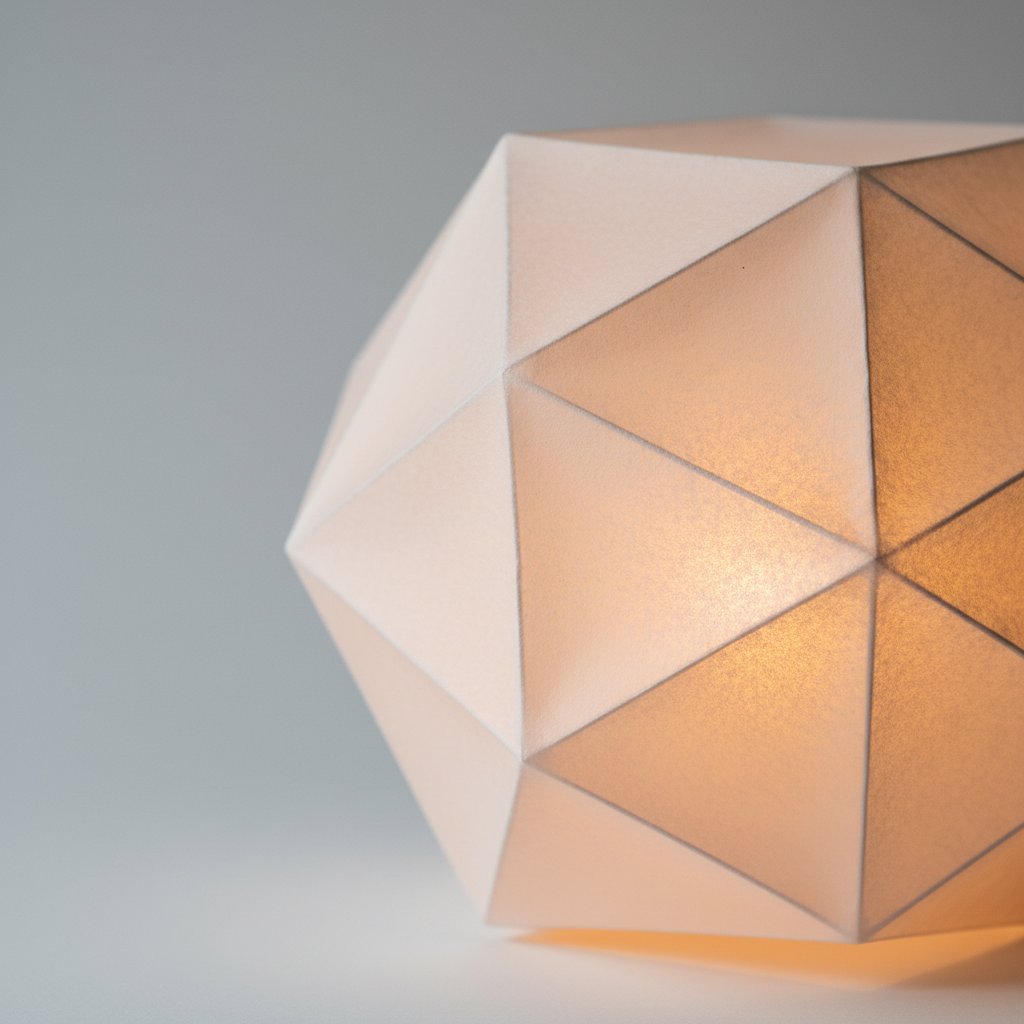
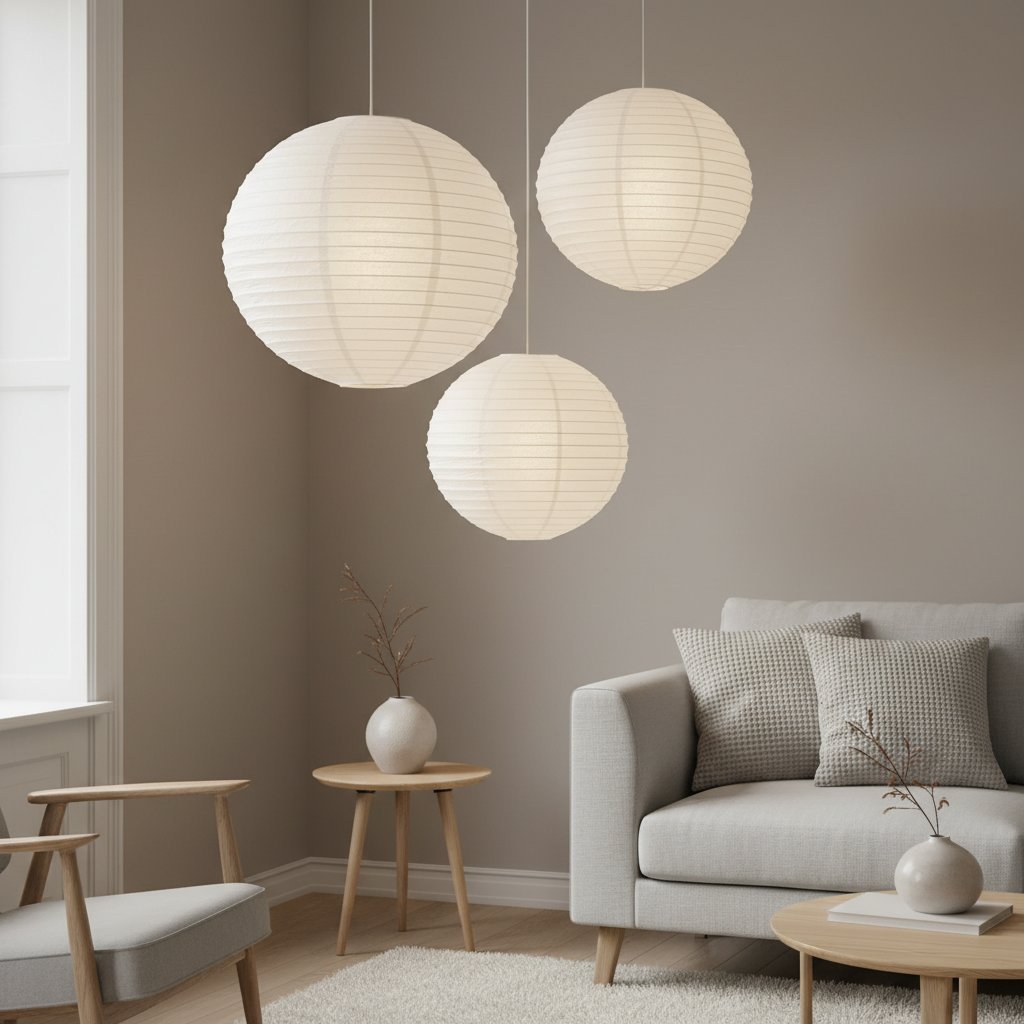
1. Scandinavian Minimalist Cluster
Make three origami lanterns in white parchment paper at different sizes (small, medium, large). Hang them at staggered heights in a corner using invisible thread. Pair with a simple floor lamp and neutral furnishings. The geometric folds and soft glow fit perfectly with Scandinavian-inspired spaces.

2. Boho Macramé Hanger with Lantern
Place a paper mâché lantern (in earthy tones like terracotta, mustard, or sage) inside a macramé plant hanger. Suspend it near a window or above a reading nook. The combination of textured cord and handmade paper creates that relaxed, layered bohemian feel.

3. Gallery Wall Accent
Use a small cut-out silhouette lantern as part of a gallery wall arrangement. The dimensional glow adds variety among flat frames and prints. Choose a geometric or botanical cut-out pattern that echoes other art in the grouping.

Bedroom

4. Bedside Glow Lanterns
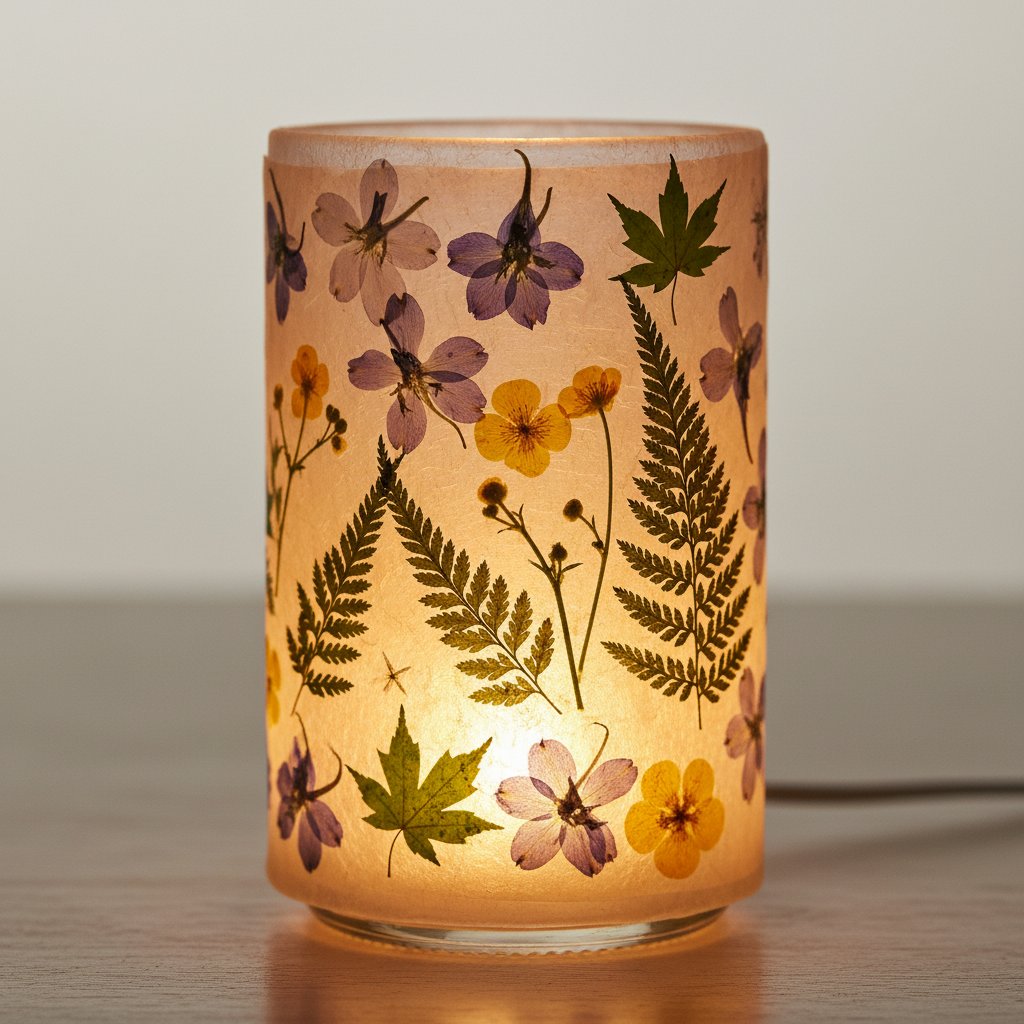
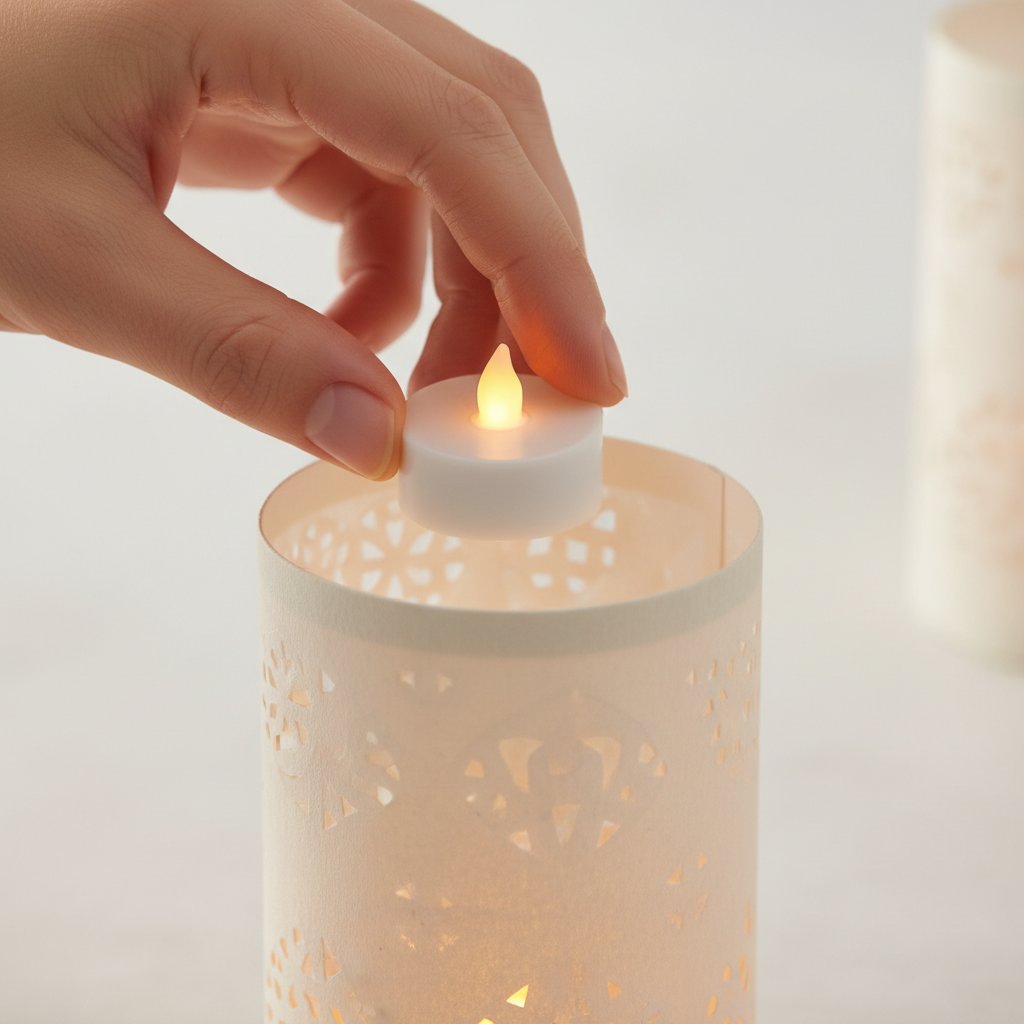
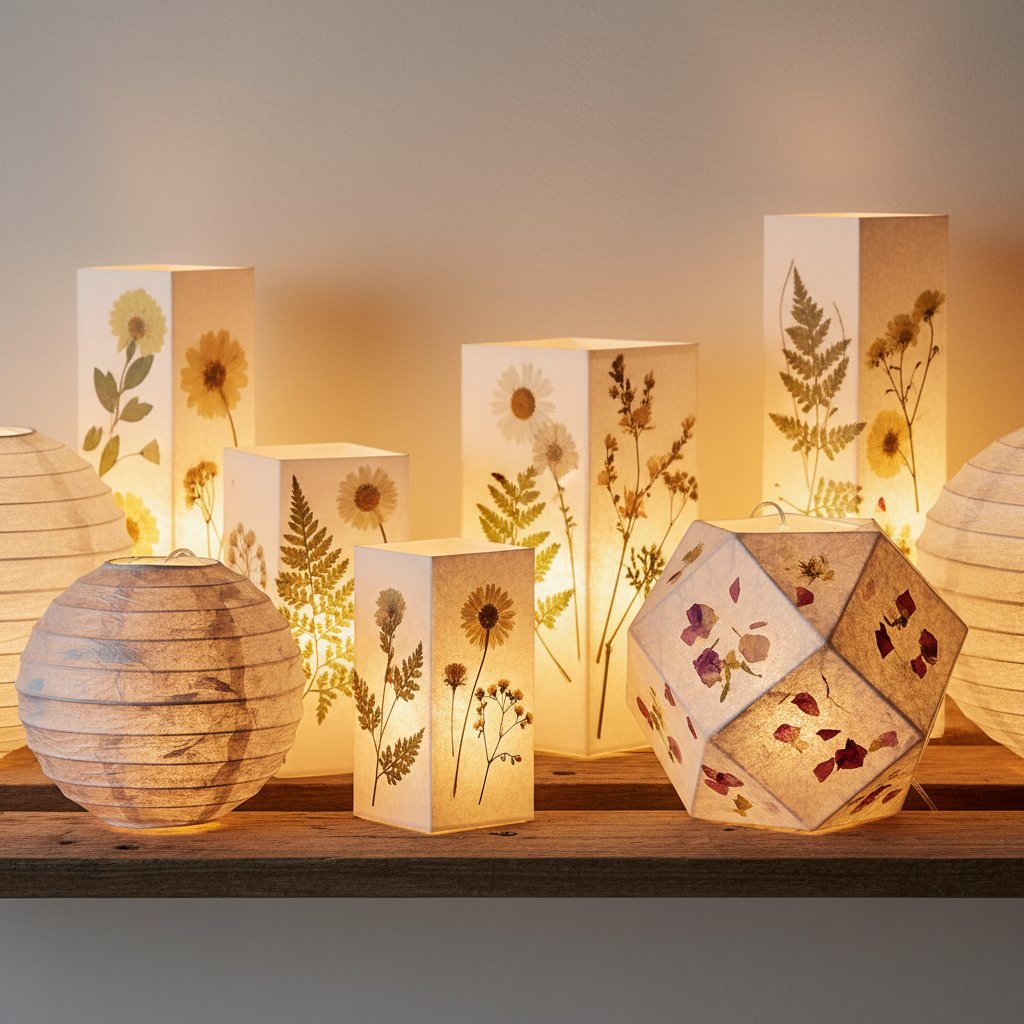
Make two matching wax paper lanterns with delicate pressed flowers and place them on bedside tables with LED tea lights inside. They cast a warm, romantic glow that is far more interesting than a standard lamp — and they double as décor during the day.

5. Japanese-Inspired Hanging Lantern
Use rice paper or washi to create a large, simple cylindrical lantern with a wire frame. Keep the design minimal — no cut-outs, no embellishments. Suspend it above the bed with a single LED pendant bulb inside (ensure the bulb is LED and low-wattage). This channel a serene, Japanese aesthetic.

Kitchen and Dining

6. Dining Table Centerpiece
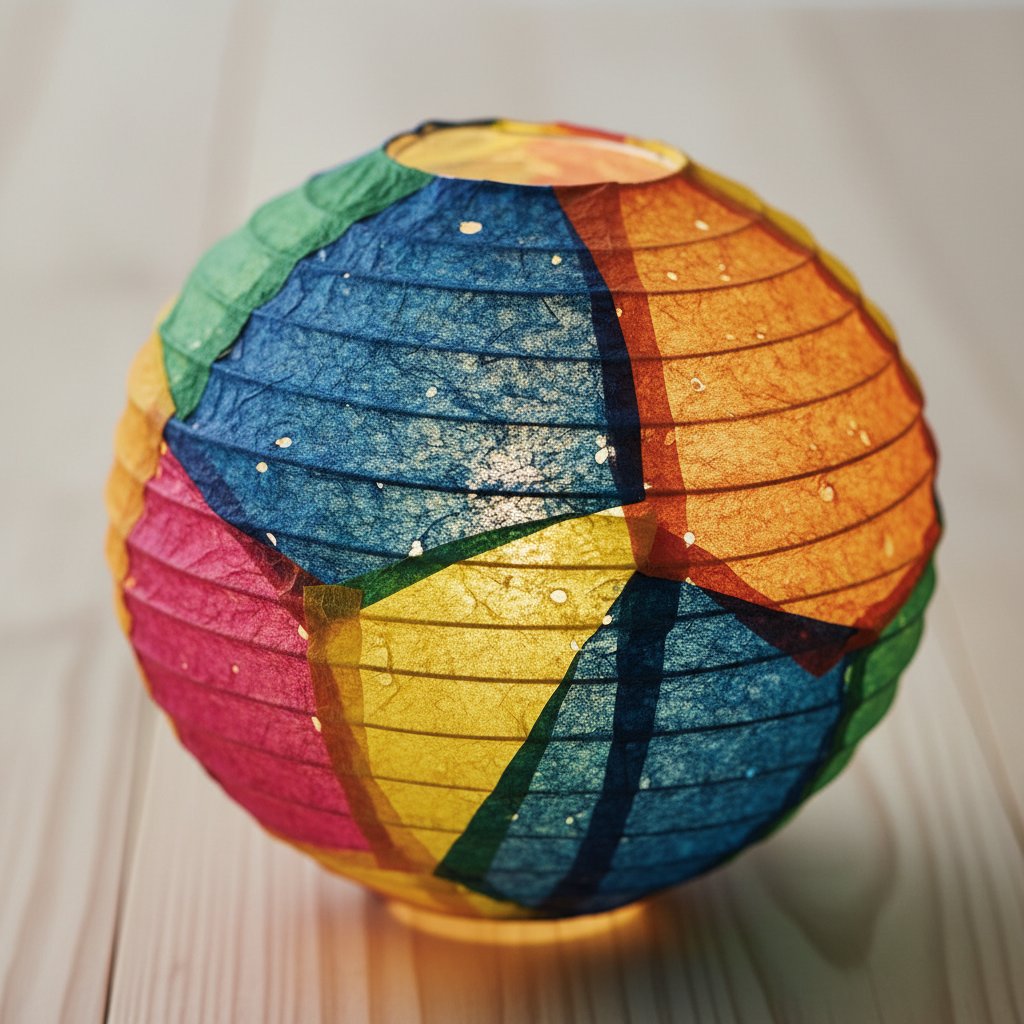
Line up five small paper mâché lanterns down the center of your dining table in graduated sizes. Use LED tea lights inside. This creates a stunning tablescape for a dinner party — and costs under $15 total.

7. Herb Garden Lanterns
For a kitchen windowsill, make small wax paper lanterns using pressed herb sprigs (rosemary, thyme, mint) instead of flowers. The green tones look fresh and kitchen-appropriate, and the herbs add a subtle natural fragrance.

Entryway and Hallway

8. Welcome Lantern
Place a large paper mâché lantern on your entryway console table with an LED light inside. Choose warm, inviting colors. Add a small potted plant or a stack of books next to it for a layered display that says "welcome home."

9. Hallway Runner of Lights
Line your hallway with six to eight small origami lanterns placed on floating shelves or a narrow console. Each contains an LED tea light on a timer (set to turn on at dusk). The effect is a warm, glowing path through your home.

Nursery and Kids' Rooms

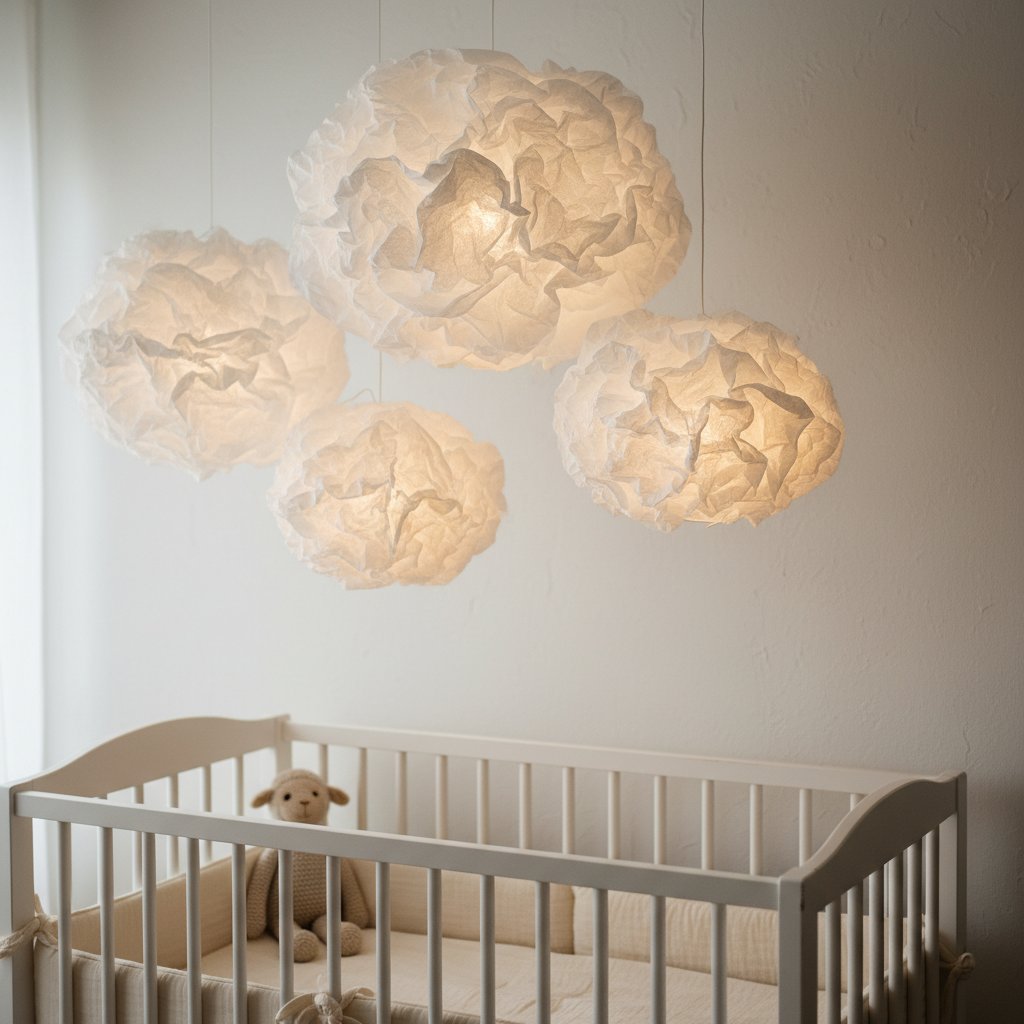
10. Cloud Lantern Mobile
Make three or four white paper mâché lanterns in slightly irregular round shapes to resemble clouds. Hang them from a wooden dowel or branch at varying heights above the crib or changing table. Use warm LED lights inside. This is a dreamy, soft addition to any nursery.

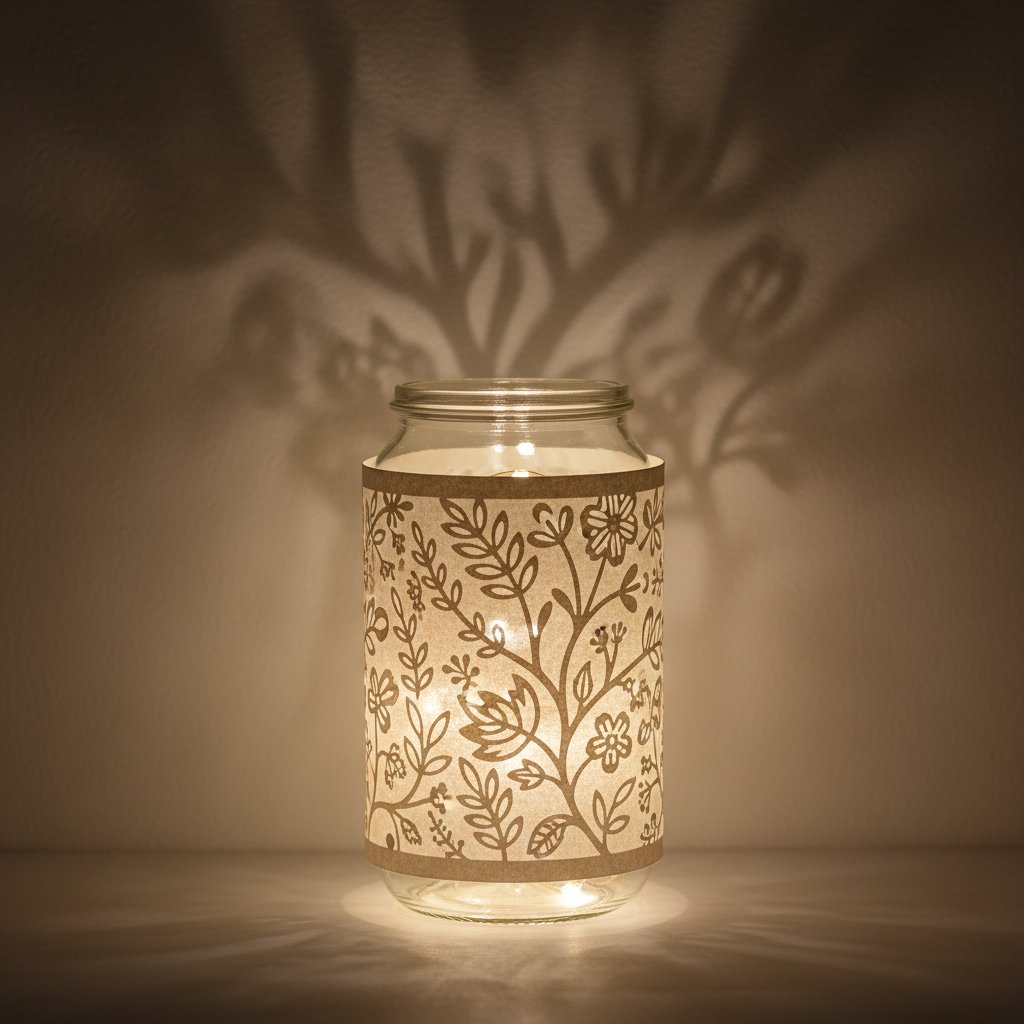
11. Star-Cut Nightlight Lantern
Use the cut-out silhouette technique with a star pattern. Wrap it around a small jar and place it on a child's bedside table. The star-shaped shadows on the ceiling are soothing and magical. Let older children help design and cut the pattern.

Home Office

12. Mood-Boosting Desk Lantern
A small wax paper lantern with pressed cheerful flowers (daisies, sunflowers) on your desk brightens both the room and your mood. The soft, warm light is easier on the eyes than harsh overhead lighting during late afternoon work sessions.

LED Lighting Safety Guide

Paper is flammable. This section is not optional — read it before lighting any paper lantern.

The Only Rule That Matters

Never use a real candle, tealight, or any open flame inside or near a paper lantern. Only LED lights are safe for paper crafts. Period.

Choosing LED Lights

Light TypeBest ForPower SourceHeat Output
LED tea lightSmall lanterns, single piecesBattery (button cell or AAA)None — stays cool
LED fairy lightsMedium to large lanternsBattery pack or USBNegligible
LED strip lightWall-mounted or shadow box lanternsUSB or plug-in adapterVery low — safe to touch
LED pendant bulbLarge hanging lanterns (rice paper)Plug-inLow — check manufacturer rating

All of these remain cool to the touch after hours of use. If any light feels warm against the paper, it is not suitable — switch to a lower-wattage LED.

Battery and Power Tips

  • Rechargeable LED tea lights save money if you plan to use lanterns regularly. Look for ones with a USB charging port.
  • Timer functions are worth the small extra cost. Set your fairy lights to turn on at dusk and off after 6 hours — no remembering required.
  • Keep battery packs accessible. When building a lantern, plan how you will reach the battery pack to change or charge batteries. A small Velcro dot on the outside of the lantern base works well.
  • Do not enclose battery packs inside sealed lanterns. Batteries can fail, and you need to be able to remove them.

Placement Precautions

  • Keep paper lanterns at least 12 inches away from any heat source (radiators, lamps, stoves, fireplaces)
  • Do not hang paper lanterns directly below ceiling light fixtures that generate heat
  • If hanging lanterns outdoors, bring them inside during rain or high wind — wet paper tears and can short-circuit battery packs
  • Keep lanterns out of reach of pets and young children who might pull them down or chew on them

For more on safely adding lights to paper projects, see our guide on how to add LED lights safely to shadow boxes and paper crafts.

Cost Comparison: DIY vs. Store-Bought

One of the best reasons to make your own paper lanterns is the savings. Here is a quick reality check:

ItemDIY CostRetail Equivalent
Paper mâché lantern (1)$2–4 (tissue paper, glue, balloon)$15–30 (decorative paper lantern, boutiques)
Origami lantern (1)$1–3 (translucent paper)$12–25 (geometric paper lamp)
Cut-out silhouette lantern (1)$2–4 (cardstock, jar)$20–40 (metal-cut lantern, design stores)
Wax paper flower lantern (1)$3–5 (wax paper, pressed flowers, jar)$25–60 (botanical lantern, Etsy/artisan)

A complete set of six DIY lanterns for your home costs roughly $15–25 in materials. The retail equivalent would be $100–200 or more.

Start Crafting Your Paper Lanterns Today

Paper lanterns are one of those rare crafts that deliver huge visual impact for very little money and effort. You have four techniques to choose from, twelve room-by-room ideas to inspire you, and a clear safety guide for lighting.

Here is how to begin:

  1. Pick one style that matches your skill level and the room you want to decorate. Paper mâché and wax paper lanterns are great for beginners. Origami and cut-out silhouettes reward precision.
  2. Gather your materials — most are already in your home or available at any craft store for a few dollars.
  3. Set aside an afternoon for your first lantern. The process is meditative and satisfying.
  4. Use LED lights only and enjoy the warm, handmade glow in your space.

If you love working with paper and want to take your crafting further, explore our collection of layered papercut shadow box templates. Each design is tested for clean Cricut cuts and comes with detailed assembly instructions — the same step-by-step approach you will find in this guide.

Happy crafting! ✂️