Articles 15 min read

Import Multi-Layer Shadow Box SVGs in Silhouette Studio

Your comprehensive guide to silhouette shadow box svg.

Import Multi-Layer Shadow Box SVGs in Silhouette Studio

Import Multi-Layer Shadow Box SVGs in Silhouette Studio

Importing multi-layer shadow box SVG files into Silhouette Studio is one of the first crucial steps in creating stunning layered paper cut shadow boxes. While the process is straightforward once you understand it, many beginners encounter frustrating issues with Designer Edition requirements, file organization, and layer separation that can derail their projects before cutting even begins.

This focused guide walks you through the complete SVG import process for shadow box projects in Silhouette Studio. You'll learn the software requirements, step-by-step import methods, essential settings to configure before importing, how to organize and separate layers, and troubleshooting solutions for common import problems. Whether you're new to creating layered paper cut shadow boxes or switching from Cricut to Silhouette, this guide ensures your shadow box SVG files import correctly every time.

Understanding Shadow Box SVG File Requirements

Silhouette Studio Designer Edition displaying SVG file format requirements and shadow box templates

Before importing any shadow box SVG, it's important to understand what makes these files different from standard cutting files and what your software needs to handle them properly.

Why Shadow Box SVGs Require Designer Edition

Standard Silhouette Studio (the free version) cannot import SVG files. This is the most common frustration for new Silhouette users trying to work with shadow box templates. The free Basic Edition only supports Silhouette's proprietary file format (.studio) and DXF files.

To import SVG files, you need Silhouette Studio Designer Edition or higher. This is a one-time upgrade purchase that unlocks SVG import capabilities, along with many other advanced features like rhinestone design tools and advanced cut settings.

Workaround for Basic Edition users: Most professional shadow box template designers provide DXF format files alongside SVG files specifically for Silhouette Basic Edition users. DXF files work identically to SVGs and import into the free version. When purchasing or downloading shadow box templates, check if DXF versions are included if you're using Basic Edition.

How Multi-Layer Shadow Box Files are Structured

Professional shadow box SVG files are organized as multi-layer designs where each layer represents one sheet of cardstock you'll cut. A typical 8-layer shadow box SVG contains eight separate design elements, usually numbered or labeled to indicate assembly order.

Layer numbering varies by designer. Some designers number from front to back (Layer 1 is the frontmost piece viewers see), while others number from back to front (Layer 1 is the backmost piece closest to the frame backing). Always check the included instructions to understand your specific template's numbering system.

Each layer includes:

  • The outer frame or boundary shape (usually a rectangle or square matching your frame size)
  • The intricate cutout design elements specific to that layer
  • Registration marks or alignment guides (in some premium templates)

When imported correctly, all layers should appear on your Silhouette Studio canvas, typically grouped together as one selectable object. You'll need to ungroup and separate them to work with each layer individually for cutting.

Preparing Your Computer and Silhouette Studio

Proper preparation before importing ensures a smooth workflow and prevents common frustration points.

Extracting Downloaded Files

Shadow box SVG files purchased or downloaded from designers almost always come in zipped (compressed) folders. You cannot import files directly from a ZIP archive—you must extract them first.

On Windows:

  1. Navigate to the downloaded ZIP file in File Explorer
  2. Right-click the ZIP file
  3. Select "Extract All..."
  4. Choose a destination folder (create a dedicated "Shadow Box SVGs" folder for organization)
  5. Click "Extract"

On Mac:

  1. Navigate to the downloaded ZIP file in Finder
  2. Double-click the ZIP file
  3. The contents automatically extract to a new folder in the same location
  4. Move the extracted folder to your preferred location

Organization tip: Create a dedicated folder structure for your shadow box projects:

Shadow Box Projects/
  ├── SVG Templates/
  │   ├── Christmas Designs/
  │   ├── Floral Designs/
  │   └── Nature Scenes/
  └── Completed Projects/

This organization makes finding files faster and prevents the "where did I save that?" frustration mid-project.

Configuring Import Settings

Before importing your first shadow box SVG, configure Silhouette Studio's import settings to ensure multi-layer designs open centered and properly positioned on your workspace.

Step 1: Open Silhouette Studio

Step 2: Access Preferences by clicking the gear/cogwheel icon in the lower-right corner of the screen

Step 3: In the Preferences panel, select the Import tab on the left

Step 4: Configure these essential settings:

  • Center imported designs on page: Check this box to ensure SVGs open in the center of your workspace rather than potentially off-screen where they're difficult to find
  • Resize imported designs to fit page: Leave this unchecked for shadow box projects (you want the design to import at the designer's intended size)

Step 5: Click OK to save settings

These one-time settings prevent the frustrating issue where multi-layer SVGs import partially or completely off your visible workspace, making them appear to have failed to import when they actually loaded outside the visible canvas area.

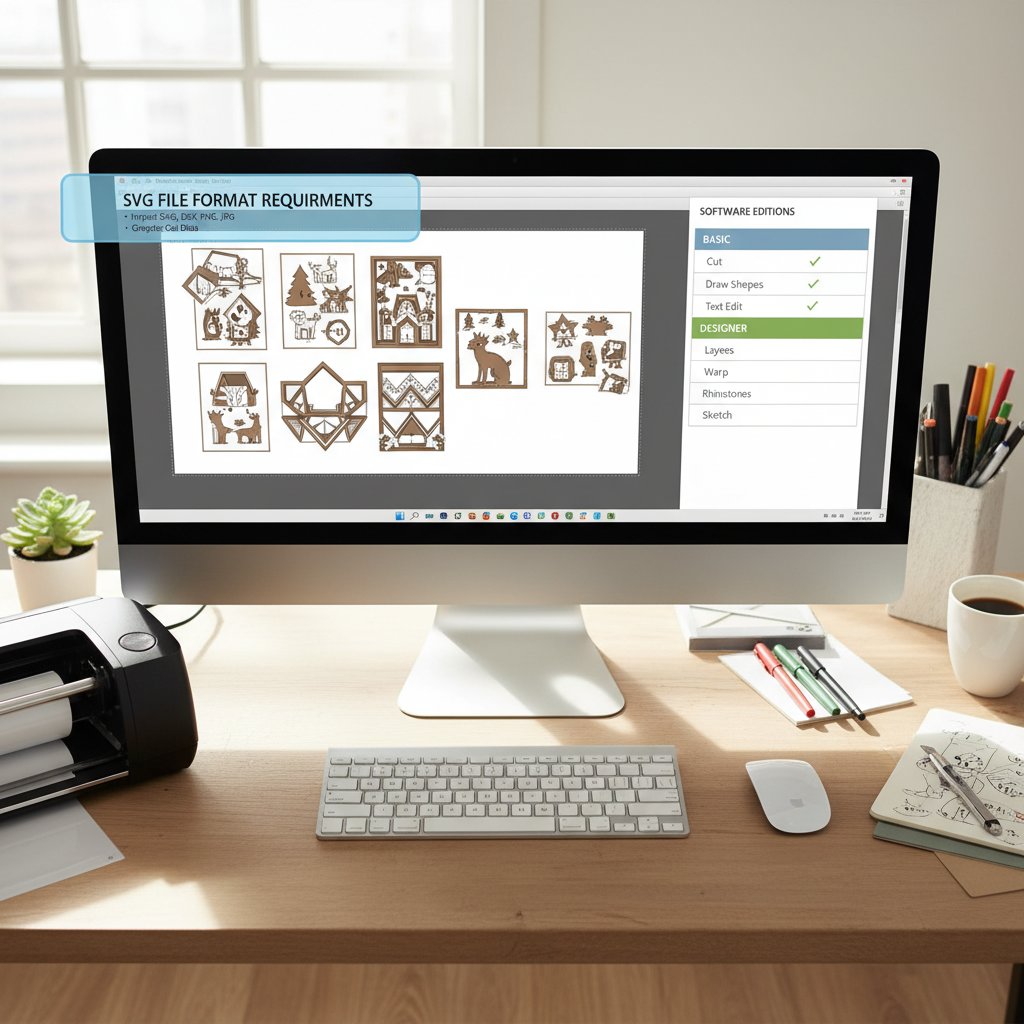
Step-by-Step: Importing Shadow Box SVG Files

Step-by-step process showing hands importing SVG file into Silhouette Studio with File menu and multi-layer design visible

With your software configured and files extracted, you're ready to import your shadow box design.

This method opens the SVG directly onto your workspace, perfect for immediate cutting preparation.

Step 1: In Silhouette Studio, click File in the top menu

Step 2: Select Open (or use keyboard shortcut: Ctrl+O on Windows, Cmd+O on Mac)

Step 3: Navigate to the folder where you extracted your shadow box SVG file

Step 4: Select your SVG file from the list (you may need to change the file type filter to "SVG files" if you don't see it)

Step 5: Click Open or double-click the filename

Your shadow box design appears on the canvas, typically as a grouped object containing all layers. The position should be centered if you configured import settings correctly.

Method 2: Import to Library (Best for Templates You'll Use Repeatedly)

This method permanently adds the SVG to your Silhouette Studio library, making it easy to reuse without navigating to file locations each time.

Step 1: Click File > Library > Import to Library

Step 2: Navigate to your extracted shadow box SVG file

Step 3: Select the file and click Open

Step 4: Silhouette Studio imports the file to your library. Access it anytime by clicking the Library icon in the left panel and browsing to the imported design

When to use this method: If you plan to create multiple versions of the same shadow box (different colors, sizes, or as gifts), importing to your library saves time. For one-time projects, Method 1 (File > Open) is quicker.

Method 3: Drag and Drop

For users comfortable with file management, drag-and-drop offers the fastest import.

Step 1: Open your file browser (File Explorer on Windows, Finder on Mac) and navigate to your extracted SVG file

Step 2: Resize your file browser window so you can see both it and Silhouette Studio simultaneously

Step 3: Click and hold the SVG file, then drag it onto the Silhouette Studio workspace

Step 4: Release the mouse button to drop the file

The design imports instantly to wherever you dropped it on the canvas.

Note: Drag-and-drop imports to the workspace only, not to the library. Use Method 2 if you want library storage.

Working with Imported Multi-Layer Designs

After importing, you need to prepare the multi-layer design for cutting by ungrouping layers and organizing them for efficient workflow.

Ungrouping Layers

Shadow box SVGs import as grouped objects, meaning all layers are connected and move together as one unit. You need to ungroup them to select, resize, and cut individual layers.

Step 1: Click on the imported design to select it. You should see selection handles (small squares) around the entire design perimeter.

Step 2: Right-click on the design and select Ungroup from the context menu

Step 3: Check if layers separated. Click elsewhere on the canvas to deselect, then try clicking individual elements. If they still move together as one unit, you need to ungroup again.

Step 4: Repeat ungrouping (right-click > Ungroup) multiple times if necessary. Some complex shadow box designs nest groups within groups, requiring 3-4 ungrouping actions before all layers separate.

How to know when you're done ungrouping: You should be able to click and select individual layers separately. Each layer should have its own selection handles when clicked.

Identifying and Labeling Layers

Once ungrouped, you need to identify which layer is which, especially if the designer didn't include layer numbers in the design itself.

Check for layer numbers: Many shadow box templates include small numbers embedded in each layer (usually in a corner or outside the frame boundary). These numbers indicate cutting and assembly order.

If no numbers are visible:

  1. Refer to the assembly instructions PDF that came with your template (quality templates always include this)
  2. Look at preview images showing what each layer looks like
  3. Match the design elements you see on screen with the preview images

Label layers in Silhouette Studio for organization:

  1. Select a layer
  2. Right-click and choose Object Name (in some versions, this is under Modify > Object Name)
  3. Type a descriptive name like "Layer 1 - Front" or "Layer 8 - Back"
  4. Repeat for all layers

Named layers appear in the Objects panel (if visible) and make it easier to find specific layers when you have many elements on your canvas.

Organizing Layers on Your Canvas

With layers ungrouped and identified, organize them on your workspace for efficient cutting.

Strategy 1: Vertical Stack (Best for small designs)
Arrange layers vertically on the canvas with Layer 1 at top, Layer 2 below it, and so on. This creates a clear visual reference showing all layers at once.

Strategy 2: Cut One at a Time (Best for large designs)
Keep all layers grouped on the canvas. When ready to cut, select just the layer you need, cut it, then move it off the canvas or hide it before selecting the next layer. This prevents workspace clutter.

Strategy 3: Separate Artboards (Advanced users)
Use Silhouette Studio's multi-page feature to place each layer on a separate page/artboard. This keeps everything organized but requires more navigation during cutting.

Spacing tip: If arranging multiple layers on one canvas page, leave at least 1 inch of space between layers to prevent accidental selection of wrong layers when clicking.

Preparing Layers for Cutting

Before sending your shadow box layers to cut, verify settings and make essential adjustments.

Checking and Adjusting Line Thickness

Many SVG files import with a line thickness setting that can cause cutting issues.

Check line thickness:

  1. Select a layer
  2. Look at the Line Style panel (usually on the right side of the screen)
  3. Check the thickness value

If thickness is set to 1.0 or higher: Change it to 0.0. A thickness greater than zero tells Silhouette to cut on both sides of a thin line, creating double cuts that waste time and may cause paper tearing.

Set to 0.0 for all layers before cutting to ensure single, clean cut lines exactly where your design intends.

Verifying Cut Lines Are Active

SVG files import without visible cut lines by default in Silhouette Studio. You need to activate cut lines before sending to your machine.

Step 1: Select the layer you want to cut

Step 2: Open the Send panel (click the Send icon in the upper-right corner)

Step 3: In the Send panel's workspace preview at top, select your design

Step 4: In the Action dropdown on the right (within the Send panel), choose Cut or Cut Edge depending on your project needs

  • Cut: Cuts both the outer boundary and internal cutout shapes
  • Cut Edge: Cuts only the outer boundary (rarely used for shadow boxes)

Step 5: Verify cut lines appear as red (default) or your chosen cut line color around your design

Repeat for each layer before cutting, or select all layers simultaneously (Ctrl+A / Cmd+A) and apply cut action to all at once.

Resizing for Your Frame (If Needed)

If your shadow box template wasn't designed for your specific frame size, you'll need to resize. This is covered in detail in our complete resizing guide, but here are the critical rules:

Critical Rule: Select all layers together before resizing. Never resize individual layers or they won't align during assembly.

To resize all layers together:

  1. Before ungrouping, resize the grouped design (easiest method)
  2. If already ungrouped: Select all layers by clicking and dragging across entire design, or Ctrl+A / Cmd+A
  3. Make sure the lock icon in the Scale panel is locked (this maintains proportions)
  4. Enter your desired width or height; the other dimension adjusts automatically
  5. Verify the size fits your frame with adequate clearance (0.25-0.5 inches on all sides)

Test before cutting all layers: After resizing, cut just Layer 1 on regular printer paper. Hold it up to your frame to verify sizing is correct before cutting expensive cardstock.

Troubleshooting Common Import Issues

Even with proper preparation, you may encounter import problems. Here's how to solve the most common issues.

SVG Won't Import or Appears Blank

Cause 1: You're using Basic Edition

  • Solution: Upgrade to Designer Edition, or check if your template includes DXF format files that work with Basic Edition

Cause 2: File corruption or incomplete download

  • Solution: Re-download the SVG file from the original source. Delete the corrupted file first to avoid confusion.

Cause 3: Design imported off-canvas

  • Solution: Use View > Fit to Page (or Ctrl+0 / Cmd+0) to zoom out and reveal designs that imported outside the visible canvas area. This is why configuring import settings to center designs is crucial.

Cause 4: Incompatible SVG format

  • Solution: Some very old or specialized SVG files use non-standard formatting. Try importing as DXF instead (many designers include both formats), or contact the template designer for support.

Layers Won't Ungroup or Separate

Cause: Layers are welded or merged rather than grouped

  • Solution: Some designers accidentally weld layers together into a single object instead of grouping them. This makes separation impossible. Contact the designer for a corrected file—this is a design error, not a user error.

Partial separation: If some layers ungroup but others remain stuck together, continue right-clicking and ungrouping the remaining grouped portions multiple times until fully separated.

Design Appears Distorted or Stretched

Cause: Aspect ratio lock was unlocked during resizing

  • Solution: Undo the resize (Ctrl+Z / Cmd+Z), re-import the original file, and resize again with the lock icon engaged

Cause: Design was resized in sections rather than all at once

  • Solution: Undo all resizing, re-import, select all layers together, and resize proportionally as one unit

Cut Lines Don't Appear

Cause: Cut action not applied in Send panel

  • Solution: Follow the "Verifying Cut Lines Are Active" steps above to apply the Cut action to your selected layers

Cause: Line thickness set too thin or design is off-screen

  • Solution: Adjust line thickness to at least 0.001 if you can't see lines at 0.0 (visual only—doesn't affect cutting), or zoom and pan to find off-screen designs

File Imports But Looks Different Than Preview

Cause: Fonts or special effects weren't converted to paths

  • Solution: Professional shadow box templates should have all text and effects converted to vector paths before distribution. If text appears as boxes or is missing, contact the designer—this indicates the file wasn't properly prepared for distribution.

Converting Between SVG and DXF Formats

If you have SVG files but need DXF format (or vice versa), Silhouette Studio Designer Edition can convert between formats.

Converting SVG to DXF

This is useful if you want to share a design with someone using Basic Edition.

Step 1: Import your SVG file using any method above

Step 2: If the design is multi-layered, separate overlapping layers by moving them apart on the canvas. Overlapping elements can cause issues in DXF format.

Step 3: Click File > Save As

Step 4: In the "Save as type" dropdown, select DXF

Step 5: Choose a save location and filename

Step 6: Click Save

Important: If your shadow box has overlapping layers in the same position (which most do), move them apart before saving as DXF, then include instructions for the recipient to reposition them.

Opening DXF Files in Silhouette Studio

DXF files work in all Silhouette Studio versions, including Basic Edition.

Step 1: Click File > Open

Step 2: Navigate to your DXF file

Step 3: Change the file type filter to DXF files if you don't see your file listed

Step 4: Select the file and click Open

DXF files import and work exactly like SVGs once opened. Follow all the same ungrouping, organization, and cutting preparation steps.

Best Practices for Shadow Box SVG Workflow

Develop these habits to streamline your shadow box creation process and avoid frustration.

File Organization Best Practices

Keep original files untouched: Never modify and save over your original downloaded SVG files. Always use "Save As" to create project-specific copies. This preserves the original in case you make mistakes and need to start over.

Name files descriptively: Instead of "shadowbox_final_v2.studio3", use names like "Christmas Cardinal 8x10 White Cardstock 2025-12-11.studio3" that tell you exactly what the file contains and when you worked on it.

Maintain template folders: Keep purchased or downloaded templates in their original folders with included PDFs, preview images, and instructions. Create separate "Projects in Progress" and "Completed Projects" folders for your working files.

Testing Before Committing to Expensive Materials

Always test cut Layer 1 on regular printer paper before cutting all layers on premium cardstock. This verifies:

  • Sizing is correct for your frame
  • Cut settings are appropriate
  • Design is positioned correctly on your mat
  • Intricate details cut cleanly

A 5-minute test cut can save you from wasting $10+ in cardstock on improperly sized layers.

Saving Your Work Incrementally

Silhouette Studio can crash or freeze, especially when working with complex multi-layer shadow box files. Protect your work:

Save immediately after importing and ungrouping (File > Save As)

Save again after resizing or making significant changes

Use incremental filenames: ProjectName_v1.studio3, ProjectName_v2.studio3, etc. This allows you to revert to earlier versions if needed without losing all progress.

Conclusion

Importing multi-layer shadow box SVGs into Silhouette Studio becomes straightforward once you understand the software requirements, configure import settings correctly, and develop an organized workflow. Whether you're working with free templates or premium shadow box designs, the import process follows the same fundamental steps: extract files, configure import settings, import using your preferred method, ungroup layers, organize for cutting, and verify settings before cutting.

Remember that Designer Edition is required for SVG import, but DXF files work in Basic Edition if your template includes them. Most import frustrations stem from working with compressed files, importing with unconfigured settings, or forgetting to ungroup layers before attempting to cut.

With your SVG successfully imported and layers properly organized, you're ready to move forward with cutting, assembly, and bringing your layered paper cut shadow box to life. Take your time with the import and preparation process—getting these foundational steps right ensures a smooth cutting and assembly experience for the rest of your project.

For the complete shadow box creation process from start to finish, see our beginner's guide to making layered paper cut shadow boxes.