Articles14 min read

DIY Paper Wall Art: 25 Creative Projects for Every Room

Your room-by-room guide to creating DIY paper wall art ideas for living room spaces, bedrooms, nurseries, and more — with difficulty ratings, materials lists, and cost breakdowns.

DIY Paper Wall Art: 25 Creative Projects for Every Room

Blank walls stare back at you every day, and store-bought art eats into your budget fast — $40 to $200 per piece at most home decor retailers. Paper wall art is the antidote: affordable, customizable, and genuinely beautiful when done right. I have spent the last three years building layered paper shadow boxes, rolled flower installations, and geometric wall pieces for my own home and for friends, and I have learned exactly which projects deliver gallery-quality results on a craft-store budget.

This guide walks you through 25 distinct paper wall art projects organized room by room, each with a difficulty rating, materials list, estimated cost, and enough hands-on detail to start tonight. Whether you want a living room statement piece, a calming bedroom accent, or a whimsical nursery mobile, you will find it here.

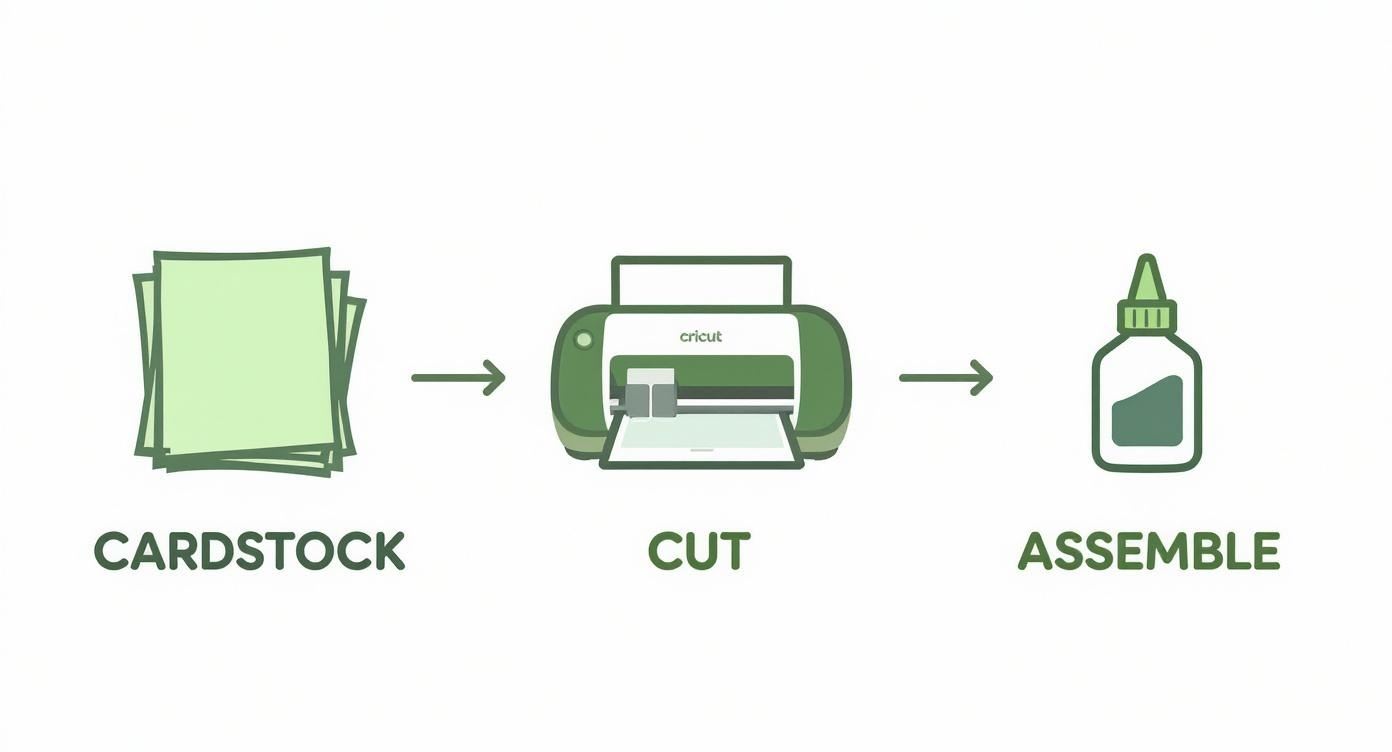
Three forces are driving the paper wall art surge. First, the cost of professionally framed art has risen steadily — a medium framed print at West Elm or CB2 now averages $120, up from $80 five years ago. Second, the Cricut and Silhouette cutting machine community has exploded past 15 million active users, making intricate paper cuts accessible to anyone. Third, the sustainability movement has pushed decorators toward renewable, recyclable materials — and paper is both.

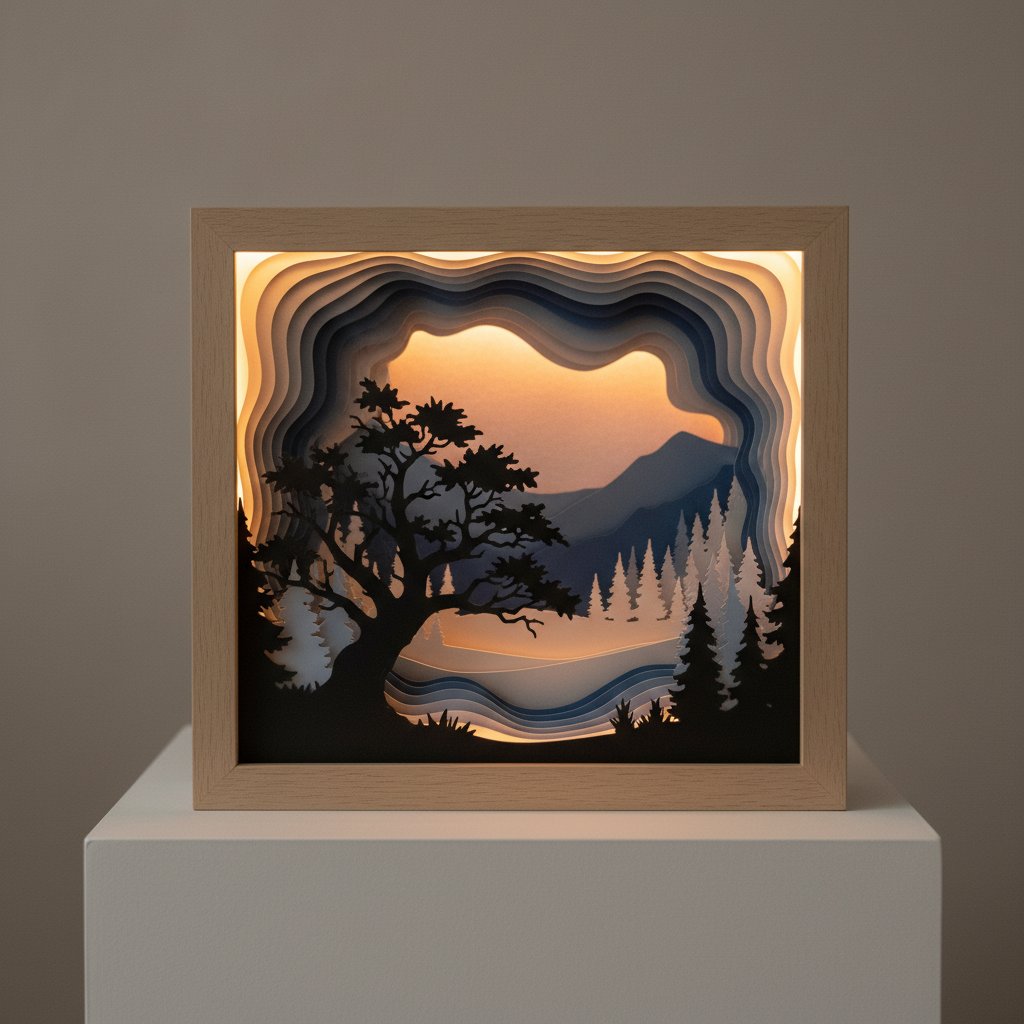
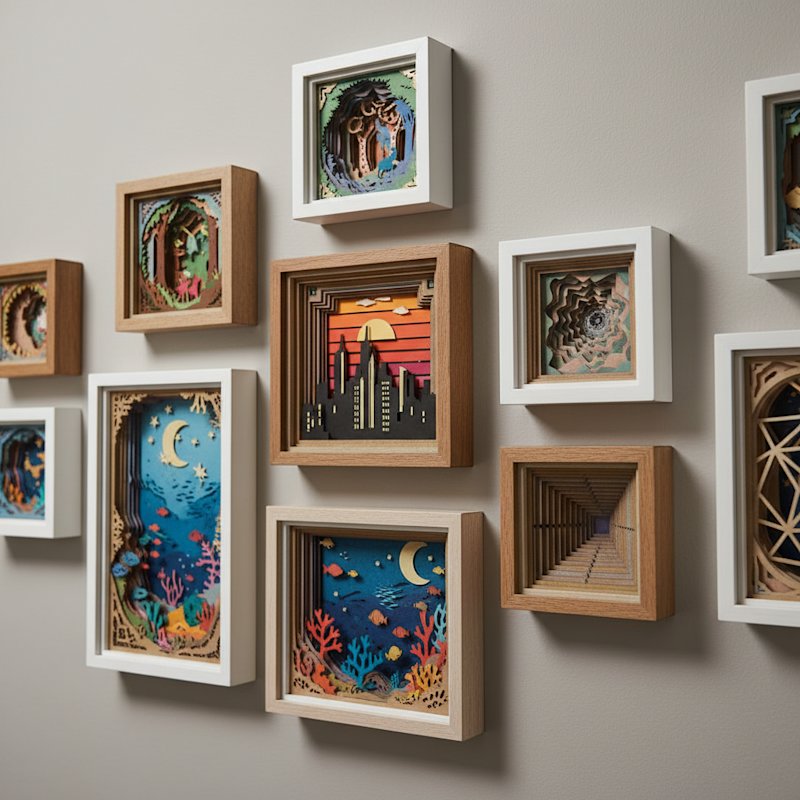
The result is a decor category that combines affordability with genuine artistic expression. A layered paper shadow box that costs $12 in materials can rival a $150 store-bought piece when you use quality cardstock and a clean frame. The projects below prove it.

Living Room: Layered Geometric Paper Art

The living room is your home's most visible space, so it deserves a statement piece. These three projects deliver maximum impact.

Project 1: Layered Geometric Shadow Box

Difficulty: Intermediate | Cost: $12–$18 | Time: 3–4 hours

Cut the same geometric pattern (triangles, hexagons, or abstract waves) from 5–7 sheets of cardstock in graduated colors — dark navy to pale blue, for instance. Stack each layer with ¼-inch foam spacers inside a deep shadow box frame. The depth creates a 3D effect that shifts as you walk past it.

Materials: 5–7 sheets 80 lb cardstock, foam mounting tape, 9×9 or 12×12 shadow box frame, craft knife or Cricut, metal ruler.

I built a seven-layer ocean-gradient version for my own living room using navy, royal blue, medium blue, sky blue, pale blue, white, and silver. The total material cost was $14. It hangs next to my sofa and every visitor asks where I bought it.

Layered paper cut shadow box nature scene with tree silhouettes showing dramatic depth through multiple layers

For detailed layer assembly techniques, see our shadow box assembly guide with spacers and alignment tips.

Project 2: Large-Scale Rolled Paper Flower Installation

Difficulty: Intermediate | Cost: $15–$25 | Time: 4–5 hours

Create 8–12 large paper flowers (8–12 inches each) using the spiral-cut technique. Roll each spiral from the outer edge inward, curling petals with a pencil as you go. Mount directly on the wall in a cluster above the sofa or fireplace.

Materials: 12×12 cardstock sheets (6–8 per flower), hot glue gun, pencil for petal curling, Command strips for wall mounting.

For flower SVG templates that work perfectly with a Cricut, browse our flower SVG templates collection.

Project 3: Typography Quote with Papercut Letters

Difficulty: Easy | Cost: $8–$12 | Time: 1–2 hours

Design a favorite quote in a large serif font. Cut each letter from black cardstock using a craft knife or cutting machine. Mount on white or kraft-colored cardstock and frame. The contrast is striking and works with any decor style.

Materials: Black cardstock (80–110 lb), white background cardstock, craft knife or Cricut, frame.

Layered Shadow Box Templates for Your Living Room Statement Piece
Skip the design phase — these ready-to-cut SVG templates give you professional layered depth in a single afternoon. Each includes all layers, spacing guidance, and works with standard 65-80 lb cardstock.

Bedroom: Botanical Paper Wall Hangings

Bedrooms call for calm, soft designs that create a restful atmosphere. These three projects lean into botanical themes and neutral tones.

Project 4: Papercut Botanical Prints

Difficulty: Intermediate | Cost: $8–$15 | Time: 2–3 hours per print

Cut leaf and fern silhouettes from green cardstock using a craft knife. Mount on white cardstock and frame. The negative space creates a delicate, lace-like quality. For a cohesive look, create a set of three with different botanical shapes — monstera leaf, fern frond, and eucalyptus sprig.

Materials: Green cardstock (2–3 shades), white cardstock backing, craft knife, cutting mat, 3 matching frames.

Project 5: Paper Feather Garland

Difficulty: Easy | Cost: $5–$8 | Time: 1–1.5 hours

Cut feather shapes from white, cream, and gold cardstock. Score a center line and snip the edges to create a fringed texture. String onto twine or thin ribbon and drape above the headboard. The gentle movement when the window is open adds life to the room.

Materials: White, cream, and gold cardstock, scissors, twine, washi tape for hanging.

Project 6: Ombre Paper Circle Backdrop

Difficulty: Easy | Cost: $8–$10 | Time: 1.5–2 hours

Punch or cut circles in 4–5 shades of a single color. Arrange in a gradient on a foam board — lightest at the top, darkest at the bottom. Frame or mount directly behind the bed as a headboard alternative.

Materials: Cardstock in 4–5 shades, circle punch (2-inch), foam board, double-sided tape.

Nursery and Kids Room: Paper Animal Wall Art

Playful, colorful, and designed to grow with the child. These three projects are crowd-pleasers.

Project 7: 3D Paper Butterfly Swarm

Difficulty: Intermediate | Cost: $10–$15 | Time: 3–4 hours

Cut 30–50 butterfly shapes from cardstock in various sizes (2–5 inches). Fold each along the center body line to create dimension. Mount on the wall in a swirling pattern using foam mounting squares — as if a flock of butterflies is migrating across the room.

Materials: Colored cardstock (3–4 colors), butterfly template or SVG, foam mounting squares, scissors or Cricut.

Project 8: Origami Crane Mobile

Difficulty: Intermediate | Cost: $8–$12 | Time: 2–3 hours

Fold 20–30 origami cranes from patterned paper. Thread onto clear fishing line at varying lengths. Suspend from a wooden dowel or driftwood branch mounted on the wall. This doubles as wall art and a gentle mobile.

Materials: Origami paper (6-inch squares), fishing line, wooden dowel or driftwood, wall hooks.

Difficulty: Easy | Cost: $10–$15 | Time: 1–2 hours

Cut animal silhouettes (elephant, giraffe, whale, fox) from colored cardstock. Mount each on a coordinating background and frame in matching white frames. Arrange as a gallery wall. Kids love pointing out the animals, and the clean design looks sophisticated enough for parents too.

Materials: Cardstock (multiple colors), white cardstock backing, animal silhouette templates, 4–6 matching frames.

Three-step Cricut crafting process showing cardstock being cut with Cricut machine then assembled with glue

Animal Silhouette Templates Kids Will Love
These papercut animal designs double as nursery art and kids room decor. Cut them on your Cricut, frame in a shadow box, and watch their faces light up.

Home Office: Minimalist Origami Wall Sculptures

A home office needs visual interest without distraction. Geometric and monochromatic paper art fits perfectly.

Project 10: Geometric Paper Sculpture

Difficulty: Advanced | Cost: $12–$18 | Time: 6–8 hours

Design a geometric form (icosahedron, dodecahedron, or abstract faceted shape) from white or metallic cardstock using tab-and-slot construction. Mount directly on the wall. The interplay of light and shadow across the faceted surface creates a striking focal point.

Materials: White or metallic cardstock (110 lb), craft knife, scoring tool, glue, wall-mount adhesive.

Various beginner-friendly paper cut shadow box design templates displayed on a craft table showing simple floral and geometric patterns

Project 11: Paper Weaving Wall Hanging

Difficulty: Intermediate | Cost: $6–$10 | Time: 3–4 hours

Cut strips of cardstock in two contrasting colors. Weave them into a checkerboard, herringbone, or freeform pattern. Mount on a board and add a wooden dowel at the top for a tapestry-like presentation.

Materials: Cardstock in 2 colors (12×12 sheets), craft knife, cutting mat, foam board, wooden dowel.

Project 12: Tessellated Paper Mosaic

Difficulty: Advanced | Cost: $15–$25 | Time: 10–12 hours

Cut cardstock into uniform small squares (1 inch) or hexagons. Arrange in a mosaic pattern on a large board — an abstract landscape, pixel art design, or geometric gradient. Fill gaps between pieces with gold or black acrylic paint for a polished, grouted look.

Materials: Colored cardstock (multiple shades), foam board, craft knife, gold or black acrylic paint, small brush.

Entryway: Paper Flower Wreaths and Monograms

The entryway sets the tone for your entire home. These projects make a strong first impression.

Project 13: Paper Flower Wreath

Difficulty: Intermediate | Cost: $12–$18 | Time: 3–4 hours

Create 15–20 medium paper flowers using the spiral-cut technique or petal-layering method. Attach to a wreath form (straw, foam, or wire) with hot glue. Add leaves cut from green cardstock. Hang on the door or above a console table.

Materials: Cardstock in 2–3 flower colors, green cardstock for leaves, wreath form, hot glue gun, ribbon for hanging.

Project 14: Rolled Paper Monogram

Difficulty: Easy | Cost: $8–$12 | Time: 2–3 hours

Print or draw a large letter on cardstock. Fill the letter shape with tightly rolled paper coils in varying sizes and colors. Frame in a shadow box for a dimensional monogram that welcomes guests with personality.

Materials: Cardstock (multiple colors), quilling tool or toothpick, glue, shadow box frame, printed letter template.

Project 15: Book Page Canvas Art

Difficulty: Easy | Cost: $5–$8 | Time: 40 minutes

Mod Podge pages from an old book, sheet music, or dictionary onto a canvas panel. Layer a paper-cut silhouette on top in contrasting black cardstock — a house shape works beautifully for an entryway. Seal with another coat of Mod Podge.

Materials: Old book pages, canvas panel, Mod Podge, black cardstock, craft knife.

Bathroom: Waterproof Paper Art Solutions

Bathrooms are humid environments, but paper art can work here with the right approach: sealed frames and moisture-resistant finishes.

Project 16: Sealed Papercut in a Waterproof Frame

Difficulty: Intermediate | Cost: $10–$15 | Time: 2–3 hours

Create a papercut design (abstract waves, koi fish, or botanical). Spray both sides with a clear acrylic sealer (matte or gloss). Frame behind glass in a frame with a tight seal. The sealer protects the paper, and the glass keeps humidity out.

Materials: Cardstock, craft knife, clear acrylic sealer spray, frame with glass.

Project 17: Laminated Paper Art Prints

Difficulty: Easy | Cost: $5–$10 | Time: 30 minutes

Print or create paper art designs. Laminate at a copy shop or with a home laminator. Mount with Command strips. Lamination makes the paper completely waterproof while preserving the colors.

Materials: Printed or handmade paper art, lamination service or laminator, Command strips.

Materials Guide: Cardstock, Crepe Paper, Tissue, Kraft Paper

Choosing the right paper is half the battle. Here is what to use for each project type:

Paper TypeWeightBest ForPrice Range
Cardstock (65 lb)Light-mediumFlat art, backing layers, silhouettes$6–$10 / 50 sheets
Cardstock (80 lb)MediumMost projects — layered cuts, flowers, weaving$8–$12 / 50 sheets
Cardstock (110 lb)Heavy3D sculptures, tab-and-slot construction, quilling$10–$15 / 50 sheets
Crepe paper (Italian)StretchRealistic flowers, organic shapes$8–$12 / roll
Tissue paperVery lightPom-poms, textured backgrounds, kids projects$2–$4 / pack
Kraft paperMediumRustic aesthetics, backing, garlands$4–$8 / roll
Metallic cardstockMedium-heavyAccent pieces, sculptures, holiday decor$10–$15 / 25 sheets

My recommendation: Start with a 50-sheet pack of 80 lb white cardstock and a 50-sheet assorted color pack. That covers 90% of the projects in this guide for under $25 total.

Tools You Need (and What to Skip)

Essential Tools

  • Craft knife (X-Acto style): $6–$10. The single most important tool. Change blades frequently — a dull blade tears cardstock.
  • Self-healing cutting mat (12×18): $8–$12. Protects your table and extends blade life.
  • Metal ruler (18-inch): $5. For straight cuts. Plastic rulers get sliced up fast.
  • Cutting machine (Cricut Maker or Explore): $180–$300. Not required, but it transforms 6-hour hand-cutting sessions into 30-minute machine cuts. For intricate layered designs, it is a game-changer. For beginner shadow box projects, a Cricut saves significant time.
  • Hot glue gun: $8–$12. For 3D projects, wreaths, and dimensional pieces.
  • Bone folder or scoring tool: $4–$6. Clean folds make a huge difference in finished quality.

What to Skip

  • Paper trimmer / guillotine cutter: Nice for straight edges, but a craft knife and ruler do the same job. Skip unless you cut high volumes.
  • Die-cut machine (manual): Electric cutting machines have made manual die-cutters obsolete for paper art.
  • Expensive specialty glue: Standard acid-free glue stick and hot glue cover 95% of projects. Skip archival spray adhesives and specialty craft glues until you are doing advanced work.

How to Hang Paper Art Without Nails or Damage

Renters and anyone who avoids wall damage have excellent options:

Command strips (3M): The gold standard. Use medium strips for framed pieces under 3 lbs, large strips for heavier shadow boxes. Press firmly for 30 seconds, wait 1 hour before hanging. Clean the wall with rubbing alcohol first for best adhesion.

Washi tape borders: For lightweight flat paper art (unframed), use decorative washi tape to create a "frame" directly on the wall. Holds up to 6 months without residue and adds a decorative border.

Poster putty / museum wax: Best for small, lightweight pieces. A small ball on each corner holds flat paper art securely and removes cleanly.

Tension rods: For paper garlands and hanging pieces, mount a tension rod inside the window frame or between two walls and hang art from it with fishing line or ribbon.

Velcro dots: Good for 3D pieces that you might want to rotate seasonally. One side on the art, one on the wall. Swap pieces without removing the wall-side dots.

Pro tip: Always test your hanging method with a piece of scrap cardboard the same weight as your art before committing. Better to have a cardboard square fall than your finished piece.

Cost Breakdown: Budget vs Premium Paper Art Projects

ProjectBudget MaterialsPremium MaterialsStore-Bought Equivalent
Gallery wall (5 pieces)$15–$25$40–$60$200–$500
Layered shadow box$10–$15$25–$35$100–$250
Large flower installation$12–$18$30–$45$80–$200
Botanical print set (3)$10–$15$20–$30$75–$200
Origami mobile$6–$10$15–$20$40–$100
Geometric sculpture$10–$15$25–$40$120–$300

Budget tier: Basic cardstock, thrift store frames, hand-cutting with a craft knife.
Premium tier: Specialty cardstock (metallic, textured), new shadow box frames, Cricut-cut precision pieces.

The savings range from 75% to 95% compared to store-bought equivalents. Even the premium DIY path costs a fraction of retail.

More Paper Wall Art Projects to Try

Need more inspiration? Here are 8 additional projects, condensed:

18. Geometric paper triangles collage (Easy, $5, 30 min) — Cut uniform triangles, arrange in honeycomb or scatter on dark backing, frame.

19. Washi tape geometric patterns (Easy, $8, 20 min) — Apply washi tape directly to a canvas panel in chevrons, diamonds, or stripes. Repositionable until perfect.

20. Watercolor paper abstracts (Easy, $12, 1 hr + dry time) — Paint watercolor washes on watercolor paper, cut into squares, frame individually.

21. Folded paper fan wall (Intermediate, $10, 2 hrs) — Fold patterned paper into accordion fans, arrange in a semi-circle on the wall.

22. Marbled paper framed art (Easy, $6, 1 hr + dry time) — Marble paper with shaving cream and food coloring. Each piece is one-of-a-kind.

23. Paper quilled heart or star (Intermediate, $8, 2–3 hrs) — Roll narrow paper strips into coils and shapes, fill a heart or star form, frame in shadow box.

24. Kirigami pop-up frame (Advanced, $10, 8–10 hrs) — Design a pop-up scene that unfolds when the frame opens. Cityscape, garden, or forest themes.

25. Collaged paper landscape (Intermediate, $8, 4–6 hrs) — Tear (not cut) colored paper, book pages, and magazine images into landscape shapes. Layer on canvas for an organic, painterly quality.

Seasonal Shadow Box Templates for Year-Round Paper Art
Build a rotating collection of paper wall art — from spring florals to winter wonderlands. Each template costs less than a greeting card and produces gallery-quality results.

Frequently Asked Questions

What is the easiest paper wall art to make?

Framed scrapbook paper is the absolute easiest. Pick 3–5 sheets of coordinating scrapbook paper, frame them in matching frames, and hang as a gallery wall. Total time: 30 minutes. Total cost: under $20. Zero cutting skills required, and the result looks polished and intentional.

How do you make 3D paper wall art?

Roll or fold paper into dimensional shapes — flowers, butterflies, geometric forms. Attach to a canvas, foam board, or directly to the wall using hot glue for heavy 3D elements and foam mounting tape for lighter ones. Layer shapes at different depths for visual richness. Shadow box frames are the best way to present 3D paper art professionally. For step-by-step shadow box techniques, see our mastering the shadow box SVG guide.

Can paper wall art look expensive?

Absolutely. The key is using quality materials and making deliberate design choices. Heavy cardstock (80 lb+) holds its shape and looks substantial. Professional framing — especially shadow boxes with clean mats — elevates any paper piece. Stick to a refined color palette: neutrals, metallics, or a single accent color. Layered paper cuts, framed botanicals, and geometric designs all achieve a gallery-quality look for under $25 in materials.

What paper is best for wall art?

80 lb cardstock is the best all-around choice. It is thick enough to hold its shape, easy to cut, and available in hundreds of colors. For 3D sculptures, step up to 110 lb. For realistic flowers, use Italian crepe paper which stretches to mimic petal curves.

How long does paper wall art last?

Properly framed paper art lasts 5–10 years without noticeable fading. Unframed pieces exposed to sunlight fade faster — 1–3 years in direct sun. Keep paper art away from humid areas (unless sealed), and use UV-protective glass in frames for longevity.