Articles11 min read

Paper Mosaic Art for Beginners — Complete Step-by-Step Guide

Your complete guide to paper mosaic art for beginners.

Paper Mosaic Art for Beginners — Complete Step-by-Step Guide

Paper mosaic art for beginners is one of the most forgiving, budget-friendly crafts you can start today — and you probably already have everything you need. When I made my first paper mosaic coaster from leftover cardstock scraps, I was shocked at how a handful of torn paper pieces could create something that looked like real tilework.
Colorful paper mosaic pieces arranged in shadow box

Unlike traditional tile mosaics that require grout, nippers, and a hefty budget, paper mosaics let you experiment freely. Tear a piece wrong? Grab another scrap. Don't like the colour combo? Rearrange before you glue. This guide walks you through everything: materials, five core techniques, a complete first project, and eight ideas you can tackle this weekend.
Paper art assembly tools and adhesive on craft mat

What Is Paper Mosaic Art?

Paper mosaic art is the practice of arranging small pieces of paper — torn, cut, or punched — into patterns or images, mimicking the look of traditional stone or glass mosaics. The technique dates back centuries, but modern crafters have made it accessible with everyday materials.

Why Paper Mosaics Are Perfect for Adult Crafters

If you enjoy art journaling, paper mosaics are a natural next step. They combine colour theory, composition, and tactile satisfaction without expensive tools. Here's what makes them ideal for beginners:

  • Zero special equipment — scissors, paper, and glue are enough to start
  • Built from recycled materials — old magazines, junk mail, wrapping paper, and cardstock scraps all work
  • Instant gratification — a small coaster-sized mosaic takes 30–60 minutes
  • Forgiving by nature — irregular pieces are part of the charm, not a flaw
  • Highly meditative — the repetitive placing of pieces is genuinely relaxing

I tested this with a group of six complete beginners at a community craft night. Every person finished a 4×4-inch mosaic tile within 90 minutes, and four of them immediately started a second one. The barrier to entry is genuinely that low.

Materials You Need

Paper Sources

The beauty of paper mosaics is that almost any paper works. Here's what I've tested, ranked by ease of use:

Paper TypeBest ForDifficulty
Cardstock (65–110 lb)Clean tiles, geometric patternsEasy
MagazinesColour gradients, abstract artEasy
Wrapping paperLarge areas, bold coloursEasy
Junk mail / flyersPractice pieces, experimentsEasy
Construction paperKids' projects, bold shapesEasy
Tissue paperTranslucent layering effectsMedium
Scrapbook paperThemed mosaics, patterned tilesEasy
Old book pagesVintage aesthetic, neutral tonesEasy

My recommendation for your first project: Use 2–3 sheets of coloured cardstock. It holds its shape when glued, cuts cleanly, and produces consistent "tile" pieces that are satisfying to arrange.

Bases and Surfaces

  • Canvas board (8×8 or 8×10) — rigid, easy to hang, available at any craft store
  • MDF coasters (4×4 inch) — perfect for small first projects and gifts
  • Wooden plaques — smooth birch plywood works beautifully
  • Heavy cardboard — free option, great for practice
  • MDF letters — spell out a name or word for wall art

Adhesives

  • Mod Podge (matte) — my go-to. Decoupage and sealant in one, dries clear
  • PVA craft glue — cheaper alternative, slightly more visible when dry
  • Double-sided tape — for paper-to-paper mosaics where you want zero drying time
  • Glue stick — works for lightweight paper (magazine, tissue), not cardstock

Sealants and Finishes

  • Mod Podge (gloss) — top coat for a shiny, polished look
  • Acrylic sealer spray — quick, even coverage, no brush marks
  • Decoupage varnish — more durable than Mod Podge for items that get handled (coasters, trays)

Basic Tools

  • Scissors (any craft scissors work)
  • Ruler and pencil (for grid-based patterns)
  • Tweezers (optional but helpful for small pieces)
  • Small brush for glue application

5 Core Paper Mosaic Techniques

1. Torn Paper Mosaic

Tear paper into irregular pieces by hand. No scissors needed.

How it works: Hold the paper with both hands about 1 inch apart and pull. Cardstock tears with a fuzzy, organic edge. Magazine paper tears more cleanly.

Best for: Landscapes, abstract colour fields, impressionist-style art where the irregular shapes are the point.

My tip: Tear with the grain of the paper for straighter edges, against the grain for rougher, more textured edges. Test on a scrap first — different cardstocks behave very differently.
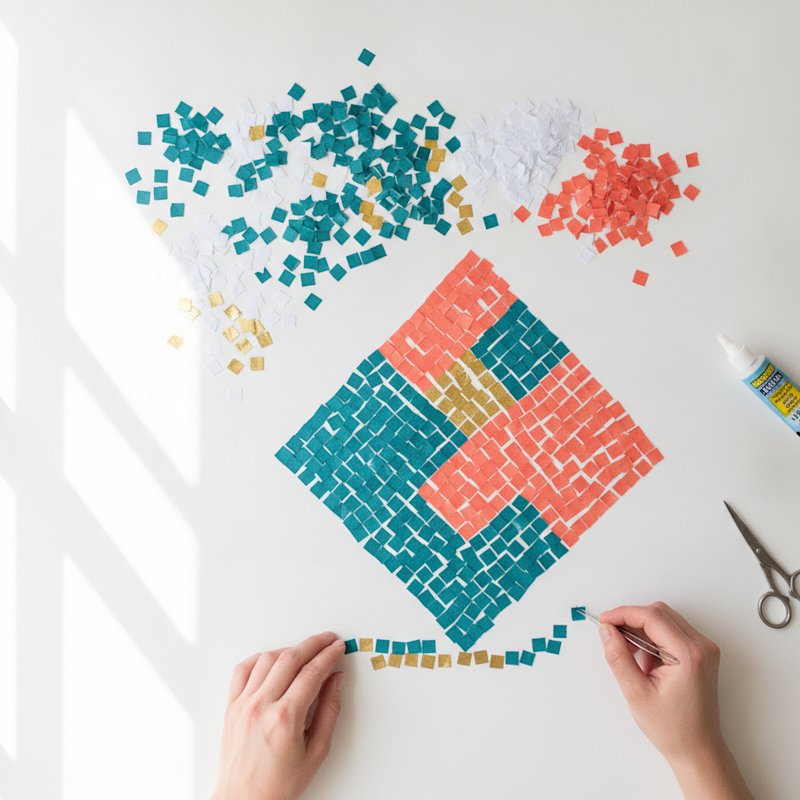
2. Cut Tile Mosaic

Cut uniform geometric shapes — squares, rectangles, diamonds — with scissors or a paper trimmer.

How it works: Cut paper into strips, then snip strips into consistent tiles. Aim for ¼ to ½ inch tiles.

Best for: Geometric patterns, kitchen backsplash-style art, checkerboard designs, pixel art.

My tip: A paper trimmer gives you perfectly straight strips in seconds. If you're doing a lot of tile cutting, it's worth the £8–12 investment.

3. Gradient Mosaic

Arrange paper pieces in a smooth colour transition, lightest to darkest (or vice versa).

How it works: Sort your paper scraps by colour value. Place the lightest shade on one end, darkest on the other, blending tones in between.

Best for: Sky effects, sunset scenes, ombre wall art, colour studies.

My tip: Magazines are gold for gradient mosaics. A single magazine page contains dozens of slightly different shades in photos and advertisements. I once built a full sky gradient from nothing but the blue tones in a furniture catalogue.

4. 3D Paper Mosaic

Fold, curl, or crumple paper pieces to add dimension before gluing them down.

How it works: Fold small squares into tents, roll magazine strips into tubes, or crumple tissue paper into balls. Glue the shaped pieces standing up.

Best for: Flowers, textured wall art, mixed-media pieces, tactile art for children or sensory projects.

My tip: Work in layers — flat base tiles first, then add 3D elements on top. This creates genuine depth that photograph beautifully.

5. Magazine Collage Mosaic

Use entire magazine images or sections as "tiles" arranged into a larger mosaic composition.

How it works: Cut magazine pages into random shapes. Select pieces with interesting textures, patterns, or colour fields. Assemble them into a cohesive image or abstract composition.

Best for: Mixed-media art, portrait mosaics, themed art (travel, food, nature), eco-art projects.

My tip: Match the content of the magazine piece to your subject. A mosaic of a coffee cup made from magazine food ads? That's a conversation starter.

Your First Paper Mosaic Project: Step-by-Step

Let's make a 4×4-inch paper mosaic coaster using the cut tile technique. This takes about 45 minutes and uses materials you likely have right now.

What You'll Need

  • 3 sheets of coloured cardstock (I used teal, white, and gold)
  • One 4×4-inch cardboard square (cut from a shipping box)
  • Mod Podge matte + brush
  • Scissors
  • Ruler and pencil

Step 1: Draw Your Design

Lightly sketch a simple pattern on your cardboard base. For your first project, try:

  • A diagonal split (half teal, half white, gold accent line)
  • A simple heart or star outline
  • A border-and-centre design

My pick: I drew a ½-inch border around the edge with a large diamond in the centre. The border would be teal, the background white, and the diamond gold.

Step 2: Cut Your Tiles

Cut each cardstock colour into ¼-inch strips, then snip strips into small squares. You don't need perfection — slight variation is what makes mosaics look authentic.

Aim for:

  • About 30 teal tiles (border)
  • About 50 white tiles (background)
  • About 20 gold tiles (diamond)

Step 3: Plan Your Layout

Before gluing anything, lay tiles on your base to test the arrangement. This dry run saves you from colour-clash surprises and lets you adjust spacing.

Leave tiny gaps (1–2mm) between tiles. These gaps are the "grout lines" that make it look like a real mosaic.

Step 4: Glue Tiles Down

Working in small sections (about 1 square inch at a time):

  1. Brush a thin layer of Mod Podge onto the base
  2. Place tiles one by one, maintaining even gaps
  3. Press each tile gently to ensure adhesion

Start with the border (easiest edge to align), then fill the background, then place the centre diamond tiles.

Step 5: Seal Your Mosaic

Once all tiles are glued and dry (wait 20 minutes):

  1. Brush a coat of Mod Podge matte over the entire surface
  2. Let it dry clear (about 15 minutes)
  3. For a glossy finish, add a second coat of Mod Podge gloss

Step 6: Admire and Iterate

Your coaster is done. Set a mug on it. Take a photo. Then ask yourself: what would I do differently? That instinct is your artistic voice developing — and it happens fast with mosaics because you complete projects so quickly.

8 Paper Mosaic Project Ideas for Adults

1. Drink Coasters (Set of 4)

4×4-inch MDF squares, sealed with waterproof varnish. Use a different colour scheme for each coaster in the set. These make genuinely impressive gifts — I gave a set to my sister and she assumed I'd bought them.

Difficulty: Beginner | Time: 2–3 hours total

2. Wall Art Panel

Use an 8×10 or 11×14 canvas board. Pick a colour palette that matches a room in your home. Abstract designs work best at this size — geometric patterns, colour blocks, or gradient fades.

Difficulty: Beginner–Intermediate | Time: 3–5 hours

3. Greeting Cards

5×7 blank card blanks with small (3×4 inch) mosaic panels on the front. Use the torn paper technique for a casual, handmade feel. Perfect for birthdays, thank-yous, and holidays.

Difficulty: Beginner | Time: 30–45 minutes per card

4. Serving Tray Insert

Line the bottom of a plain wooden tray with a paper mosaic, then seal with multiple coats of decoupage varnish. The tray's rim protects the edges naturally.

Difficulty: Intermediate | Time: 4–6 hours

5. Monogrammed Wall Letters

Buy large MDF or cardboard letters from a craft shop. Cover each letter with small mosaic tiles in a single colour or gradient. Spell out a name, "HOME," or "EAT" for kitchen wall art.

Difficulty: Beginner | Time: 1–2 hours per letter

6. Picture Frame Makeover

Cover a plain wooden picture frame with tiny mosaic tiles. Use a colour that complements the photo inside. A 5×7 frame takes about 1 hour.

Difficulty: Beginner | Time: 1–2 hours

7. Tissue Box Cover

Wrap a square tissue box in cardstock, then add a paper mosaic panel to each visible side. Quick project that turns a mundane item into a conversation piece.

Difficulty: Beginner | Time: 1–2 hours

8. Journal or Sketchbook Cover

Use torn paper mosaic on the front of a plain notebook. Seal with Mod Podge. If you already keep an art journal, this is a great way to personalise it.

Difficulty: Beginner | Time: 45–60 minutes

Templates That Let You Play with Color and Texture
Mosaic artists understand color placement. These shadow box templates reward that skill — layer different colored cardstocks to create depth gradients and color transitions.

Pro Tips for Professional-Looking Results

Consistent Gaps Are Everything

The single biggest difference between "kids' craft" and "art piece" is gap consistency. Aim for 1–2mm between every tile. Use a toothpick as a spacer if needed.

Sort Before You Stick

Sort your paper pieces by colour and shade before starting. This sounds tedious but saves enormous frustration mid-project when you're hunting for "that one piece of teal that was slightly darker."

Work in Natural Light

Cardstock and magazine colours shift under artificial light. What looks like matching teals under your desk lamp might be obviously different in daylight. Set up near a window.

Less Glue Is More

A thin layer of adhesive is all you need. Thick glue pools between tiles and looks messy. If you can see white glue squeezing up between pieces, you've used too much.

Seal Everything

Unsealed paper mosaics are fragile. Even a single coat of Mod Podge makes a huge difference in durability. For items that get handled (coasters, trays), use two to three coats.

Photograph Your Process

Paper mosaics photograph beautifully. Process shots are marketing gold if you share your work online. Buyers love seeing how handmade items come together.

Frequently Asked Questions

Can I use regular printer paper for paper mosaics?

You can, but it's not ideal. Printer paper is thin (20 lb) and tends to wrinkle when glued. It also doesn't hold its shape as well as cardstock. If printer paper is all you have, try the torn paper technique — the softer texture actually works in your favour. For cut tiles, stick with 65 lb cardstock minimum.

How do I make paper mosaic art waterproof?

Paper mosaics can't be truly waterproof since paper absorbs moisture, but you can make them water-resistant. Apply 3–4 coats of outdoor Mod Podge or marine varnish. For coasters, add felt pads to the bottom and remind users to wipe (not soak) spills. I've had sealed coasters survive everyday use for over a year with no damage.

What's the best adhesive for paper mosaics?

Mod Podge Matte is the best all-rounder. It works as both glue and sealant, dries clear, and is widely available. For a cheaper option, any PVA craft glue works for adhesion (you'll need a separate sealant on top). Avoid hot glue — it's too thick and creates visible lumps under tiles.

How long does a paper mosaic project take?

A small 4×4-inch coaster takes 30–60 minutes. An 8×10 wall panel takes 3–5 hours. The torn paper technique is fastest because you skip the cutting step. Complex geometric patterns with tiny tiles take longest. Start small and scale up as you find your rhythm.

Ready to Start Your First Paper Mosaic?

You have the techniques, the materials list, and a step-by-step project to try tonight. Grab some cardstock scraps, a bottle of Mod Podge, and give it a go — your first paper mosaic is closer than you think.

Browse more paper craft guides, stencil art tutorials, and art journaling ideas from Mural Moods Art — we're here to help you make something beautiful.