Articles24 min read

Quilling Wall Art Patterns: Complete Guide to Stunning Paper Art Designs

Six complete quilling wall art patterns — from an 8x10 beginner floral to an 18x24 layered landscape — with step-by-step assembly, color schemes, and framing advice I tested in my own studio.

Pressed flower shadow box display with preserved petals and leaves arranged on acid-free backing

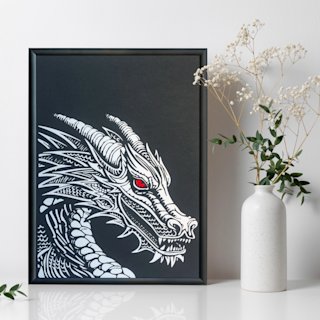
Quilling wall art patterns turn thin paper strips into dimensional wall pieces that catch light differently than any flat print or painting. The coils, scrolls, and shaped elements create real shadow and depth — something you have to see in person to fully appreciate.

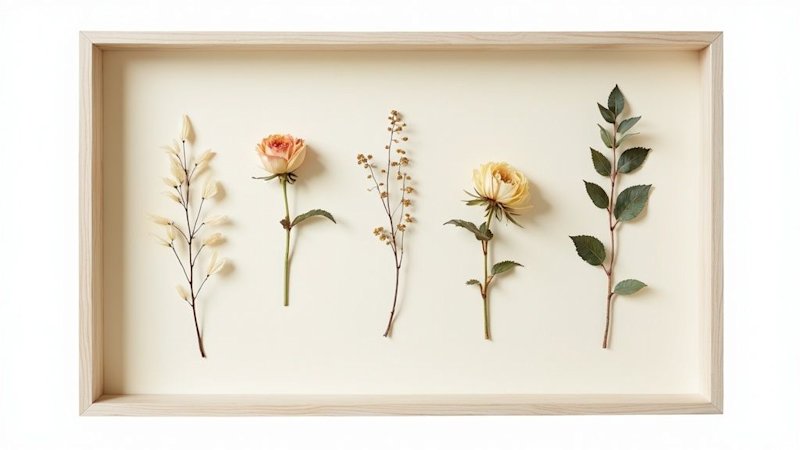
I discovered quilling wall art three years ago while looking for affordable statement pieces for a bare hallway wall. A small 8x10 quilled floral caught my eye at a craft fair — $45 for something that looked far more intricate than a mass-produced print. That piece is still on my wall. Since then I have quilled over thirty wall pieces, from simple monochromatic florals to a 16x20 botanical vine that took me three weeks of evening sessions.

This guide gives you six complete quilling wall art patterns with full step-by-step assembly instructions. Each pattern includes a materials list, time estimate, and color variations. I have also included the framing, scaling, and color theory knowledge I wish someone had handed me when I started.

If you are completely new to quilling, start with our paper quilling beginner's guide to learn the basic shapes first. This article focuses on turning those shapes into finished wall pieces.

Why Quilled Wall Art Creates Unforgettable Spaces

Three things make quilled wall art visually distinct from every other wall decor medium.

Dimensional texture. Quilled coils sit half an inch to over an inch off the backing surface. That depth creates real shadows that shift as ambient light changes through the day. A quilled piece looks different at noon than it does at dusk — and that living quality is something flat prints and canvases simply cannot replicate.

The handmade value proposition. In a world of mass-produced art prints, a hand-quilled piece signals care and intention. Every coil was rolled, shaped, and placed by a person. That authenticity resonates — which is why quilled wall art commands $40 to $200+ on Etsy for pieces ranging from 8x10 to 16x20.

Scalability. Quilling patterns scale beautifully from small gift cards to large statement pieces. The same floral design that works at 5x7 can be expanded to 16x20 by increasing coil sizes, adding detail elements, and widening paper strips. This scalability means the patterns in this guide can be adapted to whatever size wall you are working with.

Essential Tools and Materials for Quilled Wall Art

Before starting any of the six patterns in this guide, gather these materials. I have annotated each with the specific choices that matter most for wall-scale pieces (versus small card-sized quilling).

Paper strips. For wall art, paper weight and strip width are critical. Use 120–160 gsm paper strips. Lighter paper collapses under its own weight in large coils; heavier paper fights the rolling tool. Strip width scales with piece size: 3 mm for small pieces up to 8x10, 5 mm for medium pieces 11x14 to 16x20, and 7 mm or wider for large pieces 18x24 and up.

Slotted tool. A slotted quilling tool holds the paper strip securely while you roll. For wall art pieces that require hundreds of coils, a slotted tool saves significant hand fatigue compared to a needle tool. I use a slotted tool for all coils larger than 4 mm and a needle tool only for tiny accent coils.

Circle sizing guide. This is the single most underrated tool for wall art quilling. Consistent coil sizes are what separate professional-looking pieces from amateur ones. A circle sizing guide (a board with graduated holes) lets you drop each loose coil into the same hole for uniform sizing. Essential for geometric patterns like the sunburst and mandala.

Quilling board or cork work surface. You need a surface you can pin into. Quilling boards with printed grid patterns help with symmetric placement. A self-healing cutting mat works in a pinch but does not hold pins as well.

Adhesive. Use PVA glue or tacky craft glue. Apply with a toothpick or fine-tip glue bottle — never straight from the container. For wall art, the glue must hold coils permanently at various angles. Test your adhesive on a sample coil and let it dry overnight: if you can peel the coil off the backing without tearing paper, your glue is not strong enough.

Tweezers and pins. Fine-point tweezers for placing coils precisely. Dressmaker pins or quilling pins to hold coils in position while glue dries.

Layered Shadow Box SVG Templates for Framed Paper Art
If you love dimensional paper art, our layered shadow box templates pair beautifully with quilled pieces in a gallery wall. Each SVG template includes pre-sized layers for standard shadow box frames — download, cut, and assemble in an afternoon.

Pattern Fundamentals: Scaling from Cards to Wall Art

The biggest mistake new quilling wall art makers make is taking a card-sized pattern and simply making more of the same coils. Scaling up requires proportional changes to coil size, strip width, and element density.

Coil sizing rules. For every doubling of piece dimensions, increase your target coil diameter by roughly 50%. A 6 mm loose coil that looks right on a 4x6 card needs to become roughly 9 mm on an 8x10 and 14 mm on a 16x20. This keeps the visual weight of each element proportional to the overall composition.

Strip width adjustments. 3 mm strips work for pieces up to 8x10. Switch to 5 mm for 11x14 through 16x20. Use 7 mm for 18x24 and larger. Wider strips create bolder coils that read well from across a room — critical for wall art that will be viewed at distance.

Background considerations. Wall art quilling needs a backing material sturdy enough to support the weight of hundreds of glued coils. For pieces up to 11x14, heavy cardstock (250+ gsm) works. For 16x20 and larger, use mat board or illustration board. Color choice matters enormously — I have found that cream, soft gray, or deep navy backings make quilled elements pop more than pure white.

Complexity scaling. Resist the urge to add more elements to fill a larger space. What works at 8x10 often needs simplification at 16x20, not multiplication. A few large, well-shaped elements create more visual impact than a dense field of small coils that mush together at viewing distance. For more on design principles, see our DIY paper wall art ideas guide.

Beginner Pattern 1: Monochromatic Floral Bouquet (8x10)

This was my first wall piece, and I still recommend it as a starting point. The monochromatic palette eliminates color decision fatigue, and the organic floral shapes are forgiving of imperfect coils. I completed my first version in five hours over two evenings.

Materials: 3 mm quilling strips in three shades of one color (e.g., light pink, medium pink, deep rose), plus green for stems and leaves. 8x10 heavy cardstock backing. Slotted tool, circle sizing guide, tweezers, PVA glue, pins.

Step 1 — Sketch the composition. Lightly pencil a loose S-curve for the stem path on your backing. Mark three to five flower positions along the curve, varying the sizes. Do not worry about precision — organic placement looks better than rigid symmetry here.

Step 2 — Create flower centers. Roll tight coils using the darkest shade. For each flower, roll two to three tight coils and glue them together in a cluster. Size varies: make the center flower's cluster largest (about 8 mm diameter) and the side flowers smaller.

Step 3 — Shape petals. Using the medium shade, roll loose coils to 6 mm diameter on your sizing guide. Pinch one end into a teardrop shape. For each flower, make six to eight petals. Alternate some with a slight curve (curved teardrop) for natural variation. Arranged around the center cluster, these create an open rose effect.

Step 4 — Stems and leaves. For stems, fold green strips in half lengthwise and curl the fold into a gentle scroll — these V-scrolls form the main stems. For leaves, roll loose coils to 5 mm and pinch both ends into a marquis (eye) shape. Place leaves alternating along stems. For more organic leaf shapes, make S-scrolls by curling both ends of a strip in opposite directions.

Step 5 — Assembly order. Attach stems first, working from bottom to top. Then place leaves. Finally, position each flower — center cluster first, then petals around it. Pin each element and let glue set for 10 minutes before moving to the next.

Step 6 — Finishing. Once all elements are placed and glue is fully dry (wait at least two hours), gently brush away any visible glue spots with a dry toothbrush. If any coils have shifted, re-pin and re-glue.

Time estimate: 4–6 hours. Variations: Try blue tones (pale blue, teal, navy), warm tones (peach, coral, terracotta), or neutrals (cream, tan, brown).

Beginner Pattern 2: Geometric Sunburst (11x14)

Geometric patterns are the most forgiving for beginners because small inconsistencies in coil sizing are hidden by the radial symmetry. A sunburst that is slightly uneven in one quadrant still reads as intentional. I recommend this pattern for anyone who found the floral too freeform.

Materials: 5 mm quilling strips in two to three colors, 11x14 backing board, slotted tool, circle sizing guide, ruler, compass or circular template for marking.

Step 1 — Mark the radial pattern. Find the center of your backing. Using a ruler and pencil, draw 12 evenly-spaced radial lines from the center to the edges (like a clock face, with lines at every "hour"). Light pencil marks only — you will erase these later.

Step 2 — Create the rays. For each of the 12 radial lines, you will build a ray made of three coils stacked outward from center. Roll tight coils for the inner position, loose coils (8 mm) for the middle, and marquis-shaped coils for the outer tip. Work in sets: complete all 12 inner coils, then all 12 middle, then all 12 outer. This batch approach ensures consistency.

Step 3 — Center element. The focal point of the sunburst is the center. Three options: a single large tight coil (12+ mm, requires multiple strips glued end-to-end before rolling), a hollow ring made by wrapping a strip around a circular form, or a starburst made from six V-scrolls arranged radially. I prefer the starburst — it echoes the ray pattern and creates a pleasing focal point.

Step 4 — Layering for depth. To make the sunburst feel dimensional rather than flat, glue the inner coils directly to the backing, the middle coils on top of small foam dots or extra glue pads, and the outer coils even higher. This three-tier height creates the shadow lines that make the design pop.

Step 5 — Gluing strategy. Apply glue to the bottom of each coil using a toothpick — a small dot is enough. Place, pin, and move to the next. Work quadrant by quadrant so you can maintain symmetry visually as you go.

Color schemes: Monochrome (all one color, three shades), analogous (three neighboring colors like yellow-orange-red), or complementary (blue rays with an orange center for punch). Each creates a very different mood.

Time estimate: 6–8 hours.

Papercut SVG Templates for Your Crafting Toolkit
Every paper artist needs a library of ready-to-cut templates. Our papercut SVG collection includes nature motifs, abstract designs, and seasonal patterns — perfect as companion pieces alongside your quilled wall art. Compatible with Cricut and Silhouette.

Intermediate Pattern 3: Botanical Vine Border (16x20)

Botanical vine patterns are the bread and butter of quilled wall art — and for good reason. They fill rectangular frames beautifully, tolerate variation naturally, and create an elegant border effect that works in any room. This was the pattern that taught me patience with quilling, and the result was worth every session.

Materials: 5 mm strips in four to six greens (pale sage through deep forest), plus three floral accent colors. 16x20 mat board backing. Slotted tool, needle tool for fine accents, circle sizing guide, tweezers, pins, PVA glue.

Step 1 — Sketch the vine path. On your mat board backing, draw a gentle double-S vine path that enters from the bottom left, curves through the composition, and exits top right. Mark flower cluster positions at three to four points along the vine. Add smaller bud positions between clusters. Keep the vine thinner at the edges and denser in the center third of the composition — this creates a natural focal point.

Step 2 — Leaf variations. A vine border needs at least three distinct leaf shapes to avoid monotony. Basic teardrop leaves: loose coils pinched at one end, 8–10 mm. Curved leaves: teardrops with the pinched end bent slightly to one side. Husking leaves: wrap a strip around two pins placed close together, glue the wraps, and remove — this creates a long, narrow leaf shape that is unique to quilling. Make 20–30 leaves of each type in varying green shades.

Step 3 — Flower elements. Along the vine, place three types of flowers. Daisies: six to eight white teardrop petals around a yellow tight-coil center. Roses: concentric rings of curved teardrops in pink or rose. Buds: tight coils with two small curved teardrops partially enclosing them. Vary flower sizes — large roses (15–20 mm) at focal points, small daisies (8–10 mm) at transition points.

Step 4 — Vine stem construction. For the main vine, use folded green strips glued edge-on to the backing. This creates a thin linear stem that connects the leaf and flower elements. For thinner offshoots, use single unfolded strips curved into gentle arcs.

Step 5 — Progressive assembly. Work section by section rather than element by element. Complete a 4-inch section of vine: attach the stem segment, then add leaves alternating sides, then place flowers at marked positions. Move to the next section. This approach lets you adjust density and spacing as you go rather than discovering at the end that one area is too crowded.

Step 6 — Balance and breathing room. Step back and look at the piece from three feet away every few sections. Quilling wall art is viewed at distance, and density that looks right at arm's length can feel cluttered from across the room. Remove elements if needed — better to have breathing room than visual overload.

Time estimate: 10–15 hours across multiple sessions.

Intermediate Pattern 4: Mandala Centerpiece (12x12 Square)

Radial symmetry is inherently satisfying, and a quilled mandala is one of the most impactful wall pieces you can create. The 12x12 square format gives you a perfect circle with generous margins. This pattern taught me more about precision than any other — and the meditative repetition is genuinely relaxing.

Materials: 3 mm and 5 mm strips in three to four colors. 12x12 backing board. Slotted tool, circle sizing guide, compass, ruler, protractor for dividing the circle.

Step 1 — Find and mark the center. Draw diagonal lines corner to corner on your backing — their intersection is the exact center. Draw a light circle at the mandala's outer edge (about 10 inch diameter for a 12x12 board). Draw a second circle at 7 inches and a third at 4 inches — these guide your three concentric rings.

Step 2 — Divide into sections. Using a protractor, divide the outer circle into 16 equal sections (22.5° each). Mark each division with a light pencil tick at the outer circle edge. Draw radial lines from center through each tick mark. These guide lines are the skeleton of your mandala.

Step 3 — Inner ring. The inner ring (4 inch diameter) is the mandala's heart. Create 16 identical elements — tight coils or small hollow rings — placed at each radial line. Glue each one and let it set before moving to the next. Consistency is everything in the inner ring because any deviation is immediately visible.

Step 4 — Middle ring. The middle ring (7 inch diameter) is where you introduce complexity. At each of the 16 radial positions, place a combination shape: a teardrop flanked by two scrolls, or a diamond with curved marquis accents. Alternate two element designs every other position for visual rhythm. Use your circle sizing guide religiously here — every coil must match.

Step 5 — Outer ring. The outer ring (10 inch diameter) is where the mandala gets dramatic. Larger coils (12–15 mm), extended petals, and open scroll work create a sense of expansion. I like to use the widest strip width (5 mm) here for visual weight. The outer elements should feel like they are reaching outward — tight inner coils opening into loose, expressive outer forms.

Step 6 — Maintain symmetry during assembly. Complete one element at each of the 16 positions before moving to the next layer. Never complete an entire radial line from center to edge — you will end up with asymmetry. Think in rings, not slices.

Time estimate: 12–18 hours. This is a multi-session project. Work in 2-hour blocks.

Flower Shadow Box Templates — Pair with Quilled Florals
Building a gallery wall? Our rose, hydrangea, and lily shadow box templates complement quilled flower pieces perfectly. Each layered design creates depth through cut paper — a striking contrast next to quilled dimensionality on the same wall.

Advanced Pattern 5: Typography Initial with Floral Frame (16x20)

Combining a structural letter with decorative floral quilling creates a piece that works as personalized wall art — monogram gifts, nursery decor, wedding art. The challenge is balancing the rigid geometry of a letter with the organic curves of quilled flowers so neither competes with the other. My first typography piece was a "B" for my sister's new baby — it took me three weeks but remains one of my proudest pieces.

Materials: 5 mm strips in the letter color (one solid color) and 3 mm strips in four to five floral colors. 16x20 mat board. Both slotted and needle tools.

Step 1 — Create the letter template. Print or draw your chosen letter at approximately 10 inches tall, centered on the 16x20 backing. Serif fonts work better than sans-serif because the curves and terminals provide natural attachment points for quilled elements. Trace the outline lightly in pencil.

Step 2 — Build the letter. Two approaches: outlining uses quilled strips glued edge-on along the pencil outline, creating a raised letter border that you can leave hollow or fill with coils. Filling covers the entire letter area with tight coils packed together. For a first attempt, I recommend outlining — it is faster and the negative space inside the letter keeps the piece from feeling heavy.

Step 3 — Plan the floral frame. The flowers should complement the letter, not compete. If the letter is filled with dense coils, keep the frame airy — scattered buds and trailing vines. If the letter is outlined (hollow), you can afford denser floral framing. Sketch the frame lightly: flowers concentrated at the top and bottom of the letter, with vines and leaves trailing along the sides.

Step 4 — Element placement strategy. Build the letter first and let it set completely (overnight). Then add the floral frame. Start with the largest flowers at the composition's focal points (usually top center and bottom corners of the letter), then fill in with smaller elements. Avoid placing large flowers where they overlap the letter's outline — keep them clearly in the frame zone.

Step 5 — Color strategy. The simplest approach is a monochromatic letter with multicolored flowers. Alternatively, match the letter color to one of the flower colors for cohesion. The most dramatic option: a dark letter (navy, burgundy, charcoal) with bright warm flowers (coral, gold, peach).

Step 6 — Assembly. Letter first, fully glued and dried. Then frame flowers from the focal points outward. The interwoven approach — building letter and frame simultaneously — is possible but requires more experience and leads to more mistakes.

Time estimate: 15–20 hours.

Advanced Pattern 6: Layered Landscape (18x24)

This is the most ambitious pattern in the guide — a quilled landscape with foreground, middle ground, and background depth layers. I attempted my first landscape after a year of quilling, and the result was... mediocre. The second attempt was better. The third hangs in my living room. Expect to learn as much from your first landscape as from all the beginner patterns combined.

Materials: 3 mm, 5 mm, and 7 mm strips in landscape colors (sky blues, greens, earth tones, floral accents). 18x24 illustration board. Full tool set.

Step 1 — Plan depth layers. On your backing, draw three horizontal zones: background (top third — sky, distant elements), middle ground (middle third — hills, trees, buildings), and foreground (bottom third — flowers, grass, pathway). Within each zone, sketch the major elements. Keep the background simple, the middle ground detailed, and the foreground most detailed — this mimics how our eyes perceive real landscapes.

Step 2 — Background elements. Use 3 mm strips in light, muted colors. A quilled sun or moon can be a single large tight coil (15+ mm) or a ring. Distant hills are gentle arcs made from folded strips glued edge-on. Keep everything small and low-contrast — atmospheric perspective means distant elements are paler and less saturated.

Step 3 — Middle ground. Switch to 5 mm strips. Trees can be made from tight coil trunks with loose coil canopies. Buildings use rectangular tight coils for walls and folded strips for roofs. Rolling hills are achieved with long curved strips glued edge-on in overlapping layers. This is where the piece starts to feel dimensional.

Step 4 — Foreground details. Use 5 mm and 7 mm strips in the most saturated colors. Large quilled flowers (the same technique as Pattern 1 but scaled up). Grass made from loose open scrolls. A pathway from folded strips laid in perspective. The foreground elements should literally sit higher than the background — use extra glue pads or small foam pieces under foreground coils.

Step 5 — Layering technique. Attach background elements first, flush against the backing. Then middle ground elements, slightly raised. Then foreground elements, most raised. This physical layering creates the aerial perspective that makes the landscape feel deep. For more display and framing guidance, see our guide on how to display and frame 3D layered paper art.

Step 6 — Aerial perspective through color. Background elements should be the palest version of each color. Middle ground: medium saturation. Foreground: full saturation. This color graduation, combined with the physical layering, creates convincing depth in a purely paper medium.

Time estimate: 20–30 hours across many sessions. This is a long-term project.

Color Schemes for Quilled Wall Art

Color choice can make or break a quilled wall art piece. Here are the palette strategies I use most often, with specific color combinations that I have tested on real pieces.

Monochromatic schemes use a single hue from dark to light. A blue monochromatic piece might use navy, cobalt, medium blue, sky blue, and pale ice blue. The simplicity forces attention onto the shapes and texture — which is exactly what you want for your first few pieces. My first monochromatic (pink floral) remains one of my favorites.

Analogous colors sit next to each other on the color wheel — blue-green-teal, or orange-red-pink. These palettes feel harmonious and natural. They work especially well for botanical themes because nature uses analogous palettes constantly.

Complementary colors sit opposite on the color wheel — blue and orange, purple and yellow, red and green. These create bold contrast and visual drama. Use complementary colors when the piece needs to command attention from across a room.

Modern neutrals — whites, grays, creams, and metallic accents — create sophisticated pieces that work in contemporary and minimalist interiors. Add one metallic element (gold or copper strips) for a single accent that elevates the entire palette.

Botanical palettes are practical workhorses: sage green, forest green, ivory, and one floral accent color. These work for 80% of botanical-themed quilling and never look out of place.

Lighting consideration. Test your color choices under the lighting conditions where the piece will hang. Warm indoor lighting shifts yellows and reds warmer. Cool LED lighting shifts blues and greens more prominent. A palette that looks perfect under daylight may read completely differently under warm overhead lighting.

Framing and Displaying Quilled Wall Art

Framing quilled wall art is different from framing flat art. The depth of the coils demands specific frame types and techniques. For comprehensive framing guidance beyond quilling, see our frame paper art home DIY guide.

Frame depth. Quilled coils protrude 5 mm to 25 mm from the backing. Your frame needs at least 1 inch of internal depth, and 1.5 to 2 inches is ideal. Shadow box frames are purpose-built for this. Standard flat frames will crush your coils.

Glass vs no glass. Glass protects from dust, humidity, and UV — but it flattens the perceived depth and creates reflections that obscure the quilling's dimensionality. For pieces in high-traffic areas, kitchens, or bathrooms, use glass (preferably non-glare or museum glass). For pieces in controlled environments, go glassless to showcase the texture.

Mat board options. A window mat creates a clean border between frame edge and quilled piece, adding visual polish. Alternatively, float-mount the quilled backing inside a shadow box for a modern, gallery-style presentation. I prefer the float style for most pieces — it lets the quilling's edges breathe.

DIY framing. Shadow box frames from craft stores ($15–30) work perfectly for pieces up to 16x20. Remove the glass if desired, paint or stain the frame to match your decor, and use double-sided tape or silicone adhesive to mount the backing. For 18x24 pieces, look for deep canvas frames or custom framing.

Hanging. Quilled pieces are heavier than they look — a 16x20 piece with hundreds of coils can weigh 2–3 pounds. Use appropriate wall anchors. Two-point hanging (D-rings on both sides) prevents large pieces from tilting.

Creating Your Own Original Quilling Patterns

Once you have completed the six patterns in this guide, you will have the skills to design your own. Here is the process I use.

Find inspiration. Nature is the richest source — botanical illustrations, flower photography, leaf structures. Geometric sources include tile patterns, mandala references, and architectural details. Pinterest boards organized by theme are invaluable. I keep a "quilling inspiration" board with 200+ pinned images.

Sketch first, coil second. Rough-sketch your design on paper before touching quilling strips. Convert each sketch element into a quilling shape: circles become loose coils, pointed shapes become teardrops, long curves become scrolls. This translation step is the core skill of pattern design.

Create a template. Transfer your sketch onto your backing board in light pencil. For symmetric designs, draw only one section, then mirror it. For radial designs, complete one wedge and use it as a reference for the others. Printable templates (created in any vector drawing program) let you reproduce designs accurately.

Test small first. Before committing to a 16x20 version, make a 5x7 prototype using the same shapes and color palette. You will catch proportion problems and color issues in an hour instead of twenty. I prototype every new design — it has saved me from countless costly mistakes.

Document your patterns. Photograph or scan each finished piece. Note the paper strip widths, coil sizes, and color codes you used. This documentation makes your patterns reproducible and shareable — and helps you improve over time because you can see exactly what you did.

Combining Quilling with Other Paper Art Techniques

Quilling does not have to exist in isolation. Some of the most striking wall pieces I have seen combine quilled elements with other paper art forms.

Quilling + papercutting. Flat papercut silhouettes provide bold graphic elements that contrast beautifully with the soft dimensionality of quilled coils. Try a papercut tree silhouette with quilled flowers in the branches. The flat-against-dimensional juxtaposition is visually compelling.

Quilling + paper flowers. Quilled coils and constructed paper flowers (roses made from spiraled circles, for example) create mixed-texture botanical arrangements. Use quilling for fine detail work and constructed flowers for larger focal elements.

Quilling + mixed media. Fabric backgrounds, bead accents, or dried flower elements can elevate a quilled piece into mixed-media wall art. Use restraint — one or two non-paper elements are enough. Too many competing materials dilute the quilling's impact.

When to combine vs when to keep pure. Combine techniques when each element serves a clear purpose the other cannot. Keep a piece pure quilling when the design is strong enough on its own — and most good quilling designs are.

Durability and Longevity of Quilled Wall Art

Quilled wall art is made of paper — which means it requires some care to last. Here is what I have learned about keeping pieces looking good over years of display.

Paper quality matters. Acid-free paper strips last decades longer than standard paper. For pieces you want to keep permanently, invest in archival-quality quilling paper. The price difference is modest and the longevity gain is significant.

UV protection. Direct sunlight fades quilled paper within months. Hang pieces on walls that receive indirect light only. If you must hang in a sunny spot, use UV-protective glass or apply a UV-blocking spray to the finished piece before framing.

Humidity. Paper absorbs moisture and expands. In humid environments, coils can loosen and warp. Frame behind glass with a sealed back in bathrooms and kitchens. In dry climates, static can be an issue — a light mist of anti-static spray on the backing before assembly helps.

Dust. Quilled pieces collect dust in their many crevices. Glass-fronted frames solve this. For open pieces, use a soft makeup brush to gently dust coils every few months. Never use water or compressed air.

Adhesive longevity. PVA glue is archival and holds for decades if applied correctly. The enemy of glue longevity is insufficient surface contact — a tiny glue dot on the very edge of a coil will eventually fail. Ensure each coil has adequate glue on its entire contact surface.

Expected lifespan. A properly framed quilled piece made with acid-free materials and kept out of direct sun will look essentially unchanged after 10+ years. Unframed pieces in humid or sunny locations may show degradation within 2–3 years.

Common Mistakes and How to Fix Them

Every quiller makes these mistakes. I have made all of them. Here is how to prevent or fix each one.

Uneven coils. The number-one cause is rolling tension — you grip the strip too tightly on some rotations and loosely on others. Solution: use a circle sizing guide for every loose coil. Drop the coil into the target hole, let it expand to the walls of the hole, then glue the end. Perfect consistency, every time.

Visible glue. Too much glue creates shiny spots that catch the light and ruin the matte paper texture. Solution: apply glue with a toothpick, not the bottle tip. A dot half the size of a grain of rice is enough for most coils. Less is always better — you can always add more.

Wrong coil size for the piece scale. Coils that look right at arm's length may look too busy from across the room (if too small) or too chunky (if too large). Solution: make a test section of your design and step back 6 feet before committing to the full piece. Adjust coil sizes based on viewing distance, not close-up appearance.

Poor compositional balance. The piece feels "off" but you cannot identify why. Usually caused by uneven visual weight distribution. Solution: photograph your in-progress piece and view it on your phone screen — the small image reveals balance problems that are invisible at full size.

Loose coils after drying. Some coils detach from the backing over time. Solution: during assembly, press each glued coil firmly for 5 seconds. Use a glue with longer open time (tacky glue rather than instant-set) so you can adjust position before it grabs.

Frame depth miscalculation. You finish the piece and it does not fit the frame. Solution: measure the thickest part of your completed piece before buying a frame. Add 0.5 inch of clearance. This is non-negotiable.

1.How long does it take to make a quilled wall art piece?
Time varies dramatically by size and complexity. A simple 8x10 floral bouquet takes 4–6 hours. An intermediate 12x12 mandala requires 12–18 hours. Complex 16x20+ pieces like landscapes or typography can take 20–30+ hours. Always add 20–30% to your initial estimate — quilling has a way of expanding as you refine details. Break projects into multiple 2-hour sessions to maintain quality and prevent fatigue.
2.What size paper strips should I use for wall art?
Strip width scales with piece size. Use 3 mm strips for pieces up to 8x10. Use 5 mm for medium pieces 11x14 to 16x20. Use 7 mm or wider for large pieces 18x24 and up. Wider strips create bolder coils that read well from a distance — essential for wall art. Keep paper weight between 120–160 gsm for coils that hold their shape without being too stiff to roll.
3.Do quilled wall art pieces need glass in the frame?
Glass is optional but recommended for protection. Glass-free framing lets the full 3D texture be appreciated, especially from close viewing distances. Glass (preferably non-glare or museum glass) protects from dust, humidity, and UV damage. Use glass in high-traffic areas, children's rooms, or humid spaces. Go glassless in controlled environments to showcase quilling's dimensional texture.
4.How do I attach quilled coils to the backing board?
Apply a small dot of PVA or tacky craft glue to the underside of each coil using a toothpick or fine-tip applicator. Position the coil, press gently, and hold for 3–5 seconds. Work in small sections so glue does not dry before placement. For large pieces, work from top to bottom or center outward to avoid smearing already-placed coils. Minimal glue is key — too much creates visible shiny spots.
5.Can I create quilled wall art without a template?
Freeform quilled art works well for organic designs like abstract florals or landscapes. However, templates ensure symmetry and proportional sizing for geometric designs, mandalas, and typography. For your first few wall pieces, create simple pencil outlines on the backing as guides. As you gain experience, you will develop an eye for placement and can work from reference images or mental planning alone.
6.What is the best way to create custom colors for quilling?
Buy pre-colored quilling paper in a wide range of colors — the most reliable and time-efficient method. If you need specific shades, lightly coat white quilling strips with colored markers or acrylic paint and let dry completely before rolling. Avoid watercolor or ink that warps the paper. For subtle color variations, mix colored strips within a single design — the eye blends them naturally.
7.How do I clean quilled wall art?
For glass-fronted pieces, clean the glass with standard glass cleaner and microfiber cloth — spray the cloth, never the frame directly. For unframed quilled art, use a soft dry brush (makeup brush or soft paintbrush) to gently dust the coils every few months. Avoid water, liquid cleaners, or compressed air, which can loosen coils or damage paper.
8.Can quilled wall art hang in bathrooms or kitchens?
Yes, with precautions. High humidity can loosen glue and warp paper. Frame pieces behind glass with sealed backs. Avoid hanging directly above a shower or stove where steam concentrates. Choose archival-quality paper and acid-free glue for better moisture resistance. Monitor pieces in humid environments — if you see warping or loosening, move to a drier location.
9.How do I transport quilled wall art safely?
For framed pieces, wrap in bubble wrap and place in a rigid box with padding on all sides. Keep the piece upright during transport — never lay framed quilled art flat. For unframed pieces, create a custom shadow box or shallow crate. Handle by the frame or backing only, never the coils. Avoid temperature extremes during transport which can soften glue.
10.What is the best frame depth for quilled wall art?
Minimum depth is 1 inch, but 1.5 to 2 inches is ideal for most pieces. Shadow box frames are purpose-built for dimensional art and are your best option. If using a standard frame, add spacers between glass and artwork. Measure the thickest part of your quilled design and choose a frame at least 0.5 inch deeper than that measurement.