Articles20 min read

Alcohol Ink Art Techniques for Beginners: Supplies & Ideas

Learn alcohol ink art techniques for beginners — from choosing the right supplies to creating vibrant, frame-ready wall art with blending, dripping, and texture methods.

Alcohol Ink Art Techniques for Beginners: Supplies & Ideas

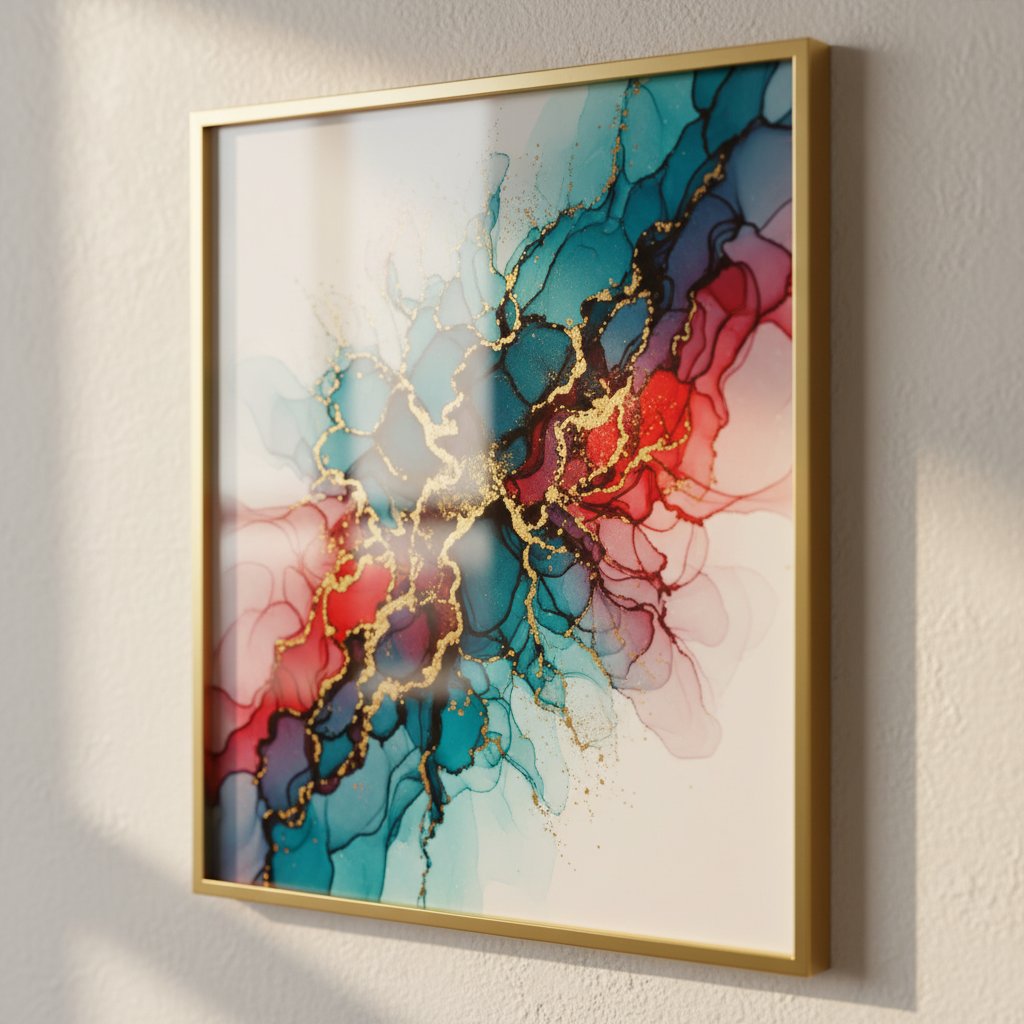
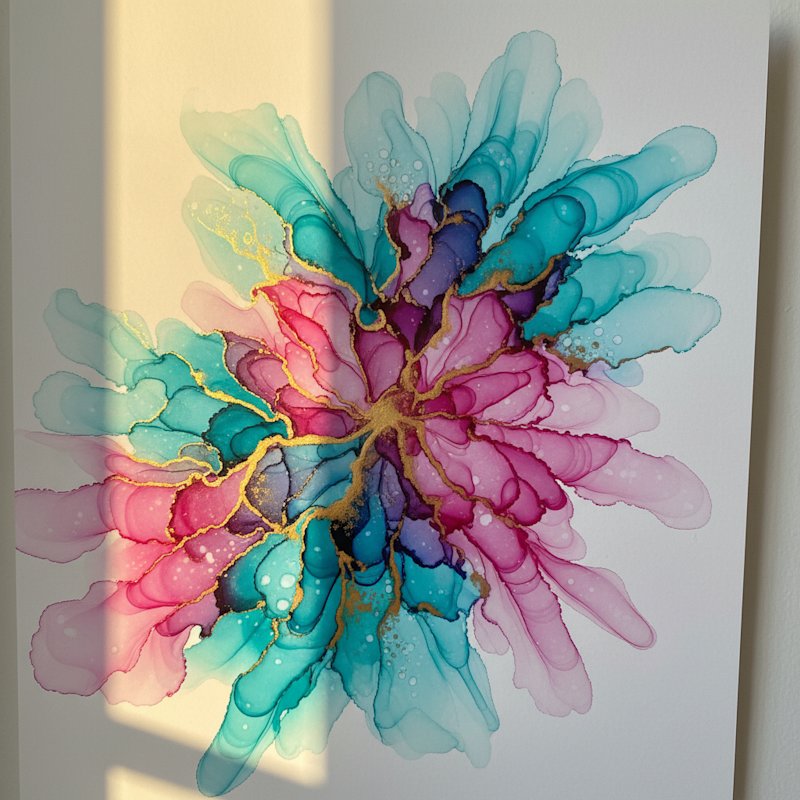
The first time I dropped alcohol ink onto Yupo paper, the color exploded outward in a bloom I could never have planned — electric teal bleeding into gold, rivulets of magenta chasing each other across the synthetic surface. That unpredictability is exactly what makes alcohol ink art so addictive. Every piece is a one-of-one.

Shadowbox Magical Fox - Image 03

I came to alcohol ink from papercutting. After spending months making layered paper-cut shadow boxes, I wanted a way to create vibrant, abstract backgrounds that would show through the cutout layers. Alcohol ink on Yupo was the answer — the ink dries fast, the colors are impossibly vivid, and the synthetic paper stays perfectly flat even after heavy ink application. That combination makes it ideal not just for standalone art, but as a background layer behind papercut designs in shadow box frames.

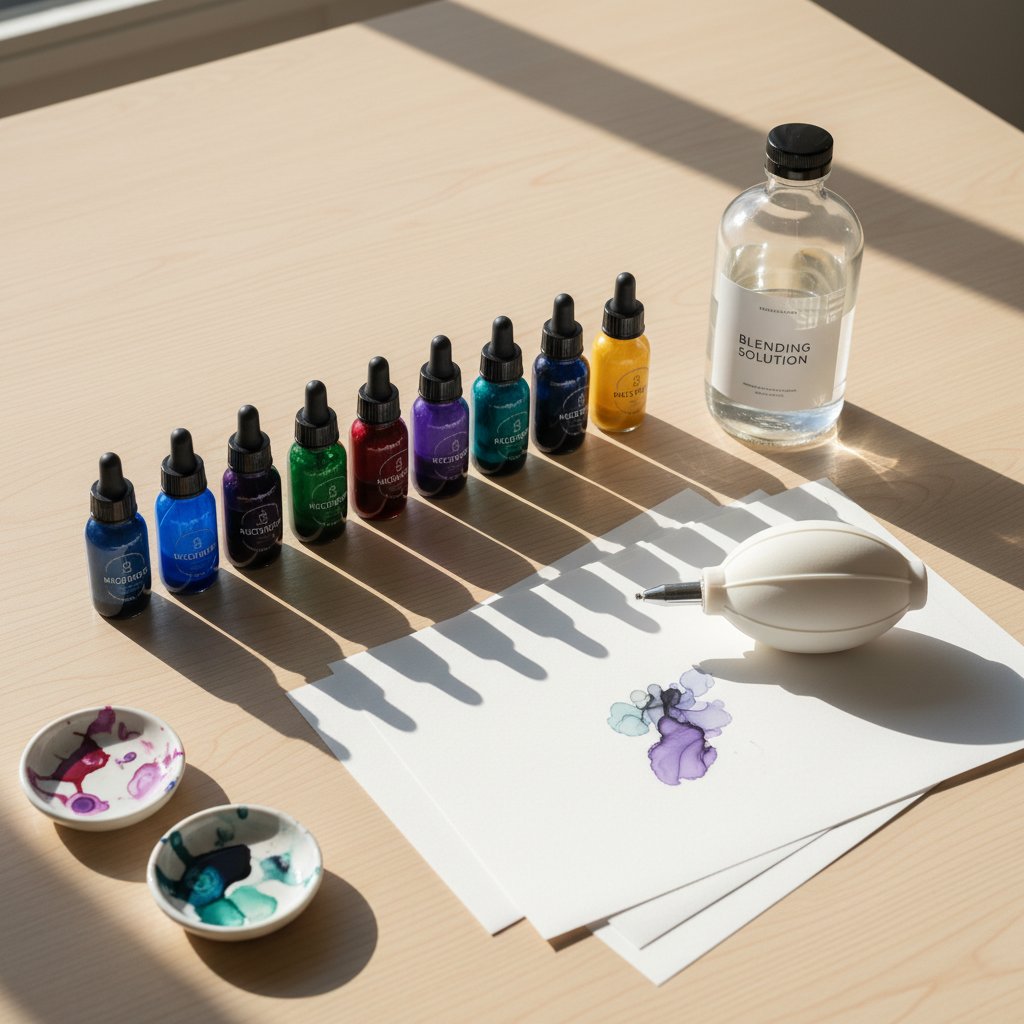
Alcohol ink art techniques for beginners are surprisingly accessible. You do not need drawing skills or painting experience. The ink does most of the visual work — your job is to guide it, tilt it, and know when to stop. This guide covers the supplies you actually need, every core technique from basic dripping to advanced texture work, safety precautions (these are solvent-based inks, not watercolors), and specific project ideas for creating wall art you can frame and display this weekend.

What Is Alcohol Ink?

Alcohol ink is a highly pigmented, fast-drying, transparent dye ink suspended in an alcohol base. The alcohol carrier evaporates quickly — usually within seconds to a few minutes — leaving behind intensely saturated color that layers beautifully.

Unlike acrylic paint (opaque and thick) or watercolor (pale and absorbed into paper fibres), alcohol ink sits on the surface of non-porous materials, remaining translucent and vibrant. You can see through the layers, which creates a stained-glass depth effect that no other medium replicates easily.

Key properties that matter for beginners:

  • Transparent layering. Each layer of ink shows through the next, building complexity with every application. A yellow base with blue drips on top creates green where they overlap — but you can still see the distinct yellow and blue tones in the mix.
  • Fast drying. Alcohol evaporates in seconds. This means you work quickly and intuitively, but it also means you cannot "fix" mistakes by re-wetting. Embrace the imperfections.
  • Reactive. Adding fresh ink or blending solution reactivates dried ink underneath. This is the core mechanic — you are never truly starting over on a piece, just adding new interactions.
  • Non-porous surfaces only. Alcohol ink works on Yupo paper (synthetic polypropylene), glossy cardstock, ceramic, glass, metal, and plastic. It does not work well on regular paper or canvas — the fibres absorb the ink and you lose the vibrant blooming effect.

Alcohol ink art has surged in popularity over the past few years, driven partly by social media — watching the ink bloom and spread is genuinely mesmerising on video. But the craft produces results that look even better in person, where you can see the translucent layering and subtle texture shifts that cameras flatten out.

Essential Supplies for Alcohol Ink Art

You need fewer supplies than you think. Here is what actually matters, what to skip, and how to build a starter kit without overspending.

Alcohol Inks

The two dominant brands are Tim Holtz Ranger Alcohol Inks and Pinata Colors by Jacquard. Both are excellent. Differences that matter:

  • Ranger inks are slightly more transparent and blend more smoothly. Wider color range available. Easier to find in craft stores.
  • Pinata inks are more pigmented — richer, more saturated colors that are slightly less transparent. Better for bold, high-contrast work. Rich Gold and Brass are standout metallics.

For your first project, buy a set of 3-5 colors rather than individual bottles. Ranger's 3-pack sets (typically a warm, cool, and neutral) are a smart starting point. Add individual colors as you discover your palette preferences.

Colour selection tip: Pick colors that work together — analogous colors (blues and greens, or reds and oranges) blend more harmoniously than random selections. A white or metallic (gold, silver) adds highlights and sophistication.

Blending Solution and Rubbing Alcohol

Blending solution (Ranger makes one, or use Pinata's Claro Extender) is your primary tool for moving, lightening, and reactivating ink. It extends the working time and creates softer, more diffused effects.

Isopropyl alcohol (91% or higher) is the budget alternative. It reactivates and dilutes ink but does not contain the same additives as blending solution — the effects are slightly less smooth but perfectly usable for practice.

You need both: blending solution for finished pieces, rubbing alcohol for cleaning and practice.

Yupo Paper (Non-Negotiable)

Yupo is a synthetic polypropylene paper that is waterproof, tear-resistant, and completely non-porous. It is the single best surface for alcohol ink. The ink sits on top and moves freely, creating the characteristic blooms and patterns.

Weight: Yupo comes in 74lb (text weight) and 144lb (cover weight). The 74lb is fine for flat, framed pieces. The 144lb is stiffer and better for pieces that will be handled or mounted without a backing board.

Size: Start with 5×7 inch or 9×12 inch pads. These are affordable and give you enough surface to create frame-ready art without wasting material on experiments.

Alternative surfaces: Ceramic tiles (glazed), glass, metal sheets, and glossy photo paper also work. Ceramic tiles from a hardware store are excellent for practice — cheap, non-porous, and the ink looks stunning on white glaze.

Applicators and Tools

  • Felt applicator pads — the standard tool. Ranger makes a handle with replaceable felt pads. Load the felt with ink and blending solution, then pounce or swipe across the surface.
  • Dropper bottles or pipettes — for controlled dripping and directing ink flow. Most ink bottles have precision tips, but spare pipettes give you more control.
  • Straws or air blowers — for blowing ink across the surface to create directional patterns and organic tendrils. A simple drinking straw works. Compressed air cans give more force for larger pieces.
  • Cotton swabs and cosmetic wedges — for lifting ink, cleaning edges, and creating soft gradients.
  • Disposable gloves — mandatory. Alcohol ink stains everything permanently, including your hands.

Safety Supplies

Alcohol ink fumes are the primary hazard. Work in a well-ventilated area. An open window with a fan pushing air outward is the minimum. For extended sessions, wear a respirator mask with organic vapor cartridges.

  • Nitrile gloves (not latex — alcohol can degrade latex)
  • Respirator mask with organic vapor cartridges (3M 6051 or equivalent)
  • Eye protection if you are using compressed air or working with large volumes
  • Drop cloth or silicone mat — protect your work surface. Ink goes through paper towels.

Budget Starter Kit

ItemApproximate Cost
Ranger Alcohol Ink 3-pack$12
Yupo pad 5×7 (10 sheets)$8
Blending solution (2oz)$5
Felt applicator with handle$6
Isopropyl alcohol 91% (from pharmacy)$3
Nitrile gloves (box)$5
Straw, cotton swabs, pipettes$2
Total~$41

That is genuinely enough to produce your first framed piece. Add a can of UV-resistant clear spray sealant ($8-10) when you are ready to seal finished work.

Shadow box crafting materials neatly organized including cardstock, foam spacers, LED lights, and measuring tools

For more on choosing craft supplies wisely, see our guide to Cricut cardstock types and paper selection — the same paper-weight logic applies to understanding Yupo and other specialty surfaces.

Turn Your Alcohol Ink Backgrounds into Stunning Shadow Box Art
These floral shadow box templates pair beautifully with vivid alcohol ink backdrops — the ink shows through delicate petal cutouts for a stained-glass glow effect.

Core Alcohol Ink Techniques for Beginners

These four techniques are the foundation. Master them and you can produce an enormous variety of effects. Each one uses the same basic supplies — the difference is how you apply the ink and what you do with the surface while it dries.

Technique 1: Dripping and Blooming

This is the most intuitive starting point. The results look complex, but the process is simple.

How to do it:

  1. Place a sheet of Yupo paper on a flat, level surface.
  2. Squeeze a few drops of your first color directly onto the paper. Use 2-3 drops per area — more ink creates larger blooms.
  3. Add 2-3 drops of a second color adjacent to or overlapping the first.
  4. Add a drop or two of blending solution on top of or between the ink drops.
  5. The inks will bloom outward on their own as the alcohol spreads. Let them.
  6. Optionally, tilt the paper slightly to guide the flow in a particular direction.
  7. Let it dry undisturbed (30-60 seconds for small drops, 2-3 minutes for larger pools).

What you will see: Each drop expands into a circular bloom with a darker rim and lighter center. Where two colors meet, they create a natural gradient with organic, cell-like formations. The blending solution creates lighter, more transparent areas and encourages the colors to interact.

Tips for better blooms:

  • Drop ink onto dry paper for sharp, defined edges. Drop onto blending solution already on the paper for softer, more diffused blooms.
  • Use less ink per drop for small, delicate patterns. More ink=larger, bolder areas.
  • Do not overwork it. The instinct is to keep adding ink and moving it around. Stop early. The ink does its best work when you let it dry on its own.

Technique 2: Tilt and Flow

This technique uses gravity to create rivers, channels, and directional movement across the surface.

How to do it:

  1. Apply several drops of ink across the upper portion of your Yupo paper.
  2. Add blending solution drops between and around the ink.
  3. Pick up the paper and tilt it slowly in the direction you want the ink to flow.
  4. Keep tilting gently — the ink will flow downward, creating rivers and streams of color.
  5. Change the tilt angle and direction to create branching paths and organic patterns.
  6. When you like what you see, place the paper flat and let it dry.

What you will see: Long, flowing channels of color with natural variations in width and intensity. Where multiple colors flow together, they blend in streaks rather than the circular gradients of the drip technique.

Tips for better flow:

  • Start with more blending solution than you think you need. The ink needs a wet surface to flow smoothly.
  • Tilt slowly. Fast tilting dumps the ink off the edge. Slow tilting gives the colors time to interact as they move.
  • Work vertically over a protected surface — ink will drip off the bottom edge. A baking sheet lined with parchment paper makes a good catch tray.

Technique 3: Pouncing with Felt

This creates textured, patterned backgrounds that work beautifully as standalone art or as layered backgrounds.

How to do it:

  1. Load a felt applicator pad with 2-3 drops of ink and 1-2 drops of blending solution.
  2. Press the felt onto the Yupo surface with a gentle up-and-down pouncing motion — like stippling.
  3. Work across the surface, pouncing in random or deliberate patterns.
  4. Reload the felt as needed. Switch colors by switching felt pads.
  5. Let each layer dry before adding the next for cleaner color separation, or work wet-on-wet for softer blending.

What you will see: A textured, almost fabric-like surface with subtle color variation. Pouncing creates a stippled texture that looks completely different from dripping or tilting. It is the best technique for covering large areas evenly.

Tips for better pouncing:

  • Use light pressure. Pressing too hard creates blotches instead of an even texture.
  • Overlap your pouncing slightly to avoid gaps.
  • Build color gradually — two light layers look better than one heavy one.

Technique 4: Air Blowing and Straws

This creates organic, dendritic (tree-like) patterns with directional energy.

How to do it:

  1. Apply drops of ink and a generous amount of blending solution to the paper.
  2. Use a straw, hair dryer on low/cool setting, or compressed air can to blow the ink across the surface.
  3. Aim the air stream from one direction to push the ink into tendrils and fingers.
  4. Change direction to create branching, organic patterns.
  5. Stop blowing and let it dry when the pattern looks interesting.

What you will see: Thin, branching rivulets of color that look like rivers, trees, veins, or neural networks — depending on the colors and how aggressively you blow. The edges are feathery and organic, unlike any other technique.

Tips for better blowing:

  • Use a straw for small pieces — you have more control over direction and force.
  • A hair dryer on cool/low is better for larger pieces. Warm or hot air speeds drying and stops the ink from moving before you want it to.
  • Apply more blending solution than ink. The ink needs a wet, slick surface to form those long tendrils. Too little solution and the ink just blobs.

Combining Techniques for Striking Results

The real magic happens when you layer these techniques on a single piece. Here is a workflow that combines all four methods into one cohesive artwork:

Step 1 — Base layer (pouncing). Cover the entire Yupo surface with a light, even layer of color using the pouncing technique. Two or three analogous colors (like blues and greens) create a rich, varied base. Let it dry completely.

Step 2 — Focal blooms (dripping). Choose 2-3 areas where you want focal points. Drop contrasting or complementary colors (gold on blue, white on dark) directly onto the dry base layer. The new drops will bloom on top of the existing color, creating layered depth. Let dry.

Step 3 — Flow connections (tilting). Add blending solution drops between the focal blooms. Tilt the paper to create flowing connections between them — rivers of color linking the focal points. This creates visual movement that guides the eye across the piece.

Step 4 — Fine detail (air blowing). Add small drops of ink at key points and blow them into tendrils using a straw. This adds directional energy and organic detail that breaks up the circular patterns of the blooms.

Step 5 — Highlights and lift. Dip a cotton swab in blending solution and touch it to areas where you want to lift color (creating light spots). This is how you add highlights and create contrast without adding new ink.

The result is a multi-layered, complex piece that looks like it required advanced skills — but you built it using the same four basic techniques, just applied sequentially.

Illuminated paper cut shadow box showing multiple layers of precisely cut cardstock with foam spacers and LED backlighting

Using Alcohol Ink as Shadow Box Backgrounds

This is where alcohol ink meets papercutting — and where the technique becomes genuinely useful for MMA-style projects. One of the most effective ways to display alcohol ink art is as the background layer in a layered paper-cut shadow box. The ink creates a vivid, abstract backdrop that shows through the cutout design in the front layers.

Why it works so well:

  • Alcohol ink on Yupo stays perfectly flat — no warping, no buckling. This means it fits behind paper-cut layers without distorting.
  • The translucent layering of the ink creates depth that enhances the 3D shadow box effect. Light passes through the ink differently depending on the layer thickness, adding subtle dimension.
  • The vibrant, abstract nature of alcohol ink contrasts beautifully with the precise, geometric lines of papercut designs. Organic chaos behind structured order is a visually powerful combination.

How to create an inked shadow box background:

  1. Cut your Yupo paper to the exact dimensions of your shadow box backing. Measure twice — Yupo does not shrink or expand, so what you cut is what you get.
  2. Create your alcohol ink art using any combination of the techniques above. Keep the design relatively abstract — specific shapes or images compete with the papercut front layer rather than complementing it.
  3. Let the ink dry completely (wait 24 hours for the deepest layers to fully cure).
  4. Seal the inked surface with a UV-resistant clear spray (see sealing section below). This prevents the ink from reactivating when you apply adhesive.
  5. Mount the sealed Yupo sheet as the back layer of your shadow box.
  6. Add your papercut front layers using foam spacers for depth.

For ideas on shadow box designs that pair well with abstract backgrounds, see our guide to five easy paper-cut shadow box projects for beginners. The simpler silhouettes — trees, butterflies, geometric shapes — work best with busy inked backgrounds because they do not compete for visual attention.

If you want to add even more drama, add LED lights safely behind the inked Yupo layer. The translucent ink glows beautifully when backlit, turning a daytime art piece into an ambient nightlight.

Sealing and Protecting Alcohol Ink Art

Alcohol ink is dye-based, which means it is vulnerable to UV fading, moisture, and physical abrasion. Unsealed alcohol ink will smudge if touched and fade noticeably within months of sun exposure. Sealing is not optional — it is part of the process.

Spray Sealants

Spray sealants are the safest option for alcohol ink because they do not involve touching the surface. A brush-on varnish can reactivate the ink and smear your carefully created patterns.

Recommended products and order:

  1. Krylon UV-Resistant Clear Coating — Apply 2-3 light, even coats. This provides UV protection and a basic physical barrier. Hold the can 10-12 inches from the surface and sweep in even passes. Let each coat dry for 15 minutes.
  2. Ranger Gloss Multi-Medium or Krylon UV Archival Varnish — Apply 1-2 coats over the UV layer for additional durability and a glossy finish that enhances the ink's vibrancy.

Resin Coating

For the most professional, gallery-quality finish, pour a thin layer of epoxy resin over the sealed ink. Resin creates a thick, glass-like surface that is completely waterproof, highly durable, and dramatically enhances the color depth.

Process:

  1. Seal the ink with spray sealant first (always seal before resin to prevent the resin from reactivating the ink).
  2. Mix epoxy resin according to the manufacturer's instructions.
  3. Pour over the artwork, spreading with a spreader or tilting to coat evenly.
  4. Use a heat gun or torch briefly to pop air bubbles.
  5. Cover and let cure for 24-72 hours depending on the resin.

Resin is best for standalone wall pieces and ceramic tile coasters. It is overkill for shadow box backgrounds where the ink will be protected behind glass.

Sealing Quick Reference

MethodBest ForDurabilityFinishCost
UV spray onlyShadow box backgroundsModerateMatte/satinLow
UV spray + gloss varnishFramed wall artGoodGlossyLow
Spray + epoxy resinStandalone pieces, coastersExcellentGlass-likeMedium
No sealantNothing — always sealPoorN/AN/A

Project Ideas for Your First Alcohol Ink Pieces

These projects are designed to use the techniques you just learned and produce frame-ready results. Each one is achievable in a single session.

Project 1: Abstract Bloom Art (Beginner)

Techniques: Dripping and blooming, tilt and flow
Time: 30-60 minutes plus drying
Supplies: 3 ink colors, blending solution, Yupo 5×7, straw

Choose an analogous palette (three blues, or three warm tones). Drop the lightest color first in 3-4 pools across the paper. Drop the medium color into the edges of the pools. Drop the darkest color as accent dots. Tilt gently to connect the pools. Blow specific areas with a straw for tendril details. Frame in a 5×7 frame.

Project 2: Ceramic Tile Coasters (Beginner)

Techniques: Dripping and blooming
Time: 20 minutes per tile plus drying and sealing
Supplies: White glazed ceramic tiles, 3-4 ink colors, blending solution, spray sealant, epoxy resin (optional), felt pads for coaster backs

Drop 2-3 colors onto each tile with blending solution. Let the ink bloom naturally. Tilt gently for movement. Dry, seal with UV spray, then coat with epoxy resin for a waterproof, durable coaster surface. Glue felt pads to the back. These make excellent gifts.

Project 3: Galaxy Effect Panel (Intermediate)

Techniques: Pouncing, air blowing, dripping, lifting
Time: 1-2 hours plus drying
Supplies: Yupo 9×12, black/dark blue/purple/white/metallic inks, blending solution, straw, cotton swabs

Pounce a dark blue-purple base. Drop black pools for deep space areas. Blow metallic gold and white inks into tendrils for "nebula" effects. Lift small dots with a cotton swab dipped in blending solution to create "stars." This project rewards patience — build layers slowly and let each one dry.

Project 4: Shadow Box Background Panel (Intermediate)

Techniques: Pouncing base, dripping focal points, tilt connections
Time: 1-2 hours plus 24-hour cure
Supplies: Yupo cut to shadow box dimensions, 4-5 ink colors, blending solution, spray sealant, shadow box frame, papercut front layer

Create an abstract background using the combining-techniques workflow from earlier in this guide. Seal with UV spray. Mount in shadow box behind a papercut silhouette. For more shadow box inspiration, browse our DIY shadow box ideas collection.

Project 5: Metallic Accents on Dark Ground (Advanced)

Techniques: Pouncing, dripping, metallic ink layering
Time: 2-3 hours
Supplies: Yupo 9×12, black ink, Pinata Rich Gold and Brass, blending solution, felt applicator

Build up a solid black ground in 2-3 pounced layers. Let dry. Drop metallic inks sparingly onto the black surface — the contrast of gold or copper against deep black is stunning. Use minimal blending solution so the metallics stay dense and opaque. A few well-placed metallic drops on a dark field create dramatic, sophisticated wall art.

Common Problems and How to Fix Them

Muddy colors. This happens when you mix too many colors in one area, especially complementary colors (red + green, blue + orange). The fix: limit your palette to 3-4 colors per piece. If an area gets muddy, let it dry completely and pounce a dark color over it to "reset" that section, then start layering again.

Ink beading up instead of spreading. The surface is contaminated — likely finger oils or residue. The fix: wipe the Yupo with rubbing alcohol on a lint-free cloth before starting. Handle Yupo by the edges only. If beading persists, the Yupo may have a manufacturing residue — wash it gently with mild dish soap and water, then dry completely.

Colours look dull after sealing. You applied the spray sealant too heavily in one pass, creating a milky film. The fix: apply sealant in multiple light coats rather than one heavy coat. If already sealed and dull, you can sometimes restore vibrancy by applying a gloss varnish over the top.

Ink smudges when touched. It is not fully sealed, or you used too light a sealant. The fix: reapply spray sealant in 2-3 additional light coats. For pieces that will be handled (coasters, phone cases), resin coating is the only reliable protection.

Paper warping. You are probably not using Yupo — regular paper curls and buckles under the alcohol. The fix: use Yupo. If you must use another surface, tape it down to a rigid board with painter's tape around all edges while working.

Headaches or dizziness. Stop immediately. Move to fresh air. You are working without adequate ventilation. Alcohol ink fumes are solvent-based and can cause headaches, nausea, and dizziness with prolonged exposure in enclosed spaces. Always work with ventilation. Always wear a respirator for sessions longer than 15 minutes.

Start Creating Alcohol Ink Art

You have the techniques, the supply list, and five concrete projects to try. Alcohol ink art rewards experimentation — the medium is inherently unpredictable, and that is the point. Your first piece will not be perfect, but it will be uniquely yours, and it will teach you more about how the ink behaves than any tutorial can.

Start with the abstract bloom project. It uses the most intuitive technique, requires only three colors, and produces results that look impressive in a frame. Then bring those skills to our DIY shadow box ideas and create something dimensional — an alcohol ink background behind a layered papercut silhouette is a combination that genuinely stops people when they see it on a wall.

For more paper craft techniques that pair with alcohol ink, explore our guide to DIY stencil art on canvas — stencilled designs over inked backgrounds create another layer of visual complexity.

Frequently Asked Questions About Alcohol Ink Art

Is alcohol ink art safe for beginners?

Alcohol ink is safe when you follow basic precautions. The inks are solvent-based, so ventilation is essential — work near an open window with a fan, and wear nitrile gloves. For sessions longer than 15 minutes, use a respirator with organic vapor cartridges. Keep inks away from children and pets. The pigments are not food-safe, and the fumes can cause headaches in enclosed spaces.

Can I use alcohol ink on regular paper?

You can, but the results will be disappointing. Regular paper absorbs the ink into its fibres, which eliminates the characteristic blooming and spreading effect. The colors look flat and muted compared to Yupo or other non-porous surfaces. For best results, use Yupo paper (synthetic polypropylene), glossy photo paper, ceramic tiles, or glass. If you want to try regular paper, use a heavy watercolor paper (300gsm) and accept that the effects will be more subtle.

How do I fix a mistake in alcohol ink?

The easiest fix is to let the area dry, then cover it with a new layer of ink. Because alcohol ink is transparent, the "mistake" becomes part of the layering. For small corrections, dip a cotton swab in blending solution and gently lift the ink from the specific area — this lightens or removes the color. For major mistakes, flood the entire surface with blending solution, wipe with a lint-free cloth, and start over. Yupo is forgiving — you can clean it completely with rubbing alcohol.

How long does alcohol ink take to dry?

Small drops and thin layers dry in 30-60 seconds. Larger pools take 2-5 minutes. Heavily saturated areas with multiple layers may take 10-15 minutes. For complete curing before sealing, wait at least 24 hours to ensure all alcohol has evaporated from the deepest layers. Sealing too early can trap solvent under the sealant, causing cloudiness.

Can I use alcohol ink with Cricut projects?

Yes — and the combination is excellent. Create an alcohol ink background on Yupo, seal it, then use it as the back layer of a Cricut-cut shadow box design. The vivid ink contrasts beautifully with white or black cardstock silhouettes. You can also apply alcohol ink directly to Cricut-cut shapes made from glossy or coated materials. Avoid applying ink to uncoated cardstock cuts — the results are muted and the cardstock warps.