Articles13 min read

Flower Shadow Box Ideas — 12 Paper Cut & Cricut Projects

Transform paper into lasting blooms with these 12 flower shadow box ideas. From simple single-flower designs to elaborate botanical scenes, each project works with Cricut or Silhouette and uses layered paper cut techniques.

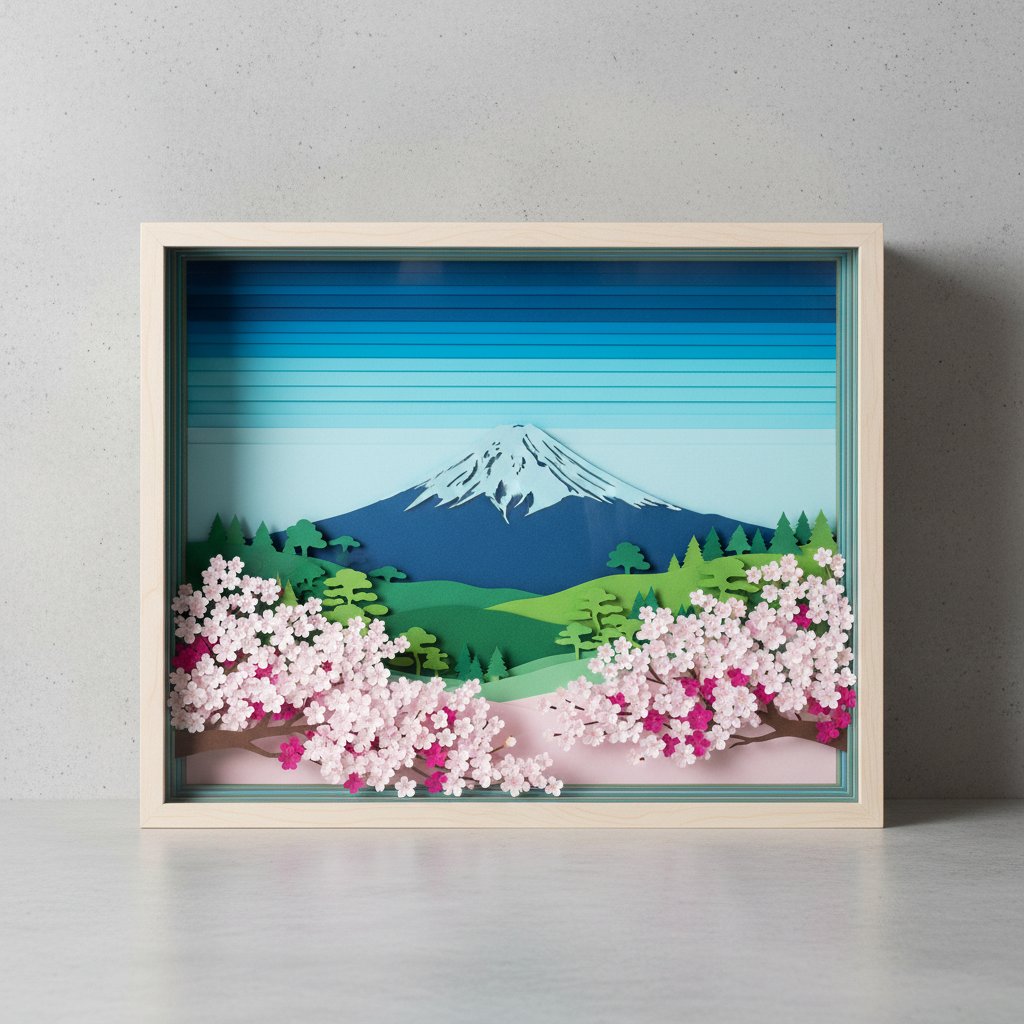
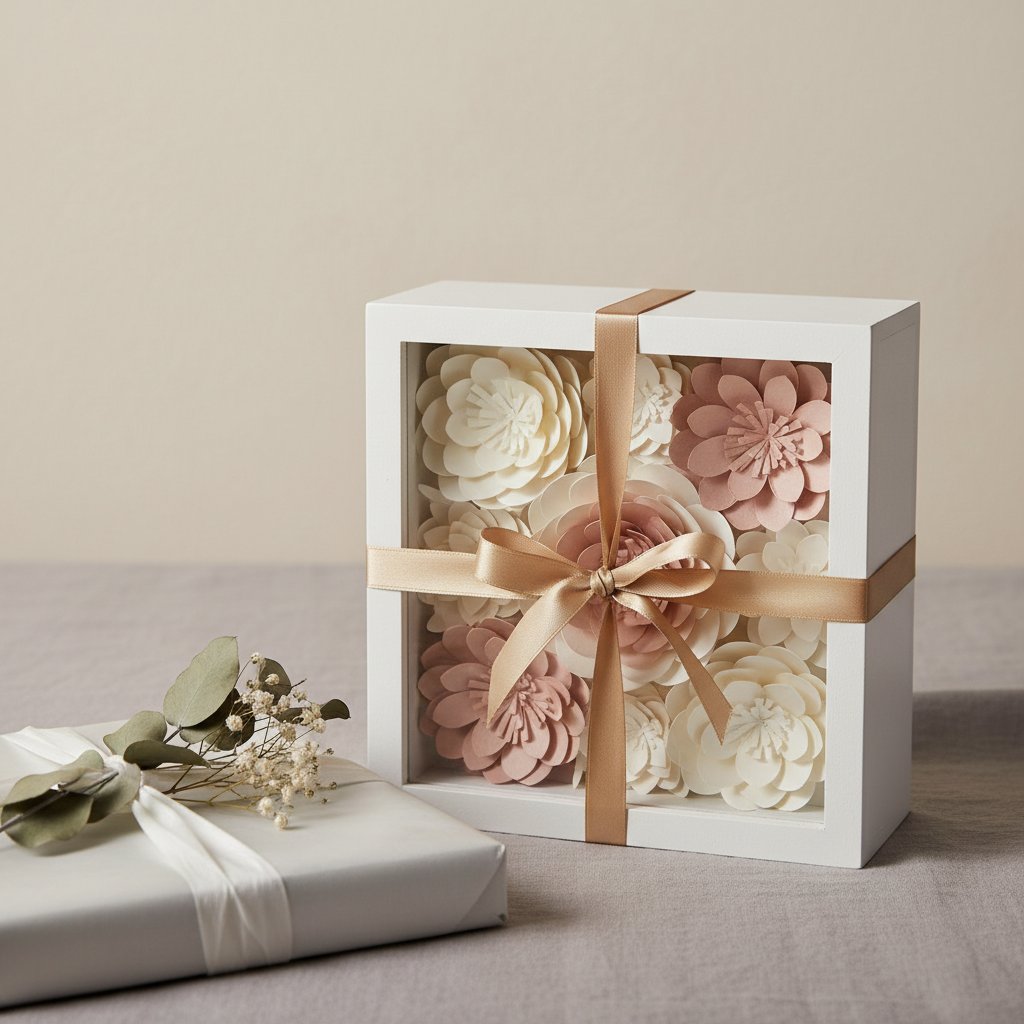
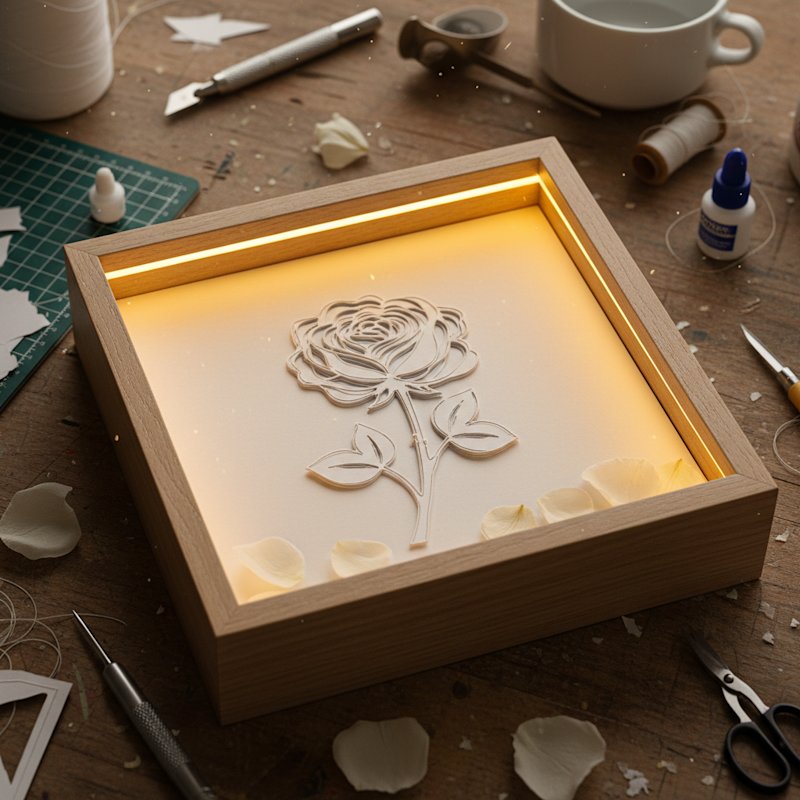
Flowers fade, but paper flowers last forever. A flower shadow box combines the beauty of botanical design with the depth of layered paper art, creating a piece that glows when backlit and looks stunning on any wall. Whether you want a single rose for a bedroom, a wildflower meadow for a nursery, or an elaborate hydrangea arrangement for a wedding gift, paper cut flower shadow boxes deliver.

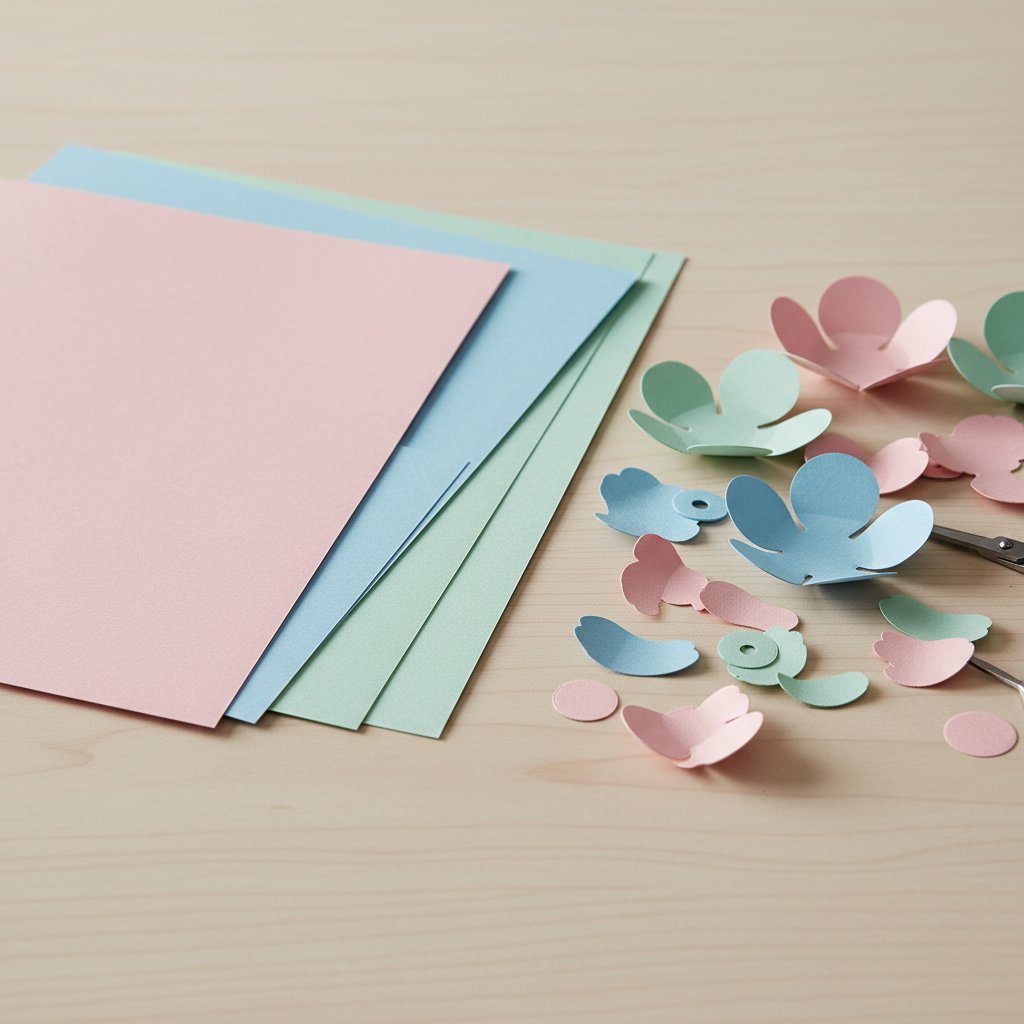
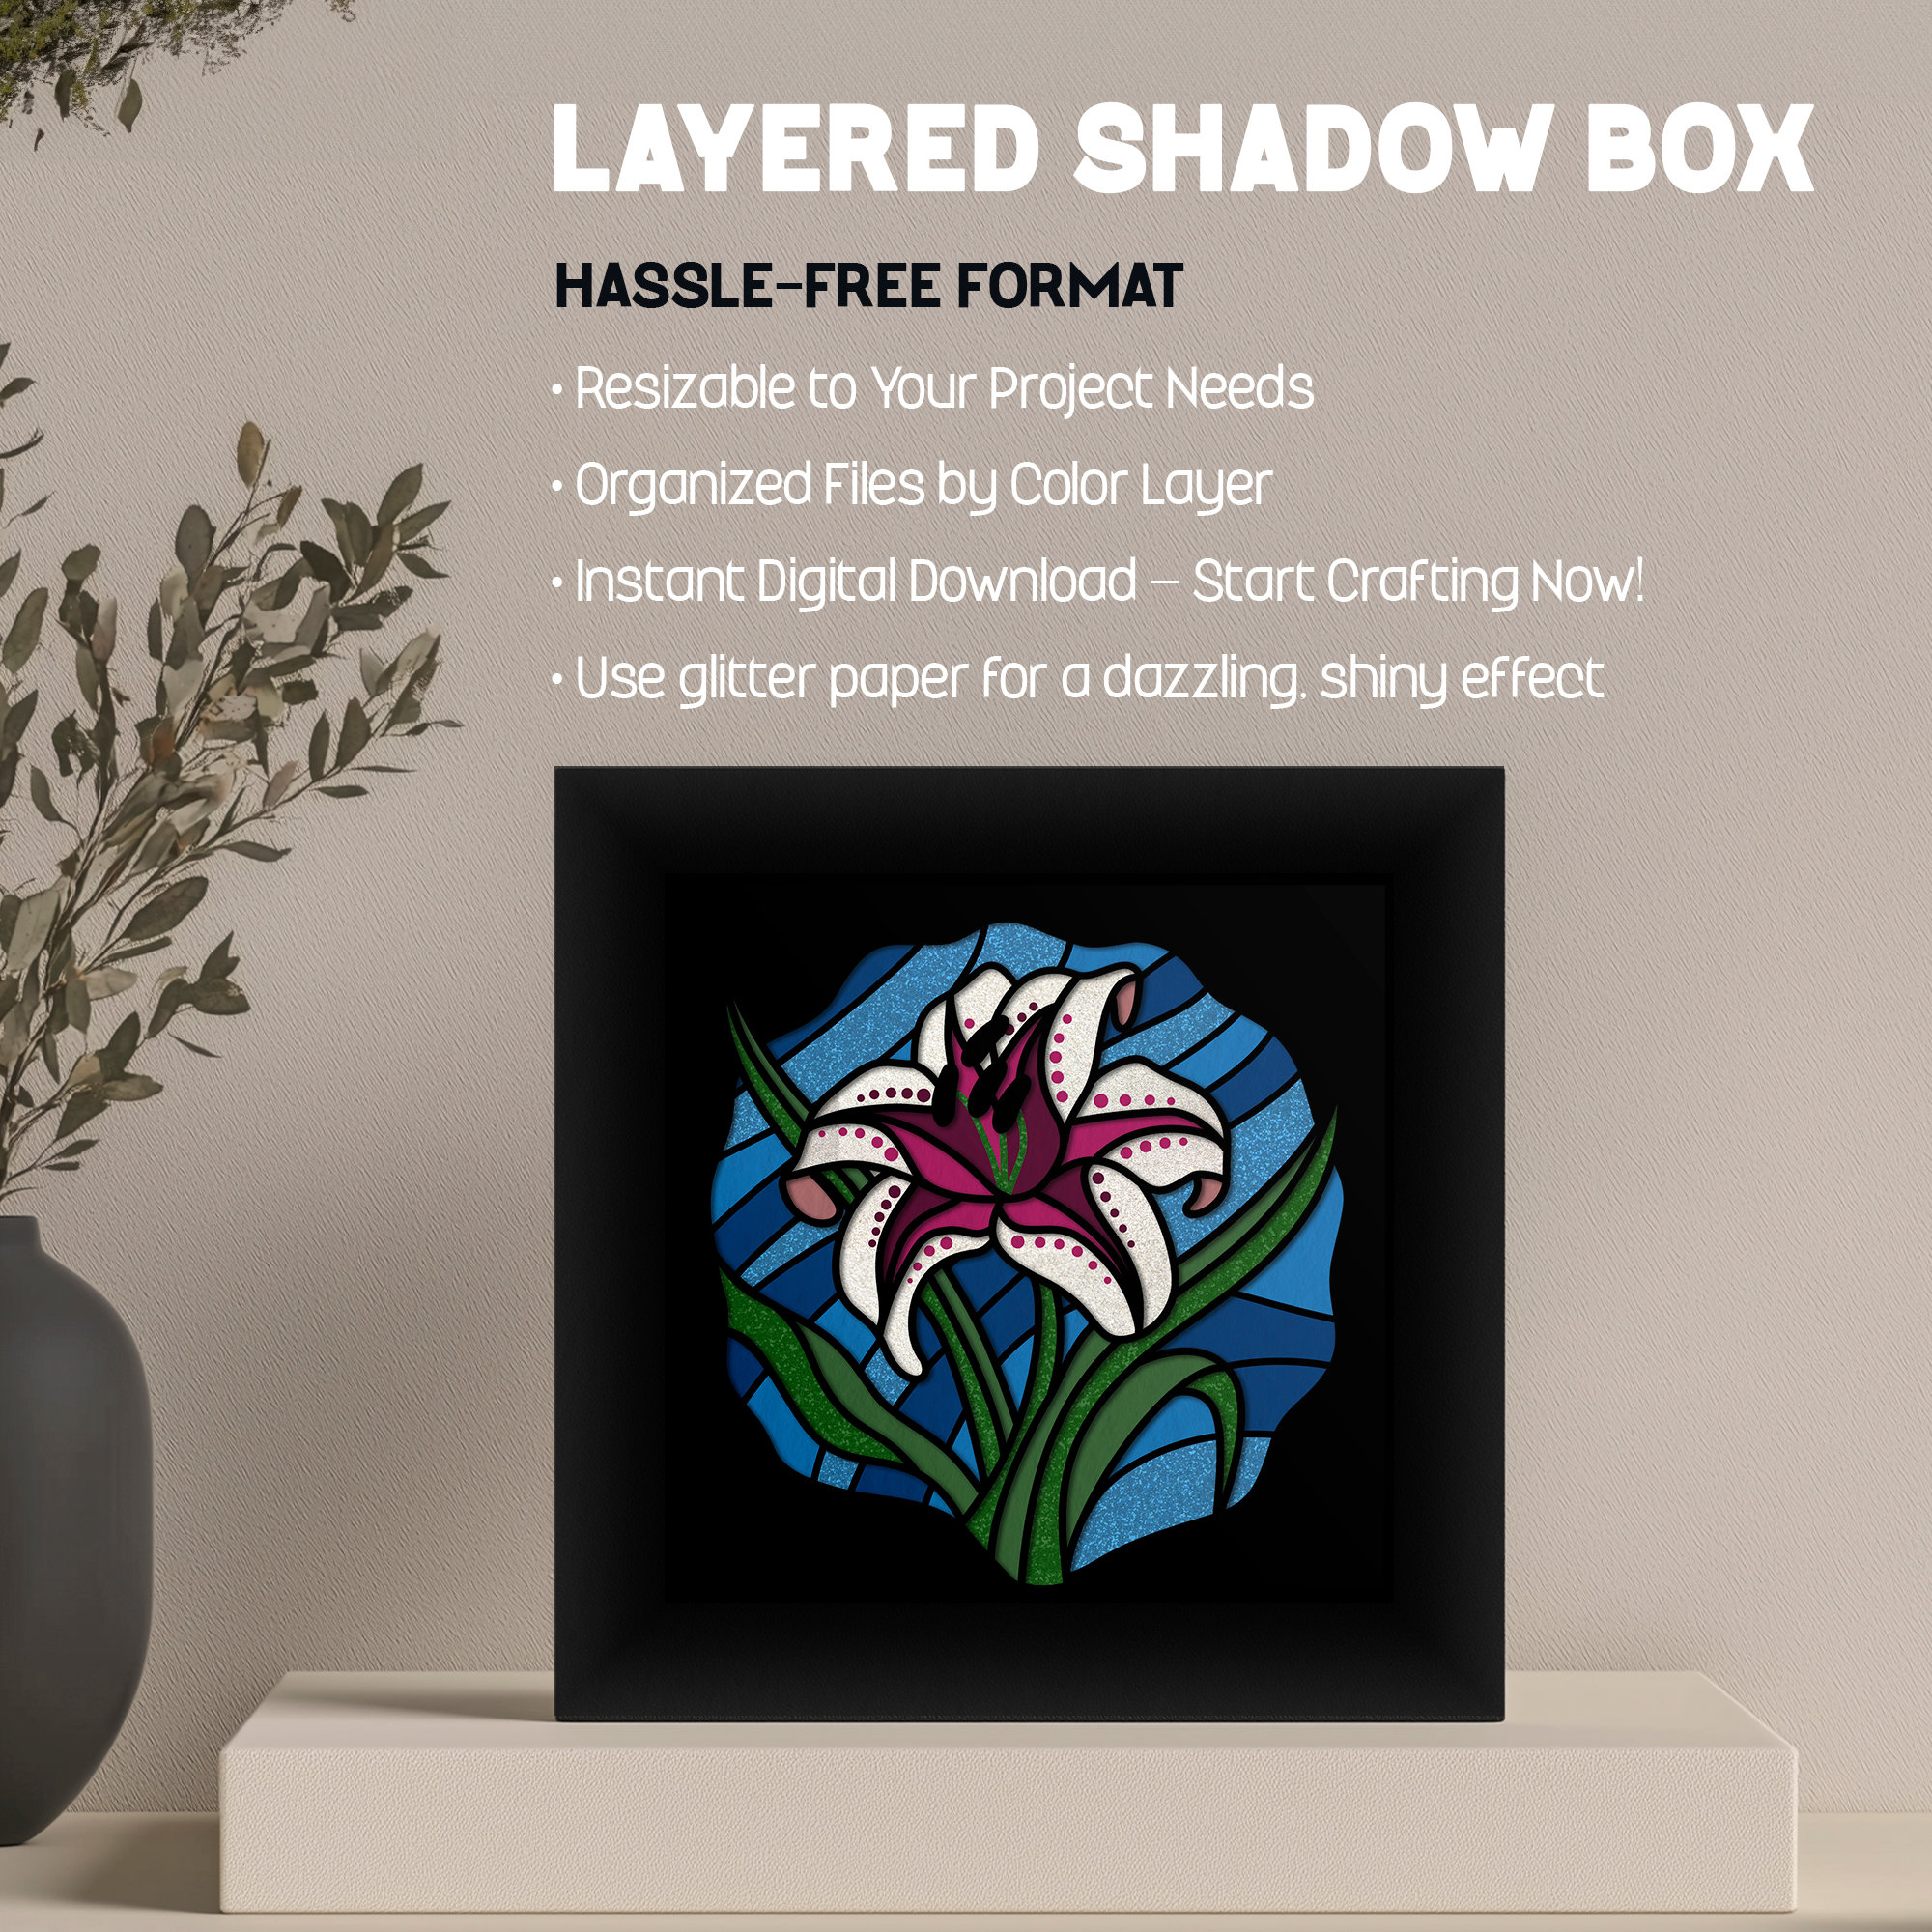
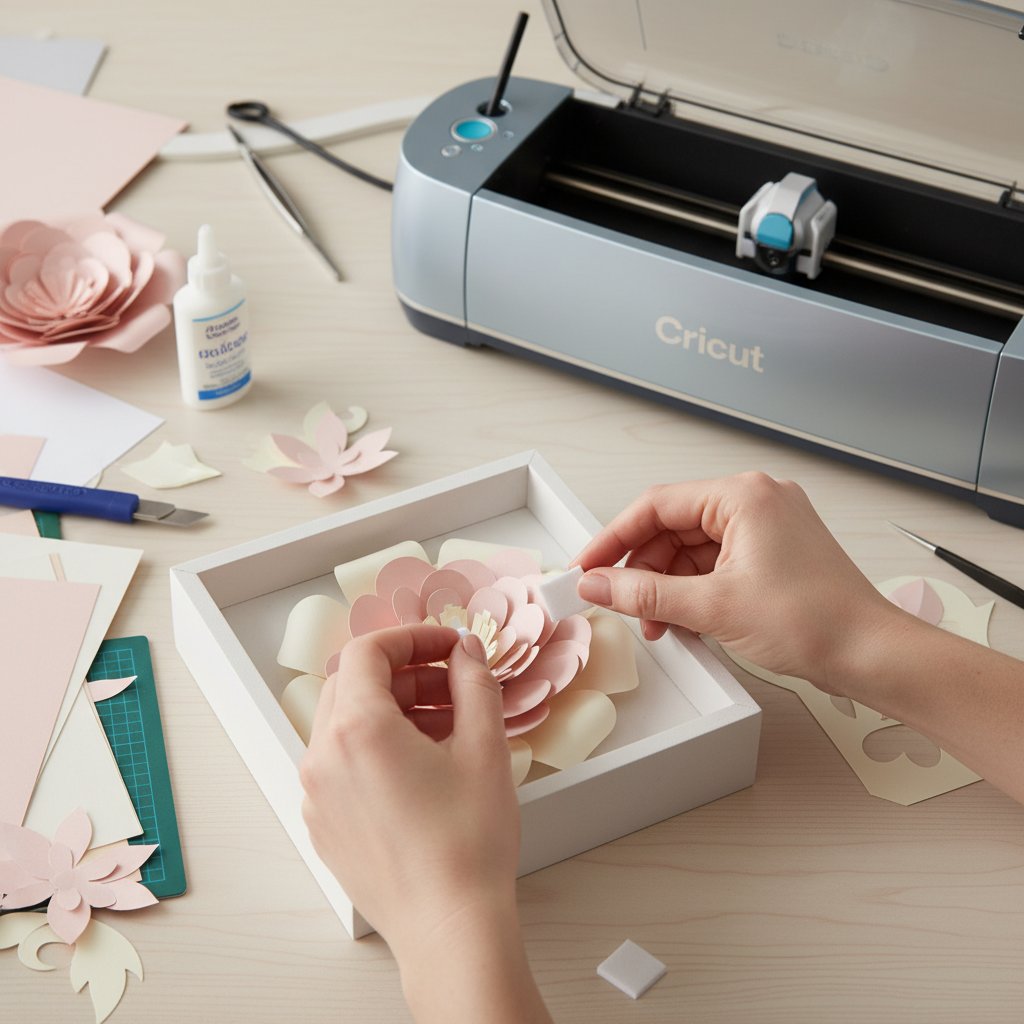
This guide walks you through 12 flower shadow box ideas organized by difficulty, from beginner-friendly single-flower designs to advanced multi-species botanical scenes. Each project includes paper recommendations, frame depth requirements, layer counts, and styling suggestions. Every design works with a Cricut or Silhouette cutting machine using layered SVG templates.

If you are new to shadow box crafting, start with our complete beginner guide to layered paper cut shadow boxes for the fundamentals of layering, spacing, and assembly. Already comfortable with the basics? Jump straight to any project that catches your eye.

Floral shadow boxes have become one of the most searched papercraft projects, and for good reason. They combine three things crafters love: natural beauty, intricate cutting, and a finished piece that looks far more expensive than it costs to make.

Paper Flowers Never Wilt

Real flower arrangements last a week. A paper cut flower shadow box lasts indefinitely. This makes them ideal for memorial pieces, wedding keepsakes, and gifts where permanence matters. A Mother's Day shadow box made in May still looks identical in December.

Layered Depth Creates Realism

Unlike flat paper flowers, a layered shadow box adds genuine three-dimensional depth. Each petal, leaf, and stem sits on its own layer, separated by foam spacers. When you add LED backlighting, the light passes through the layers at different intensities, creating the illusion of real depth and shadow. Our LED lighting safety guide covers the best lighting setup for flower designs.

Universal Gift Appeal

Flowers are universally appreciated. A paper flower shadow box works as a gift for birthdays, anniversaries, Mother's Day, Valentine's Day, weddings, sympathy, and home decor. The same technique produces wildly different results depending on the flower species and color palette you choose.

Budget-Friendly Luxury Look

A completed flower shadow box looks like a $100+ piece of art. The actual materials cost: cardstock ($0.50–$2 per sheet), a shadow box frame ($8–$25), foam spacers ($3), and LED lights ($5–$10). Total cost per project typically falls between $15 and $40. For a deeper breakdown, see our cost analysis for shadow box projects.

Beginner Flower Projects (4–6 Layers)

These projects use 4 to 6 layers and work with 1-inch deep frames. They are ideal for your first flower shadow box or a quick weekend project.

1. Single Rose Silhouette

A single rose in profile is the most iconic flower shadow box design. The layers create depth through overlapping petals, and the silhouette style means you can cut it from a single color of cardstock (red or burgundy looks stunning) with a white or cream background.

  • Layers: 5
  • Frame: 8×8 inch, 1-inch depth
  • Paper: 65 lb cardstock (red for flower, cream for background)
  • Difficulty: Easy
  • Tip: Use graduated shades of red from dark (front) to light (back) for a more realistic bloom. The best cardstock guide covers which brands hold clean cuts for petal curves.

2. Sunflower with Spiral Center

Sunflowers are structurally simple — broad petals radiating from a textured center. The spiral center can be cut as a single intricate layer, while the petals spread across 2–3 broader layers. Yellow and brown cardstock create a cheerful piece that works well in kitchens and children's rooms.

  • Layers: 4
  • Frame: 8×8 inch, 1-inch depth
  • Paper: 65 lb cardstock (golden yellow, dark brown, green)
  • Difficulty: Easy
  • Tip: Use a fine-point blade for the spiral center. If your machine struggles with the tight curves, our Cricut blade comparison guide helps you pick the right blade.

3. Simple Daisy Chain

A row of daisies connected by curving stems makes a charming, minimalist shadow box. Because daisies are geometrically simple (oval petals around a circle), this project cuts quickly and assembles easily. It is an excellent first project for crafters who want a flower design but feel intimidated by complex petal work.

  • Layers: 4
  • Frame: 8×10 inch, 1-inch depth
  • Paper: 65 lb white cardstock with pastel green stems
  • Difficulty: Very easy
  • Tip: White-on-white daisies look elegant. Try white petals with a soft yellow center on a pale blue background for a fresh, Scandinavian feel.

4. Tulip Trio

Three tulips standing at different heights create a balanced, pleasing composition. Tulips have a simple cupped petal shape that translates well to layered paper cutting. Arrange them in a small vase shape at the bottom layer for a complete botanical scene.

  • Layers: 5
  • Frame: 8×8 inch, 1-inch depth
  • Paper: 65 lb cardstock (choose pink, red, purple, or orange)
  • Difficulty: Easy
  • Tip: Cut the tulips in three different colors for a spring arrangement feel, or use graduated shades of a single color for a more sophisticated look.

Intermediate Flower Projects (7–9 Layers)

These designs use 7 to 9 layers and require deeper frames (1.5–2 inches). The additional layers allow for more petal detail, foliage, and background elements.

5. Hydrangea Cluster

Hydrangeas are a favorite for paper shadow boxes because their clustered petal structure creates spectacular depth when layered. Each "bloom" is actually dozens of tiny four-petal flowers packed together. In a shadow box, these layers stack beautifully, creating a full, lush appearance.

  • Layers: 8
  • Frame: 8×10 inch, 1.5-inch depth
  • Paper: 65 lb cardstock (blue, pink, or white with green foliage)
  • Difficulty: Moderate
  • Tip: Hydrangeas naturally change color based on soil pH. Recreate this effect by using 2–3 shades of your chosen color across different layers.

6. Cherry Blossom Branch

A Japanese-inspired cherry blossom branch creates an elegant, asymmetric composition. The branch sweeps diagonally across the frame with clusters of five-petal blossoms at varying depths. This design benefits from a dark background (navy or black) that makes the pale pink blossoms glow dramatically when backlit.

  • Layers: 7
  • Frame: 8×10 inch, 1.5-inch depth
  • Paper: 65 lb cardstock (soft pink, brown, dark background)
  • Difficulty: Moderate
  • Tip: Add tiny dots of gold or pearl cardstock at the flower centers for an authentic Japanese aesthetic. Metallic cardstock tips are in our metallic and pearl cardstock guide.

7. Wildflower Meadow

A meadow scene with 3–5 different wildflower species creates a lush, storybook-quality shadow box. Include daisies, cornflowers, poppies, and grasses at varying heights. This project rewards careful color planning — sketch your color layout before cutting to ensure the final piece feels cohesive rather than chaotic.

  • Layers: 9
  • Frame: 11×14 inch, 2-inch depth
  • Paper: 65 lb cardstock in 5–6 colors
  • Difficulty: Moderate
  • Tip: Place taller flowers (poppies, cornflowers) on the back layers and shorter species (daisies, clover) on the front layers to create a natural perspective effect.

8. Lotus Pond

A serene lotus flower floating on water with lily pads and gentle ripples creates a calming, zen-inspired piece. The circular frame composition and water-effect layers make this a unique addition to any space. Use blue gradient layers for the water and soft pink or white for the lotus.

  • Layers: 8
  • Frame: 8×8 inch or 10×10 inch, 1.5-inch depth
  • Paper: 65 lb cardstock (blue gradient, soft pink, green)
  • Difficulty: Moderate
  • Tip: Use vellum (translucent paper) for the water ripple layers to create a realistic see-through effect. Our cardstock types guide includes vellum cutting settings.

Advanced Flower Projects (10–14 Layers)

These designs are for experienced crafters who want showpiece results. They use 10+ layers and deep frames (2–3 inches), and they reward careful assembly with genuinely spectacular finished pieces.

9. Bouquet of Roses

A full bridal-style bouquet with 3–5 roses at different stages of bloom (tight bud, half-open, full bloom) surrounded by filler flowers and foliage. This is one of the most impressive shadow box designs you can make. The finished piece looks like an actual preserved flower arrangement behind glass.

  • Layers: 12
  • Frame: 11×14 inch, 2.5-inch depth
  • Paper: 65 lb cardstock (red or pink roses, green foliage, cream filler)
  • Difficulty: Advanced
  • Tip: Use 3 shades of your rose color (dark, medium, light) and assign them to layers based on depth — darker in front, lighter in back. This mimics how light naturally hits a real bouquet.

10. Botanical Wreath with Seasonal Flowers

A circular wreath design that frames a monogram letter or quote in the center, surrounded by seasonal flowers. Spring version: tulips and daffodils. Summer: daisies and sunflowers. Autumn: chrysanthemums and wheat. Winter: poinsettias and holly. The wreath structure means the design looks balanced and intentional regardless of the season.

  • Layers: 11
  • Frame: 10×10 inch or 12×12 inch, 2-inch depth
  • Paper: Seasonal colors, 65 lb cardstock
  • Difficulty: Advanced
  • Tip: Design the wreath frame and center element first, then place flowers around the circle. This ensures symmetry. For resizing the SVG to fit your frame, follow our shadow box SVG resizing guide.

11. Japanese Cherry Blossom Scene (Fuji-san)

A full landscape scene with Mount Fuji in the background, cherry blossom trees in the foreground, and falling petals drifting through the middle layers. This is a statement piece that doubles as wall art and conversation starter. The gradient sky layers (pale blue to deep blue) create stunning depth when backlit.

  • Layers: 14
  • Frame: 11×14 inch, 3-inch depth
  • Paper: 65 lb cardstock (blue gradient, pink, white, grey, green)
  • Difficulty: Advanced
  • Tip: Use our layer alignment techniques to keep the mountain silhouette crisp across all layers. Even a 1mm shift is visible in a landscape scene.

12. Pressed Flower Wall (Multi-Panel Triptych)

Three matching shadow boxes displayed side by side, each containing a different flower arrangement that connects visually to the next. Together they form a single wide composition. This project multiplies the wow factor and works beautifully above a sofa, bed, or dining table.

  • Layers: 8 per panel (24 total)
  • Frames: Three 8×10 inch frames, 1.5-inch depth each
  • Paper: Coordinated color palette across all three panels
  • Difficulty: Advanced (planning + assembly)
  • Tip: Design all three panels as a single SVG file, then separate into three files for cutting. This guarantees visual continuity across the triptych.

Paper and Color Tips for Flower Shadow Boxes

Getting the paper and colors right makes the difference between a flat-looking cutout and a bloom that looks real enough to touch.

Cardstock Weight

Use 65 lb (176 gsm) cardstock for most flower layers. This weight holds clean cuts on curved petals without being too thick to layer densely. For delicate filler flowers and tiny petals, try 80 lb text weight (120 gsm) — it cuts cleaner on intricate details. Our cardstock settings guide has exact Cricut and Silhouette settings for each weight.

Color Theory for Flowers

  • Monochromatic: Use 3–4 shades of one color (dark pink, medium pink, light pink, blush). This creates sophisticated, cohesive designs.
  • Complementary: Pair opposites on the color wheel (blue hydrangeas with orange butterflies, purple lavender with yellow bees). This creates energetic, eye-catching pieces.
  • Analogous: Use neighboring colors (pink roses with red berries and orange autumn leaves). This feels natural and harmonious.
  • Single-color silhouette: Cut everything from one dark color against a light background. Black or navy flower silhouettes look dramatic and modern.

Textured and Specialty Papers

  • Linen cardstock: Adds subtle texture that mimics real petal surfaces
  • Vellum: Translucent layers that work beautifully for water effects or soft petal overlays
  • Metallic cardstock: Use sparingly for flower centers, dew drops, or butterfly accents
  • Glitter cardstock: Reserve for accent layers only — too much sparkle overwhelms floral designs

Store your floral cardstock flat in a dry environment. Humidity warps paper and ruins clean cuts. Our paper storage guide has specific solutions for organizing paper by color.

Framing and Displaying Flower Shadow Boxes

The frame you choose dramatically affects the final look. Flower shadow boxes work in almost any frame style, but some pairings are particularly effective.

Frame Depth by Layer Count

  • 4–6 layers: 1-inch deep frame
  • 7–9 layers: 1.5-inch deep frame
  • 10–14 layers: 2–3-inch deep frame

Need help choosing the right frame? Our shadow box frame guide covers every size and depth option.

Best Frame Colors for Flowers

  • White frames: Clean, modern, works with every flower color. Best for daisies, tulips, and spring designs.
  • Natural wood: Warm, rustic, pairs beautifully with wildflowers and botanical scenes.
  • Black frames: Dramatic, creates strong contrast. Excellent for single-color silhouettes and cherry blossoms.
  • Gold frames: Elegant, formal. Perfect for rose bouquets, wedding designs, and anniversary gifts.

Display Placement

Flower shadow boxes look best where they catch natural or artificial light. Hang them near a window (not in direct sunlight, which fades cardstock), on a wall opposite a light fixture, or in a hallway with overhead lighting. For the full backlit effect, mount LED strip lights behind the frame as described in our LED installation guide.

Grouping Multiple Flower Boxes

Create a gallery wall with 2–4 flower shadow boxes in matching frames but different flower species. A popular combination: a rose, a hydrangea, a sunflower, and a cherry blossom branch in identical white frames. Space them 2–3 inches apart for a clean grid or offset them for an organic arrangement.

Occasions and Gifting Ideas

Flower shadow boxes make memorable gifts because they combine handmade effort with lasting beauty. Here are the best pairings of flower type to occasion:

OccasionBest Flower DesignColors
Mother's DayHydrangea or wildflower meadowPink, purple, soft green
Valentine's DaySingle rose or bouquetRed, burgundy, cream
WeddingBouquet of roses or botanical wreathWhite, blush, gold
AnniversaryTheir wedding flower recreatedOriginal wedding colors
BirthdaySunflower or their favorite flowerBright, cheerful
Sympathy / MemorialSingle white lily or lotusWhite, cream, soft blue
New BabyDaisy chain or tulip trioPastels matching nursery
HousewarmingBotanical wreath or wildflower meadowNeutrals, green, cream
Teacher GiftApple blossom or daisy chainRed, white, green
ChristmasPoinsettia (from seasonal designs)Red, green, gold

For wedding and anniversary pieces, consider including the couple's initials or wedding date in the design's center layer. This transforms a beautiful piece into a personalized keepsake.

Parents and grandparents particularly love flower shadow boxes made by children. Even a simple 4-layer daisy looks precious when a child helped choose the colors and assemble the layers.

Getting Started: Your First Flower Shadow Box

Ready to make your first flower shadow box? Here is a quick-start checklist:

What You Need

  • Cutting machine: Cricut Maker, Cricut Explore, or Silhouette Cameo
  • Fine-point blade: Standard blade works for most flower designs
  • StandardGrip mat: For 65 lb cardstock. Use LightGrip for lighter weights
  • 65 lb cardstock: 3–5 sheets in your chosen flower colors
  • Shadow box frame: 8×8 inch, 1-inch depth for beginner projects
  • Foam spacers: 2mm adhesive foam squares
  • Tweezers: For placing small petal pieces
  • LED fairy lights: Optional but highly recommended

If your cutting mat has lost its stickiness and cardstock shifts during flower cuts, revive it with our Cricut mat restoration guide. Flower designs with tight petal curves require a properly sticky mat.

Step-by-Step Assembly

  1. Cut all layers starting from the back layer to the front. Label each layer as you go.
  2. Stack and align all layers on top of each other to verify the design lines up before gluing. For alignment help, see our layer alignment troubleshooting guide.
  3. Attach foam spacers to the back of each layer (except the backmost layer). Use 2–3 spacers per side.
  4. Stack layers front-to-back inside the frame, pressing spacers firmly.
  5. Add LED lights behind the back layer if desired.
  6. Close the frame and display.

The entire process takes 1–2 hours for a beginner 4-layer project, including cutting time. Advanced designs with 12+ layers may take 3–4 hours.

For detailed assembly techniques including spacer placement and glue options, see our shadow box assembly guide with spacers and alignment.