Articles17 min read

Paper Cutting Tools for Beginners

Every tool you need to start paper cutting — from craft knives and cutting mats to specialty blades — tested with real projects and honest budget picks that actually work.

Simple floral silhouette shadow box with layered rose petals creating depth through backlighting

When I started paper cutting, I used a dull kitchen knife on a magazine as a cutting surface. The result was exactly what you'd expect — torn edges, ragged lines, and frustration that almost made me quit before I began. The right tools don't just make better cuts; they make the process enjoyable instead of painful.

Paper cutting is a tool-driven craft in a way that drawing or painting isn't. A pencil draws whether it costs $1 or $20. But a cheap knife with a loose blade will tear 65 lb cardstock on curves, while a quality craft knife with a fresh #11 blade glides through it. The gap between frustrating and satisfying is often a $5 blade replacement.

This guide covers every tool a beginner needs, organized by priority. Start with the essentials, add specialty tools as your projects demand them, and skip anything a marketing department told you was "must-have" that actually isn't.

Already have your tools and want to learn the craft itself? See our complete paper cut art guide for beginners, which covers techniques from your first cut to finished wall art.

Essential Tools Every Beginner Needs

Overhead flat lay of shadow box supplies including a frame colored cardstock foam dots and craft tools

You can start paper cutting with four things: a craft knife, a cutting mat, paper, and a metal ruler. Everything else is an upgrade, not a requirement. Here's the full breakdown of what matters and what doesn't.

The Core Four

| Tool | Purpose | Budget Pick | Pro Pick | |------|---------|-------------|----------| | Craft knife | Precision cuts, curves, interior shapes | X-Acto #1 with #11 blade ($5) | Olfa SVR-2 ($12) | | Cutting mat | Protects surface, self-heals | OLFA 12×18 green mat ($12) | Fiskars 18×24 ($20) | | Metal ruler | Straight cuts, measuring | Westcott 12" stainless ($4) | C-Thru 18" ($10) | | Cardstock | Your cutting medium | Recollections 65 lb, 50 sheets ($8) | Neenah Astrobrights 65 lb ($12) |

Total starter cost: under $30 if you buy budget options. That's enough to make your first 20+ projects.

What to Skip as a Beginner

  • Rotary cutters — designed for fabric and straight lines, not paper cutting detail work - Guillotine paper cutters — useful for trimming sheets, useless for cutting designs - Die-cutting machines — expensive ($100+) and limited to pre-made shapes - Laser cutters — overkill, expensive, and require ventilation

Focus on the core four until you can cut clean curves and straight lines consistently. Then add tools based on what your projects actually need.

Start with a Tested Beginner Template
The Crazy Dog papercut SVG is a single-layer design with bold cuts and forgiving curves — ideal for testing your new knife and cutting mat on a real project instead of practice scraps.

Precision Craft Knives

A fresh sharp craft knife making a clean precise cut through dark cardstock on an intricate floral papercut design

The craft knife is the single most important tool in paper cutting. Nothing else comes close in terms of impact on your results. A good knife with a sharp blade makes clean, precise cuts. A bad knife or dull blade tears, drags, and forces you to press too hard — which leads to mistakes and injuries.

X-Acto #1 Knife

The standard. Almost every paper cutter starts here and many never switch.

  • Blade type: #11 (fine point, triangular) — the universal paper cutting blade - Grip: Aluminum body, slightly textured - Collet: Twist-to-tighten collar holds blade securely - Price: $5–7 for the knife, $4 for a pack of 5 replacement blades - Best for: All-around paper cutting, beginners through advanced

The #11 blade has a tapered point that reaches into tight corners and a straight edge that excels at smooth curves. Replace it when cuts stop being effortless — usually after 2–3 hours of active cutting on cardstock.

Olfa SVR-2

A stainless-steel upgrade that many experienced cutters prefer.

  • Blade type: Snap-off 9mm (you snap off the dull segment for a fresh edge) - Grip: Stainless steel, rubberized grip section - No blade changes needed: Snap off 1–2 segments and keep cutting - Price: $10–12 - Best for: Long cutting sessions, heavy cardstock

The snap-off mechanism means you always have a sharp edge without buying replacement blades separately. One blade strip lasts for weeks of regular cutting.

Swivel Knife

A specialty blade that rotates 360° as you cut, following curves automatically.

  • Best for: Tight curves, circles, organic shapes - Not ideal for: Straight lines, beginners who haven't mastered basic knife control - Price: $8–15 - When to buy: After you've completed 10+ projects with a standard knife

Don't start with a swivel knife. Learn knife control on a fixed blade first — the swivel knife rewards skill but doesn't build it.

Cutting Mats — Your Most Underrated Tool

A cutting mat does three things: protects your table, protects your blade, and provides a measuring surface. The "self-healing" claim means the mat's surface compresses when cut and partially closes the cut line. It doesn't last forever, but a quality mat survives years of regular use.

Size Guide

| Mat Size | Best For | Projects | Price Range | |----------|----------|----------|-------------| | A4 (9×12") | Small designs, card-size cuts | Greeting cards, small art | $8–12 | | A3 (12×18") | Standard projects, most beginners | Shadow box layers, wall art | $12–18 | | A2 (18×24") | Large designs, multiple sheets | Big wall art, production cutting | $18–25 | | 24×36" | Professional use, batch cutting | Selling at craft fairs | $25–35 |

For beginners, the A3 (12×18") is the sweet spot — large enough for shadow box layers but not so big it dominates your workspace.

Printed papercut shadow box template being cut by hand with a craft knife

Mat Care Tips

  • Never cut on a cold mat straight from storage — let it reach room temperature first - Store flat, not rolled — rolling creates permanent warps - Wipe clean with a damp cloth; don't use solvents that degrade the PVC - Replace when the surface is visibly grooved and no longer self-heals - Flip it over periodically for even wear on both sides

Grid Lines and Measurement

Most mats have printed grid lines. Use them for: - Quick squaring of cardstock sheets - Measuring border widths for framing - Aligning templates at 90° and 45° angles

Scissors for Paper Crafts

Scissors can't replace a craft knife for paper cutting art — they can't cut interior shapes or tight curves. But they're essential for trimming, shaping, and tasks where a knife is overkill.

What You Need

Detail scissors (small, 4–5" blades): For cutting small shapes, trimming edges, and snipping threads. Tonic Studios and EK Tools both make reliable detail scissors for $6–10.

General craft scissors (6–8" blades): For cutting sheets to size, trimming cardstock, and rough shaping. Any sharp pair works — Fiskars, Westcott, or whatever is at your local craft store for $5–8.

Ergonomic Scissors

Fanned stack of colored cardstock sheets beside cut paper flower petals ready for layering

If you cut for more than 30 minutes at a time, spring-loaded scissors reduce hand fatigue. The spring mechanism opens the blades for you — your hand only squeezes to cut. Fiskars EasyAction ($10–12) and Tim Holtz Tonic ($12–15) are both good options.

Scissors Maintenance

  • Wipe blades after each session (oils from your hands cause rust over time) - Never cut adhesive tape with your good scissors — adhesive gums up the blades - Sharpen with a dedicated scissor sharpener, not a knife sharpener - Store with blade caps to protect the edge (and your fingers)

Metal Rulers and Cutting Guides

A ruler does double duty in paper cutting: measuring for layout and guiding your knife for straight cuts. Plastic rulers get sliced by craft knives — you need metal.

What to Look For

  • Stainless steel — won't nick from blade contact - Cork backing — prevents slipping during cuts - 12" minimum length — 18" is better for larger projects - Raised edge — keeps the blade from climbing onto the ruler

Budget Pick vs Pro Pick

Westcott 12" stainless steel ruler ($3–4): Works perfectly fine. Get this to start.

C-Thru 18" stainless ruler with cork ($8–10): The raised edge and longer length make it worth the upgrade once you're cutting larger designs regularly.

Cutting Guide Tip

Close-up of layered paper-cut flower shadow box showing depth between rose petal layers with soft shadows

For perfectly straight cuts, press the ruler firmly with your non-cutting hand. Keep all fingers behind the ruler's far edge — never curl your fingertips over the side closest to the blade. One slip and you'll understand why this rule exists.

Ready for Multi-Layer Cutting Projects?
Once you've mastered single-layer cuts with your beginner tools, try the Magical Fox shadow box SVG — a multi-layer design that lets you practice precision cutting with depth and dimension.

Specialty Tools You'll Eventually Want

These aren't essential for your first project, but they solve specific problems you'll encounter as you advance.

Light Pad / Light Box ($15–25)

Place a template under your cardstock on the light pad and the lines shine through clearly. Eliminates the need to trace designs first. Especially useful for: - Tracing complex designs onto dark cardstock - Aligning multi-layer templates - Checking cut quality on detailed work

Bone Folder ($3–5)

A smooth, flat tool for creasing and scoring. Used primarily for: - Creating clean folds in box construction - Scoring lines before folding - Burnishing glued seams flat

Tweezers ($4–8)

For picking up and positioning small cut pieces that are too tiny for fingers. Get reverse-action tweezers (they grip when you release) for the least hand strain.

Weeding Tool ($5–8)

Craft supplies arranged on cutting mat with tools and colored paper for a paper cutting project, but excellent for: - Lifting tiny cut pieces away from the sheet - Removing internal shapes without damaging bridges - Picking out debris from tight corners

WasHi Tape ($3–6)

Low-tack tape that holds paper to your cutting mat or holds templates in place without leaving residue. Get 2–3 rolls in neutral colors. It doesn't matter what color the tape is — it's temporary.

Safety for Beginners

Close-up of paper cutting mistakes on cardstock showing torn edges and incomplete cuts from dull blade

Paper cutting involves sharp blades. Every experienced cutter has at least one scar story. Here's how to avoid becoming a cautionary tale.

The Non-Negotiable Rules

  1. Always cut away from your body. If the blade slips, it should go toward empty space, not your hand. 2. Replace dull blades immediately. Dull blades require more pressure, which means less control and more force when (not if) the blade slips. 3. Never hold the paper you're cutting. Use your free hand to hold the mat or ruler, not the paper near the cut line. 4. Cut on a proper surface. Kitchen tables, glass, and bare wood are all dangerous — the blade can skip or sink unpredictably. 5. Keep blades covered when not in use. Most craft knives come with a blade cap. Use it.

Blade Disposal

Dull blades are still sharp. Don't throw them in the trash loose. Use a blade disposal container (a small plastic jar with a slot works fine) or tape used blades to a piece of cardboard before discarding.

First Aid

Keep bandages and antiseptic at your cutting station. Most paper cutting injuries are shallow nicks that heal quickly, but they bleed surprisingly much because the blade is very sharp. Clean, cover, and keep cutting — the story makes good Instagram content.

Basic Cutting Techniques with Your New Tools

Having the right tools is step one. Using them correctly is step two. Here are the fundamental techniques that separate clean cuts from ragged messes.

Knife Grip

Hold the craft knife like a pencil — not like a dagger. Your fingers should be 1–2 inches from the blade tip. This gives you maximum control for curves and detail work.

Cutting Motion

  • Pull the knife toward you in short, controlled strokes - Let the blade do the work — don't press hard - For thick cardstock, make 2–3 light passes instead of one heavy cut - Rotate the paper, not your wrist, when cutting curves

Straight Cuts with a Ruler

  1. Align the ruler on your cut line 2. Press firmly with your non-cutting hand (fingers behind the far edge) 3. Start at the top and pull the knife toward you in one smooth stroke 4. If the cut isn't complete, make a second pass — don't force it

Cutting Interior Shapes

Craft knife with precision blade cutting detailed patterns in colored cardstock 
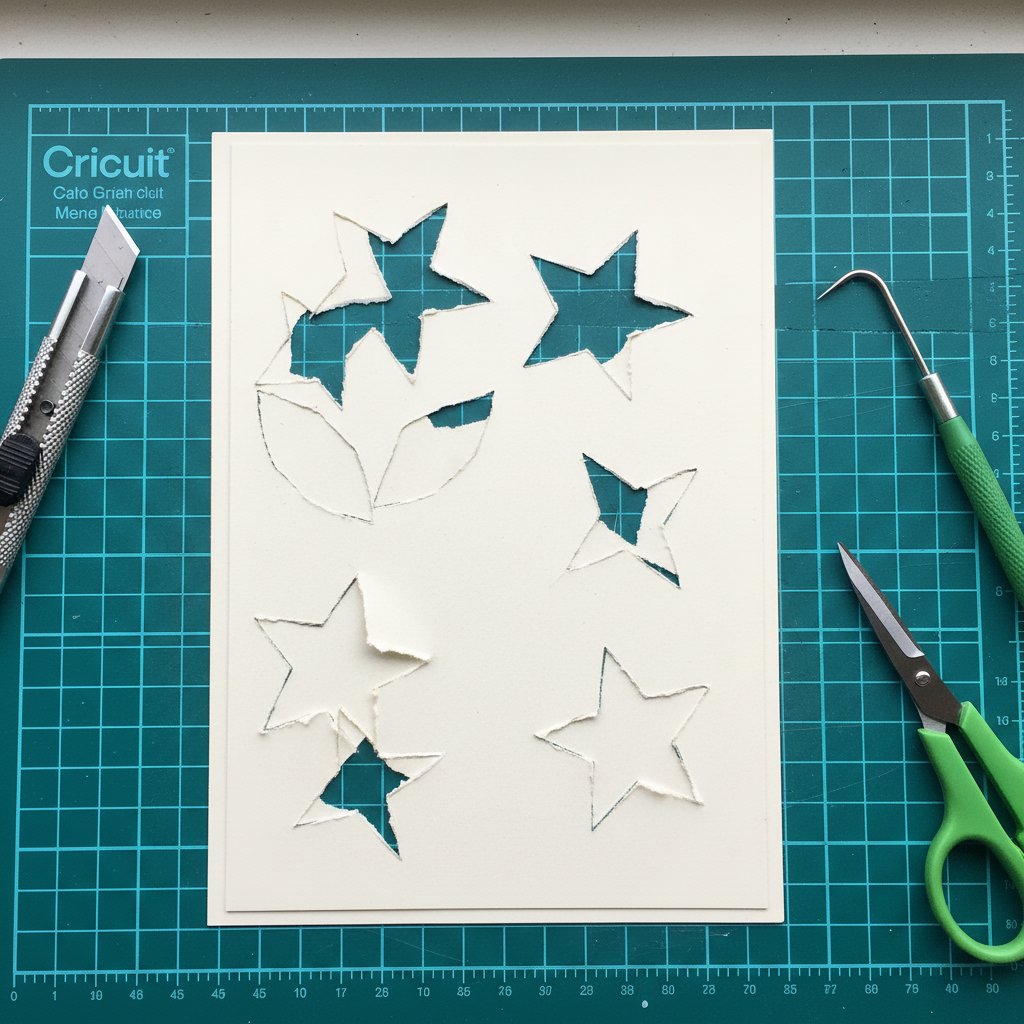
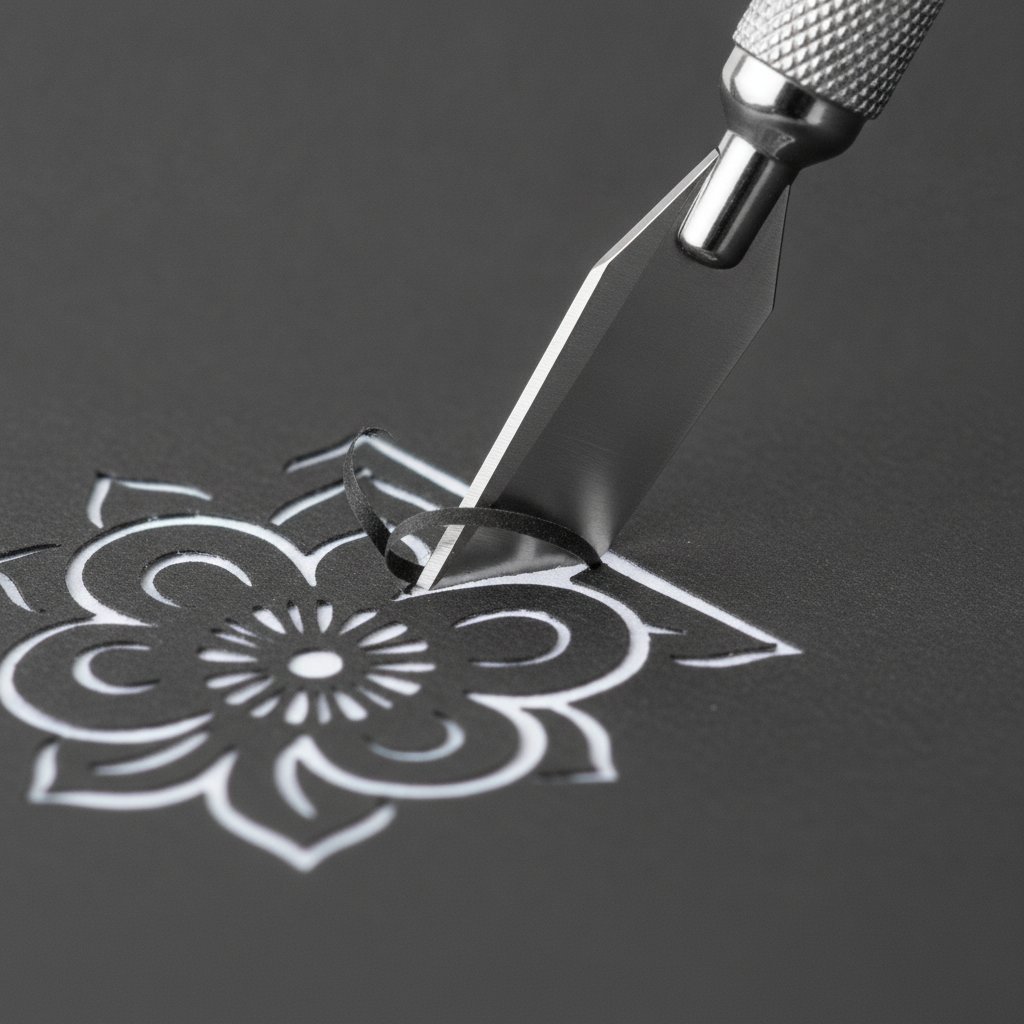
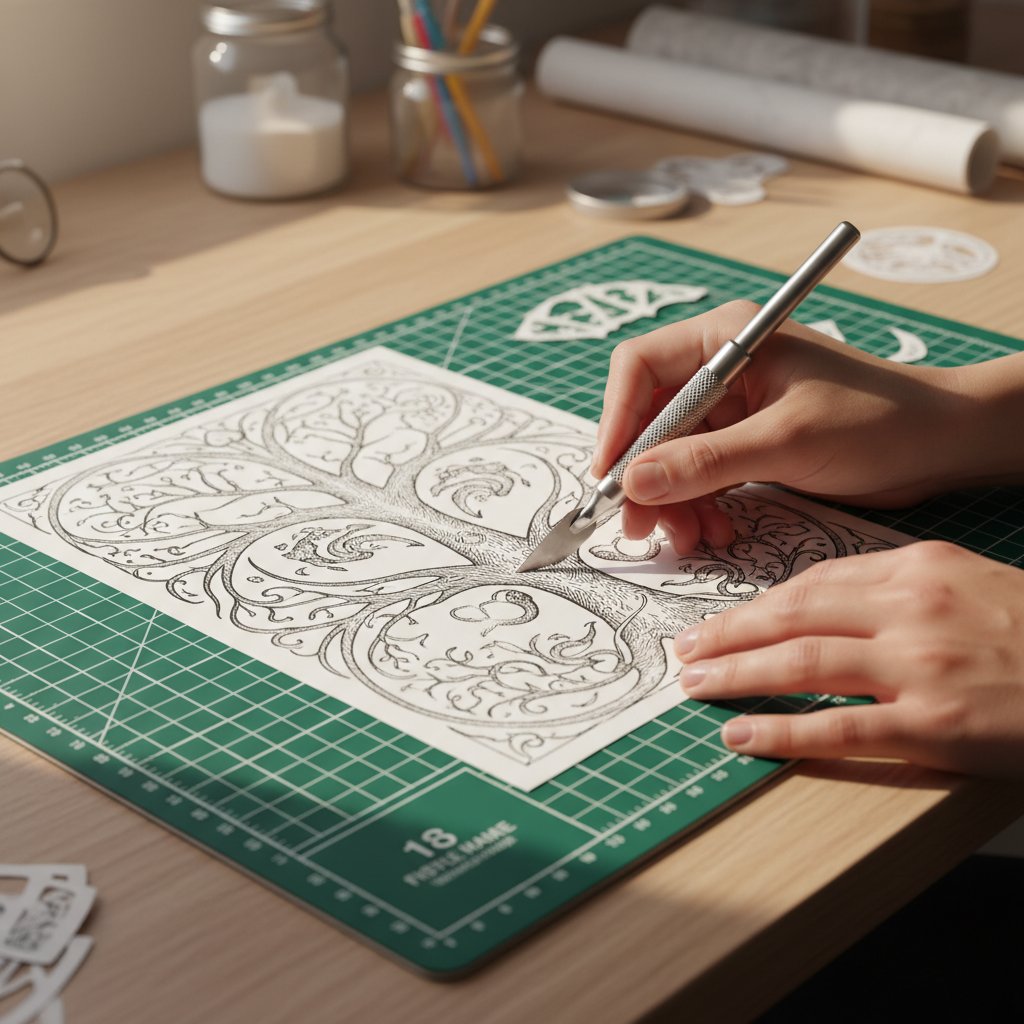
(holes inside the design) are what make paper cutting unique and can't be done with scissors: 1. Pierce the blade through the paper at a point on the cut line 2. Cut along the line, maintaining steady pressure 3. Work in small sections — don't try to cut the whole shape in one stroke 4. Use your weeding tool or tweezers to remove the cut piece

For more technique instruction including layered designs, see our paper quilling guide for beginners and paper flower wall art guide.

Budget-Friendly Starter Kit Under $50

You don't need to spend $100+ to start paper cutting. Here's a tested budget kit that covers everything for your first 30+ projects.

The $30 Starter Kit

| Item | Specific Product | Price | |------|-----------------|-------| | Craft knife | X-Acto #1 with #11 blade | $6 | | Replacement blades | X-Acto #11, 5-pack | $4 | | Cutting mat | OLFA 12×18 self-healing | $12 | | Metal ruler | Westcott 12" stainless | $4 | | Cardstock | Recollections 65 lb, 50 sheets | $8 | | Total | | $34 |

The $50 Expanded Kit

Add these to the starter kit above:

| Item | Why You Need It | Price | |------|----------------|-------| | Detail scissors | Trimming small shapes | $7 | | Light pad (A4) | Template tracing | $15 | | WasHi tape (3-pack) | Holding paper/templates | $4 | | Added Total | | $26 | | Grand Total | | $60 |

The expanded kit is slightly over $50 but covers every situation a beginner encounters for the first six months of paper cutting. The light pad in particular is a game-changer that eliminates the tedious tracing step.

Crafter holding and admiring a finished glowing layered papercut shadow box in warm light
Practice with a Floral Shadow Box
The Rose Flower Shadowbox SVG lets you test your cutting tools on a multi-layer project with beautiful results. Cut by hand for practice or use with a Cricut for speed — the template works either way.

Tool Maintenance and Blade Care

Good tools last years if you maintain them. Here's the maintenance routine that keeps everything cutting cleanly.

Blade Replacement Schedule

| Blade Type | Lifespan | Signs It's Dull | |-----------|----------|-----------------| | #11 craft blade | 2–4 hours active cutting | Dragging, tearing, requiring more pressure | | Snap-off blade | 1–2 segments per session | Same as above | | Scissors | 3–6 months (regular use) | Folding paper instead of cutting cleanly |

A sharp blade is a safe blade. Dull blades cause more injuries than sharp ones because you compensate with extra force and lose control.

Cutting Mat Care

  • Store flat, away from heat sources - Rotate the mat 90° every few sessions for even wear - Clean with a lint roller to remove paper fibers - Replace when cuts become permanent grooves (usually after 1–2 years of regular use)

Knife Maintenance

  • Wipe the collet (blade holder) monthly — paper dust builds up and causes blade wobble - Tighten the collet before each session — a loose blade produces jagged cuts - Oil the collet threads with a drop of machine oil every 3 months for smooth tightening

Scissor Care

  • Never cut tape or adhesive with your paper scissors - Wipe blades after each use - Store in a protective sleeve or with blade caps on

Tool Selection by Project Type

Different projects stress different tools. Here's what matters most for common paper craft project types.

Single-Layer Paper Cut Art

Priority tools: Craft knife + cutting mat + cardstock

The simplest setup. One sheet, one knife. Focus on a quality #11 blade and a fresh cutting mat surface. Blade sharpness matters more here than anything else because you're cutting the full design in one pass.

Multi-Layer Shadow Boxes

Finished paper shadow box art displayed in a frame with soft lighting showing layered depth

Priority tools: Craft knife + cutting mat + metal ruler + tweezers + light pad

Shadow boxes require cutting 4–8 identical-sized layers and assembling them with spacers. The light pad helps align layers, tweezers position small pieces, and the ruler ensures consistent sizing across all layers.

See our best cardstock for shadow boxes guide for paper selection specific to this project type.

Paper Flowers

Priority tools: Scissors (detail + general) + craft knife + wire (for stems)

Paper flowers use scissors more than knives — petal shapes are mostly convex curves that scissors handle efficiently. A craft knife is useful for detail work on centers and small decorative cuts.

Quilling

Priority tools: Quilling tool (slotted or needle) + circle sizing board + tweezers

Quilling has its own specialized tools. A slotted quilling tool ($3) handles most work. The circle board ($5–8) ensures consistent coil sizes. See our paper quilling beginner guide for the full quilling-specific tool breakdown.

Digital vs Manual Cutting for Beginners

At some point you'll ask: should I get a cutting machine? Here's the honest comparison from someone who uses both daily.

Manual Cutting (Craft Knife)

Pros: - Costs under $30 to start - Full control over every cut - Works on any paper type and weight - No software learning curve - Portable — cut anywhere

Cons: - Slow for complex designs (30–60 min per layer) - Hand fatigue on long sessions - Each cut is one-of-a-kind — hard to reproduce exactly

Digital Cutting (Cricut / Silhouette)

Pros: - Cuts complex designs in 5–15 minutes - Perfect reproduction every time - Handles intricate details that are difficult by hand - Software lets you resize, modify, and combine designs

Cons: - Cricut Maker 4 starts at ~$250; Explore 4 at ~$200 - Learning curve for Design Space software - Blade and mat consumables add ongoing cost - Limited to materials the machine can handle

My Recommendation

Start manual. Learn how paper behaves under a blade. Understand bridges, grain direction, and cutting pressure through your hands, not a screen. After 10–15 hand-cut projects, you'll know whether machine cutting fits your workflow and budget.

When you're ready for a Cricut, our Cricut cardstock settings guide covers everything from blade selection to pressure settings for perfect machine cuts.

Left-Handed and Accessibility Considerations

Most paper cutting tools are designed for right-handed users. Left-handed crafters need a few specific adjustments.

Left-Handed Craft Knives

The X-Acto #1 and Olfa SVR-2 are both ambidextrous — the cylindrical grip works in either hand. The blade angle is the same regardless of hand. No special left-handed knife needed.

Left-Handed Scissors

This is where it matters. Right-handed scissors have the top blade on the right side, which left-handed users can't see the cut line through. Buy true left-handed scissors (Fiskars makes several models, $8–15) — the blade orientation is reversed and the grip ergonomics match your hand.

Accessibility Tools

  • Spring-loaded scissors reduce grip strength needed — helpful for arthritis or limited hand mobility - Larger grip knives (Olfa CMP-1, $15) have a thicker barrel that's easier to hold with reduced dexterity - Cutting mats with stronger grid lines reduce the need for separate rulers - Magnifying lamps ($25–40) help with detailed work if you have vision challenges - Anti-fatigue mats under your cutting mat reduce strain during long standing sessions

Common Beginner Mistakes with Tools

Colorful cardstock sheets in various colors spread out for a paper craft project

Every beginner makes these mistakes. I made all of them. Here's how to avoid them.

1. Using a Dull Blade Too Long

This is the #1 mistake. When cuts start requiring effort instead of feeling smooth, the blade is done. Replace it immediately. A pack of 15 replacement blades costs $8 — that's $0.53 per fresh blade. There's no economy in stretching dull blades.

2. Cutting on the Wrong Surface

Cardboard, magazine stacks, and glass are all terrible cutting surfaces. They either destroy your blade (glass, metal) or provide no support (soft materials). A self-healing cutting mat is non-negotiable.

3. Pressing Too Hard

If you need to press hard, either your blade is dull or you're trying to cut too much at once. On 65 lb cardstock, a sharp blade should cut through in one pass with minimal pressure. For 110 lb cardstock, make two light passes.

4. Ignoring Blade Angle

Hold the knife nearly vertical (80–90° to the paper). Tilting the blade produces angled cuts that look sloppy and weaken bridges. The only time to tilt is on very tight interior curves where a slight angle helps the blade track.

5. Buying Too Many Tools at Once

Start with the core four (knife, mat, ruler, paper). Add tools one at a time as your projects demand them. Buying a $50 "complete kit" means half the tools sit unused while you figure out what you actually need.

For more on avoiding common pitfalls, our beginner mistakes in paper cut shadow boxes guide covers tool-related errors specific to shadow box projects.

Paper cutting tools are widely available. Here's where to find them and which brands to trust.

| Category | Budget Pick | Mid-Range | Premium | |----------|-------------|-----------|---------| | Craft Knife | X-Acto #1 | Olfa SVR-2 | Excel K5 | | Cutting Mat | OLFA | Fiskars | Alvin | | Scissors | Westcott | Fiskars | Gingher | | Ruler | Westcott | C-Thru | Alvin | | Light Pad | AGPtEK | Huion | Artograph | | Tweezers | EK Tools | Tonic Studios | Xuron |

Where to Shop

  • Michaels / Joann / Hobby Lobby — walk in and buy everything today; use coupons for 40–50% off - Amazon — fastest delivery, widest selection, read reviews carefully - Dick Blick / Jerry's Artarama — better selection of professional-grade tools - Local independent art supply stores — knowledgeable staff, try before you buy
Assorted paper craft tools including scissors rulers and cutting mats arranged on a work surface

What to Buy Online vs In-Store

Buy in-store: Craft knives, scissors (you want to feel the grip), cutting mats (check for warping)

Buy online: Replacement blades (cheaper in bulk), light pads, specialty tools, cardstock (better selection)

For more guidance on setting up your complete paper crafting workspace, see our guide on how to frame and preserve paper art.

1.What size cutting mat should a beginner buy?
Get a 12×18 inch (A3) self-healing cutting mat. It's large enough for shadow box layers and standard paper crafts but compact enough for a small desk. You can always upgrade to 18×24 later, but starting smaller keeps your initial investment under $15.
2.How often should I replace my craft knife blade?
Replace the #11 blade after 2–4 hours of active cutting on cardstock. The telltale sign is when cuts require more pressure or start producing fuzzy edges instead of clean lines. Blades cost about $0.50 each in bulk — replacing early is always cheaper than ruining a project or injuring yourself.
3.Can I use regular scissors instead of a craft knife?
For straight edges and simple shapes, yes. But scissors cannot cut interior shapes (the holes inside a design), which is the defining feature of paper cut art. A $5 craft knife opens up the entire craft in a way scissors simply cannot. Start with both.
4.Is a cutting machine worth it for beginners?
Not for your first 10 projects. Learn how paper behaves under a blade by hand first. Machine cutting makes sense once you're cutting multi-layer designs regularly and want reproducible results. A Cricut Explore at ~$200 is the entry point if you decide to go digital.
5.What paper weight is best for beginner paper cutting?
65 lb cardstock (176 gsm). It's thick enough to hold its shape and maintain bridges but thin enough to cut cleanly with a standard craft knife. Heavier weights (80–110 lb) are more challenging to cut and better suited for experienced cutters or cutting machines.
6.How do I keep my cutting mat lasting longer?
Store it flat (never rolled), keep it away from heat sources, rotate it periodically for even wear, and don't cut on it when it's cold (let it reach room temperature first). With proper care, a quality mat lasts 1–2 years of regular use before the self-healing surface wears out.